Monday, January 21, 2013

How about a Friendship Braid?


I think I can see the end of the list of webpages to make!  Oh hooray!  :-)

This Friendship Braid was another attempt at stash management.  The braid was constructed with half-hexagon pieces and is one of the easiest techniques I've used.  Even a beginning quilter would be able to make this braid with her eyes shut. :-)

I used one of Darlene Epp's designs from her "Pocket Guide to Free-handing: Borders & Sashings" for the yellow sashing.  A variation of a design I found "someplace" was used on the braid portion.  Stitch in the ditch stabilizes *everything*.

While the top was pieced in July 2012, the quilting waited until early January 2013.

If you wander on over to the webpage, you'll find links to the Missouri Star Quilting Company video on making the half-hexie braid, to Darlene Epp's wonderful books and lots of pictures!

Those pictures are just teasers! For all the gory details, links and more pictures, please visit my web page for the Friendship Braid: half-hexies quilt.


"Evening Flight": a wall-hanging


This is another quilted project that I finished last year, June 2012 to be specific, but never made the webpage until now.  (You're going to be seeing several more blog entries in this vein, so you have been warned!)

A cousin of Mr. Pirate has a job with one of the hot air balloon companies that operate in the Napa Valley of California.  Napa Valley is a premier wine grape growing area and hot air balloon companies have taken advantage of how picturesque it is.

I was in the middle of working on another hot air balloon and grapes quilt when Mr. Pirate asked if I would make such a thing for this cousin.  I agreed and found this pattern, "Evening Flight" by Barbara Jones.

I must admit that because I am usually making and quilting LARGE quilts, I am continually surprised at how FAST small projects can be.   Sometimes it just takes a while for reality to sink in.  :-)


Evening Flight was a delightful project to do.  Departing from my usual construction techniques, I  fused the appliques and stitched a tight satin stitch over the raw edges.  Quilting was minimal but appropriate.  I even remembered to use one of my specialty templates to stitch a single rope cable in the border!


Those pictures are just teasers! For all the gory details, links and more pictures, please visit my web page for the Evening Flight wall-hanging.


Sunday, January 20, 2013

Snakes! Slithery Snakes!


Now before y'all start muttering to yourselves that it sure seems as though I am producing A LOT OF QUILTS these days, let me make this perfectly clear .... not true.  I am making a lot of WEBPAGES these days!

You see, all of the recently posted quilts (and the ones to come in the near future) were all pieced, quilted and bound *LAST YEAR*.  I just never made the accompanying webpage to share the quilt.

Yes, I am a lamer. :-)

So... for this quilt .. Slithery Snakes ...

One of Mr. Pirate's nieces was about to have her first baby.  Well, kinda/sorta about to.  It was March when I found out and June when the baby was born so instead of making a baby quilt to catch up with the baby, I was able to make the quilt ahead of time!

Since we knew the baby was going to be a boy, I could make a  "boy" quilt.  What is more "boy" than snakes?  :-)

Here we have 3 columns of intertwined snakes surrounded by a border of alligators.


I used a pantograph called "Rain", designed by Lisa Calle.


Those pictures are just teasers! For all the gory details, links and more pictures, please visit my web page for the Slithery Snakes quilt.


Golden Angel wall-hanging: another previously finished proejct


During last year's (2011) Quilting Retreat in Phoenix, AZ, I found a pre-printed panel from Michael Miller.  It was of an angel holding a lamb.  It was simply spectacular.  I knew that one of Mr. Pirate's cousins would love it *and* appreciate the work that would go into making something with it.

Michael Miller's company does have a suggested project but it really is dismal.  So, I made up my own. :-)

I bordered the panel with Dupioni silk (*NEVER AGAIN*), put machine embroidered words (individually stitched letters put into Cathedral Window blocks) along the right side and along the bottom.

In the bottom right corner, I put an embroidered angel by Sonia Showalter.

Even with the problems I had with longarm quilting the Dupioni silk (*NEVER AGAIN*!), I think it came out very nicely.


Those pictures are just teasers! For all the gory details, links and more pictures, please visit my web page for the Golden Angel wall-hanging.


Wednesday, January 16, 2013

It's what's for dinner!


Mr. Pirate loves his toys.  Almost anything mechanical, electrical and/or computerized is fascinating.  Especially if they can all be found in the same item. :-)

Mr. Pirate gets guy-stuff catalogs in  the mail, touting all the latest "manly" stuff.  One item that caught his eye was a battery powered rotisserie (that's two out of the three attractions).  You might ask, "why on EARTH would he be interested in such a thing?????"   But, I tell you, there IS a reasonable rationale!

You see, the Pirate family likes to go tent camping.  We have done that for our annual family vacation since Mr. Pirate & I were married, lo those many 34-odd years ago.  Yes, several of those years were VERY odd, indeed. :-)

When I was growing up with my parents and siblings, that's what WE did for vacations.  Mr. Pirate was slightly more rustic, in that he went back-packing.  I gave back-packing the old college try when dating Mr. Pirate but I'm a wuss ... it just wasn't my cup of tea.  But I love camping.

So, Mr. Pirate is always on the lookout for camping gear.  Sometimes weird camping gear.  Some of the items he buys are experimental and don't work out as envisioned.  Some have become part of our standard camping equipment.

You see, as we are tent camping, we don't have electricity.  This cuts down our options on cooking quite a bit.  Mainly we do stovetop cooking and Dutch oven cooking.  Typically speaking, we have a large group when we camp ... sometimes between 15-20 people.  This also cuts down our options for cooking, as grilled steaks for 20 just doesn't cut it.  In recent years, the group has decreased to 8-12 people but still ... that's a lot of people to cook for out of doors! We have some tried and true dishes that have become standards at camping, simply because they feed a lot of people without a  lot of work and it's easy clean up.


Back to the guy-stuff catalog ... Mr. Pirate saw this battery powered rotisserie.  It was intriguing. We could potentially do a rotisserie roast for *everyone*, no muss/no fuss, and what a great change of pace for dinner!

This afternoon/evening we (Mr. Pirate & I) decided to try out the new battery rotisserie.  A 3 lb roast was obtained, seasoned and skewered onto the rotisserie.

Originally, Mr. Pirate thought he would use coals from the wood fire to cook the roast, but being unsure of how long this might be, he changed his mind and opted to use charcoal briquettes instead.

Last summer, Mr. Pirate built us a keyhole firepit in our backyard.  For this rotisserie experiment, he built a wood fire in the firepit (so we could keep warm in the chilly January late afternoon) and a charcoal fire in the keyhole portion.  As the wood fire burned down and produced some wonderful coals, we moved those wood coals to the charcoal briquette pile to help cook the roast.

As we waited the hour-and-20-minutes for the roast to cook, we enjoyed some wine that was leftover from a previous party.

No, these bottles were NOT full when we started the roast.  But they sure became empty by the time the roast was ready to eat!  :-)

During the waiting time, I used the opportunity to collect the daily eggs from our stupid chickens.

Boy, we had a bumper crop today!  Four eggs!  woo hoo!

These chickens 


and these chickens  (plus one rooster who doesn't lay eggs at all) produced those four eggs.

And let me tell you, they are really producing these days!   Those four eggs are double the production from last month!  :-) 

During the summer, they'll lay between 8-10 eggs a day but now, during winter, when there's less daylight, they just don't sit down on the job, as they should.  I keep waving a rubber chicken in front of them, with the caution that "this could be YOU" but they, like the cats, just ignore me.

Eventually, the roast was done, the chickens had gone home to roost and Mr. Pirate & I moved indoors.  The roast was wonderful and I do believe we have found an additional way to fix dinner at camping!  :-)


Sunday, January 13, 2013

Yet Another Not-Recently-Finished Quilt: Madeline's Lamb Quilt


 In November 2010 (yes, over 2 years ago), I pieced a top.   In May 2011, I quilted it for a new baby in the family.    Due to my extreme talent in procrastination, the webpage for this quilt wasn't made until *just this very minute*!

I'm almost (but not quite) embarrassed at how easy this quilt was to make.  Granted, it started with a pre-printed panel (that's not heretical, is it?) but I did add on a wonderful pieced dogtooth border that fit exactly.  Boy, was I proud of myself with that!


I used Darlene Epp's Pocket Guide to Freehanding (wonderful, wonderful series of books; highly recommended) for the background embellished meander.  I did some nifty little swirly things in the lambs' fleece.  I SITD all the big motifs of the panel and quilted some (almost) good looking hearts in the dogtooth border.   Free-motion hearts that look symmetrical and great require great talent and skill .. neither of which I possess.  (I also didn't want to devote *that much time* to use a template. 

  I'm just that lazy.)


The resultant quilt was just too cute for words. :-)

Therefore, I give you Madeline's Lamb quilt ... for the newest member (AT THE TIME) of the Rodgers/Shehu family. (We have another newer member, this time of the Jansky branch ... but, yeah .. that quilt doesn't have a webpage yet either. Patience, young grasshopper ... all things comes to he who waits.)


Those pictures are just teasers! For all the gory details, links and more pictures, please visit my web page for Madeline's Lamb quilt.


A not-so-recently-finished project


About a year ago, I received some die cut Apple Core pieces from a quilting friend. In an uncustomary rush of timeliness, I actually made a table runner from the pieces *right then*. [I think the Earth might have been shocked into tilting a bit more on its axis because of this.)

Even though it's a small project, I quilted it on Lizzie. It was just easier for me to do so than quilting it on my Janome 6500.

The table runner as been in use since then but it's only *now* that I've gotten around to making a web page. Now, this is more like me! Procrastinators unite!


That picture is just a teaser! For all the gory details, links and more pictures, please visit my web page for the Apple Core table runner quilt.


Quilts finished and more projects


 I have a list of projects.  This list has 5 sections: Tops to be Quilted; UFOs & kits; Ideas/Designs for which I've pulled fabrics; Ideas/Designs only - no fabric; Coordinated bundled fabrics  with no specific idea in mind.

I've been working off the first section for a Real Long Time.  Currently, it has 17 entries.  It's turned out to be a revolving door: no sooner do I finished one project in that category then another gets listed to fill in the vacancy!  The newly listed project isn't necessarily one from the other categories either!

However, it is with some significant sense of accomplishment that I can say since this past December, I have quilted *five* of those projects, which means I have twelve projects still be quilted.

Some of those projects I've already talked about:
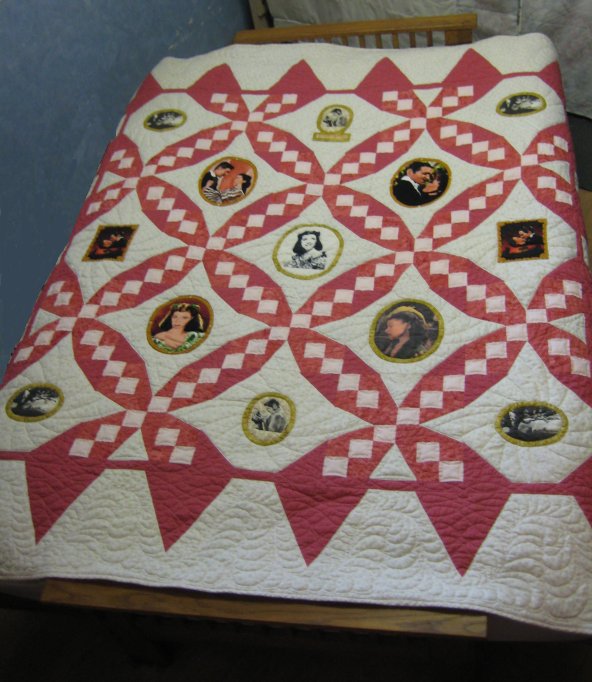
 Gone with the Wind, String of Pots and Woven Ribbon Trees

Since the first of the year, I've finished the quilting and binding of two more projects: both vaguely twin sized quilts.  Scrap Assassin is about 60"x90" and the Half-hexie Friendship Braid is about 66"x94".


All of those 5 quilts were done on my longarm machine, which means that when I was quilting on them, I wasn't in my sewing room doing any piecing.  This causes some inner angst in me since Mr. Pirate likes to sit in my sewing room (where I have a decent sized TV) in the evening and spend some time watching TV.  I would like to spend time in his company but if I'm working on the longarm, that isn't possible.  If I do adjourn to the sewing room, I'm not working on the longarm.  Additionally, if I'm in my sewing room, I like to be working on a project and not just sit there like a bump on a log!

BUT, I do NOT want to start another machine piecing project!  That will just create Another Top, which would join the pile!  My intent is to whittle that list of Tops to be Quilted down to nothing .. then: piece a top/quilt a top.  So, at this time, machine piecing a project is not on the horizon.


However, I do still have my hand-piecing Forever Project!  Originally designed as a hand-work project I could work on when I was away from home (doctor appointments, Little League games, trips in the car, etc),  I am now working on my current Forever Project at home ... in the evening whilst Mr. Pirate & I enjoy each other's company.  As a result, this Forever Project is going to get done much faster than is "normal".  :-)

My current Forever Project is using up even MORE vintage calico squares that I had rediscovered during a re-organization of my sewing room.  I've already made FOUR quilts from these squares and had thought I had finally used them up.  I was wrong.  Gosh, I am SO tired of looking at this color palette! 

This Forever Project is currently at 83"x93" and will get slightly larger, as I still need to put on the top/bottom narrow borders then a final, wider blue border.  Yep, it's entirely hand-pieced. 

I've tentatively worked out a barter with a local sewing buddy who likes to hand quilt.   She doesn't particularly care for piecing and will happily hand quilt cheater tops just so she can get to the quilting part!   I, on the other hand, deeply admire and appreciate hand quilting but am not in the least bit interested in doing any more of that!  So the barter may work out to be that she will hand quilt my Forever Project (in whatever manner she feels is appropriate and is willing to do) and in return, I will piece a top for her (of whatever size and pattern she would like), so that when the machine pieced top is finished, she can get right to the quilting part!

I do believe I am getting the better part of the deal. :-)

Anyway, I was finishing up the half-hexie Friendship Braid quilt on my longarm and thought about the webpage that needed to be created for it.   You see, for myself, part of the project is not only sewing and quilting but also making a webpage for the project so it can be shared.  It is a sad fact of life that some activities simply can NOT be multi-tasked!   If I'm longarming, I can't be piecing on my sewing machine.  If I am piecing, I can't be working on the computer for a webpage.  All of those activities are mutually exclusive.

As I thought of what I'd put on the webpage for the latest quilt, I also was simultaneously thinking of the OTHER quilts for which I needed to make a web page.  I was becoming discouraged as I thought of more completed projects without their webpages.  Finally, so I wouldn't lose track of them, I wrote them down.

CRIPES!!  I am TWELVE projects behind!  ::thunk head on wall::  O.M.G.  Now, in order not to become further behind on this part of my quilting process, I need to put the quilting on hiatus to get the web pages done!  (cue violins to indicate how sorrowful my problems are)

My situation is as follows:
1. work on the remaining tops to be quilted from the list.  This will probably be done during the daytime when Mr. Pirate is doing his own activities
2.  work on the hand-pieced Forever Project in the evenings when Mr. Pirate is relaxing in the sewing room
3. simultaneously, work on the computer to create the appropriate webpages

Or .. I could simply ignore the entire quilting enterprise all together and do some housework.
.
.
.
.
.
.
Nah.  :-)


Saturday, January 05, 2013

Scrap Assassin: first project loaded up


Now that the holidays are over and all of the people who were staying here have returned to their homes, I can return to quilting.  I mean the QUILTING part of quilting, not the piecing part!

Allow me to digress for a small moment .... many years ago, I made myself a list (on the computer, for easy maintenance) of all the projects I had.  Finished tops to be quilted.  WIPs.  Self-kitted projects.  Fabrics bundled together but no specific project.  Fantastic ideas but no specific fabrics.  The category that I wanted to focus on was the tops that needed to be quilted.  Over the years, I *have* worked on it and whittled it down, but I've also pieced many more tops, so there have been additions.

The current status of that category is seventeen, yes, count 'em,  *17* tops to be quilted.  Oy vey!  What's even worse, I know I have two king sized tops in there, maybe three.  That's a LOT of real estate to quilt.  BUT ... I need to get those tops quilted!  So ... that's where I am right now. 

Back in  2004, I started a layout called "Scrap Assassin" as part of a quilting demonstration.  When the demo was over, I packed the blocks away.  It wasn't until summer of 2012 that I finished all the blocks and assembled them into a top (roughly 60"x90").

So, to resume my quilting, I've pulled the Scrap Assassin top, purchased the batting and cut the backing from 108" muslin (currently my favorite fabric for backing).  Just tonight, I loaded it onto Lizzie.  I'm always SO PLEASED when I see the horizonal seamlines running nice and parallel to the rails!  That means I've loaded the top straight and level!  Such simple things make me happy. :-)


Because this top is just SO. VERY. BUSY ... I decided that I'd do a pantograph.  I chose "Espalier" by Hermoine Age.


I'm using Glide thread by Fil-Tec.  This color is called "Khaki" but it really looks like an "old gold" shade.  Lovely, lovely stuff.

The panto is looking good and I just LOVE the way Glide thread stitches!

The only annoyance (for me) is that I don't particularly care for doing pantos.  I don't like not being able to see what I'm stitching.  This is ESPECIALLY annoying when the bobbin thread runs out and I don't notice it until much later.  This particular top has a LOT of intersections.  Unfortunately, I made an unwise choice in the black fabric ... it's especially thick for some reason.  Lizzie doesn't exactly "balk" at the intersections but she does protest a little by doing a little dance around the thick areas.  I can feel it when I'm guiding the machine head and I'm not always certain if it's a thick intersection or if something is really going wrong with Lizzie.  Thankfully, it's always been a thick intersection (so far!).   Since I can't see where I'm stitching, I can't compensate the quilting design in those areas, so they look a little weird.

I've loaded the quilt lengthwise.  I did it in this case to reduce the number of passes I'll need for the quilting.  There is no "top" or direction to this layout, so loading it lengthwise or crosswise doesn't make any difference.  This top is about 60" wide.  The panto is about 11" wide ... so it'll take me about 6 passes to fully quilt it.  I've already done two passes tonight .. and it's looking very nice indeed!   :-)

So, why am I doing a panto when I don't really care to do them?  Well, basically, just to keep my skills current.  Being able to quilt with a pantograph is useful and I don't want to forget the specifics.  It'll never be my favorite style of quilting but some quilts don't need custom, semi-custom, or even specific quilting in different areas.  For some quilts, pantographs are just the best way to go and I want to be able to do it.


Tuesday, January 01, 2013

The Absolute LAST project for 2012


For whatever reason, last night, as we were waiting for the New Year to roll in, I got a wild hair in my bonnet to make a new project.

I have a bunch of pearl jewelry.  A couple of years ago, I had a jeweler separate the fake from the real pearls for me.  When I got home, I put them into separate hard cases, so they wouldn't get mixed up again.

The wild-hair-project that I thought of was to make two jewelry rolls, one for each of the pearl jewelry.  I did a Google/Image search for inspiration, made a practice jewelry roll for the fake pieces and then, a nicer roll for the real pearl jewelry.

I was exceedingly pleased to be able to make each one with supplies I had on-hand ... fabric, batting and zippers.  The jewelry rolls feature a zippered compartment for each of the pearl jewelry piece, lined with a soft material for the pearls to rest against, and a separating zipper on the outside to secure it.   I identified each roll with an embroidered label ... which is getting kinda fancy but I really DO need to use my embroidery machine more! :-)

Here's a picture of the jewelry roll for the real pearls: 

Those pictures are just teasers! For all the gory details and more pictures, please visit my web page for the Jewelry Roll project.


Tuesday, December 25, 2012

Quilted Placemats


Mr. Pirate  & I were recently at my brother and sister-in-law's  house.  Mr. Pirate noticed that the placemats on the table were looking a bit peaked.

She's always a difficult person to get gifts for since she (like myself) doesn't really NEED anything and if she wants some little thing, she's capable of getting it for herself.

But as I sat at the table looking at the placemats, I had a brainstorm ... NEW PLACEMATS!

When Mr. Pirate & I returned home, I immediately set to making a set of 4 placemats for her.  I had carefully looked at her color scheme (blue) and pulled 12 blue fat quarters to make the placemats from an Angie Padilla pattern.

When she opened the box with the placemats, she remembered the amusing incident that occured regarding the placemats and was further *amazed* when she realized that I had made them in the week between we returned home and Christmas.  (I didn't enlighten her that placemats are darn-near an Instant Gratification item and take no time at all to make. :-)  ).

She really, really liked them.  :-)


That picture is just a teaser! For all the gory details, links and more pictures, please visit my web page for the Diane's placemats quilt.


Monday, December 17, 2012

Woven Ribbon Trees


Here's another top from the Pile of Tops that I recently quilted.  The top was pieced in 2010, then sat around, waiting patiently to be quilted.  It had to wait 2 years.  :-)

 It feels wonderful to have another top made into a quilt.

The blue and yellow triangle blocks are from the messload of blocks that I created whilst using a specialty ruler that (for once) is Very Useful. :-)   They are the same blocks that I used in another quilt, Equilateral Triangles, quilted in June 2010.

I used Carla Barrett's "Flying Geese Quilting Design" in the triangles, diagonal cross-hatching in the pale green fabric strips and another of Carla Barrett's designs, "Curly Swirly' for the dark green strips.


This picture is just a teaser! For all the gory details, links and more pictures, please visit my web page for the Woven Ribbon Trees .


Sunday, December 09, 2012

Sedona's "String of Pots"


I am exceedingly happy to be able to show you guys my recently finished project, "String of Pots".  This was a pattern and fabrics I bought in Sedona last year, when Mr. Pirate & I did a road trip there.

I don't normally do a lot of wall-hangings these days, as I have plumb run out of wall space (and I don't want to rotate my stock because *I like what I have hanging there!*)  but this pattern was very attractive and I thought I'd actually have a fighting chance of getting it finished "soon-ish".

I was partially correct. :-)

I pieced the top shortly after returning home but there it sat, waiting patiently.  It wasn't until now, over a year later, that I finally quilted it.

Also unusual for me, I did a very dense background fill.  This was a calculated move so that the appliqued pots would have a tendency to "puff" out.  I could have done a faux trapunto effect for more puffiness, but I didn't.

The pots were done with needleturn applique and have hand-embroidered hanging strings and accents.

I'm rather pleased with the final effect.

Those pictures are just teasers! For all the gory details, links and lots more pictures, please visit my web page for the String of Pots quilt.


Thursday, December 06, 2012

A Christmas throw pillow


My last Christmas project for your consideration is a throw pillow.  I saw this pillow in a Crate-n-Barrel catalogue and shortly thereafter, I was able to see the actual pillow in the store.  The entire pillow was made from felt.  Whether it was wool felt or polyester, I don't know.  I made my version from polyester as wool felt is horrendously expensive.

The idea is pretty simple and very effective.  The tree is made up of circles.  Each circle is tacked in the center to the base fabric.  I'm not sure how packed or loose the Crate-n-Barrel pillow was made but I packed my circles pretty doggone tightly.

I don't know why I didn't put a piping around the edge, as I normally do with pillows.  Not only does it strengthen the seam but it makes the edge more defined.  ::shrug::

To make things REALLY easy, one of my crafting friends let me borrow her Sizzix Big Shot die cutter.  OH MY GOODNESS ... did that make the circle creation So Much Easier!!   You cut a strip of the felt, send it through the die cut machine and out the other side comes all these perfectly cut circles.  SO EASY!  :-)

For all the gory detail and another picture, please visit my web page for the Christmas throw pillow.


Tuesday, December 04, 2012

a Practical Christmas tree

In 2004, our oldest daughter was in college.  She was lamenting the fact that she didn't have a Christmas tree in her apartment.   She hadn't purchased one and really didn't want to spend the money on one ... but she still missed having one.

So, we put our heads together and collaborated to find a solution.  We created a wonderful wall-hanging.  She drew the graphic (because I can barely draw a straight line with a ruler) and I did the sewing and quilting.

I even put buttonholes in the tree, so she could insert those teeny-tiny, miniscule Christmas tree lights from the back so that her tree could also have lights. :-)

This picture is the only one I have before she whisked it off, back to college.  I'll have to bug her about getting another picture for display. 

Although, I must admit that even though I didn't plan it (and the thought wouldn't have entered my head anyway), the sunlight coming in through the side window really makes it look wonderful. :-)


That picture is just a teaser! For all the gory details and more pictures, please visit my web page for the Practical Christmas tree quilt.


Monday, December 03, 2012

Looking for .... a quilt pattern.


*Somewhere* in my blog reader is a blog where, once upon a time, the quilter posted a  picture of an urban, modern, pieced (not appliqued) quilt.   It might have even been labeled as a "masculine" quilt.  It's definitely NOT traditional.  The background was a medium/dark gray and the stripes were white and orange.  Maybe a red one too.

I thought FOR SURE I had tagged the blog entry as a keeper.  I can't find it.

I thought FOR SURE I had kept a copy of the picture.  I can't find it.

I thought FOR SURE that if I just browsed through my blog subscriptions, I'd certainly find the blogger because the style is so unique.  I can't find it.

I thought FOR SURE that it would show up Pinterest.  I can't find it.

I thought FOR SURE that a Google/image search would find it.  Nope.

I am obviously NOT looking with the correct search terms.  ::sounds of aggravation::

But ... I *KNOW* the internet knows.  The best I can describe it is a bunch of wide, broad stripes that take a right angle but the right angle is not squared off .. it's *ROUNDED*.  Think of a schematic of pipes.  My (badly) drawn image at left is a *representative* of the general look-and-feel of the quilt I am looking for.

The quilter has written a book on these types of quilts.  Do you think I can remember the name of the book?  Of course not.  I'm fairly certain that it was done this year (2012) but the way my poor one brain cell is (not) working these days, I'd hate to say that was a firm date.

Sooooooo .... does anyone Out There recognize this general quilt design?    I'd deeply appreciate your suggestions, responses, guesses as a comment ... so everyone else can see what has already been suggested.

Thanks for your help.


Gone with the Wind ... finished!


oh, at long, long last, this top has been quilted, bound, laundered .... stick a fork in it cuz it's *DONE*!!  woooo hooo!  :-)

I pieced the top way in 2010 when the specially printed fabric came out.  (Subsequent fabric searches reveal that most of the fabric used for this pattern have been discontinued.  You may find bits and pieces being sold by private parties, but Quilting Treasures isn't printing it any longer).

I didn't particularly care for their pattern layout, so I changed it to suit my own tastes.  After the piecing was done, there it lay ... ageing ... sitting contently ... until I just couldn't stand having *all those tops* unquilted  (ummm .. 17 at last count).

I began to plot the quilting.  It wasn't as easy as other quilts.  There are some very awkward areas to deal with and I'm just not terribly clever when it comes to quilting designs.  I tend to think "inside the box" and have a difficult time stepping outside the lines.


I even remembered to use my embroidery machine to make a secondary label.  :-)

But, eventually, it all came together and now, it's done!  I feel such a sense of accomplishment!


Those pictures are just teasers! For all the gory details, links and more pictures, please visit my web page for the Gone with the Wind quilt.