Thursday, November 19, 2015

Turkey napkins - Weaver Fever quilt - NYC pillowcases


Catching up on what I've been doing and working on ...

It all started when Mr. Pirate needed the remote control to our TV monitor.  He couldn't find it.  *I* couldn't find it.  And I strongly suspected that it was hiding underneath all the quilting stuff on the adjacent window shelf.  

That window shelf had slowly been accumulating STUFF for a very long time and had eventually become quite cluttered.  Well .. *really* cluttered, if you want to be truthful.  I have a high tolerance for clutter but even this level of disorganization was getting on my one remaining nerve.

So, I bit the bullet and began digging through the piles and piles and piles of quilting stuff and projects and magazines and books and everything else .. all in the hopes of finding the remote.   When I'm cleaning/reorganzing, I kinda/sorta use the "touch once" rule, which is to say that you handle the item ONCE ... putting it where it belongs .. and the returning to the area being cleaned.  You don't put it in a pile to be dealt with later .. that just invites more disorganization.

Well, I hadn't gone through too many piles when I FOUND the remote!  Oh hooray!  But now, I had a conundrum ... do I continue cleaning and putting things where they actually belong?  Or do I go back to what I was working on before (and leaving the existing piles of clutter alone)?  It was a real temptation to return to what I was doing before ...but .. by golly, I really was on a roll with this cleaning effort!  Ultimately, I continued with that ..... and rediscovered quite a few quilting projects that had been put on hiatus .. and never gotten back to.
One project was my New York City pillow cases.  In the Spring of 2014, we visited our Favorite Middle Daughter, who is living in New! York! City!   We went to Grand Central Station and admired all the things to see there.  I visited The City Quilter, where I found the New York City specific fabric they had commissioned.  I bought the fabric that replicated the ceiling of Grand Central Station and a companion fabric, with the intent of making pillowcases for Mr. Pirate and myself.

Upon our return home, the pillowcase project was deferred "for a while" .. which means it never was made.  But, during this cleaning/excavation project, I rediscovered it!  Now, pillowcases really do not take very long to make, so I was very pleased when I finished both pillowcases!  I even remembered to sew my little embroidered pirate tag into them!  Hooray!


Another project was a set of cloth napkins that I had intended on using for Thanksgiving *2014*.  I had read a blog entry that described how to decorate napkins with English paper pieced turkeys .. they were absolutely DARLING.  At that time (in 2014), I was really into making hexies using the English paper piecing technique and I JUST KNEW that I could make 12 napkins to use that Thanksgiving .. even though it was only 2 weeks away.  Honestly .. how long could it possibly take me?


Well, suffice it to say that I did NOT finish them for Thanksgiving 2014. BUT .. since the project had now been rediscovered, I could resume working on them for Thanksgiving 2015!  And I did!  Hooray!


The next project that I rediscovered was actually leftover pieces and yardage from a previous project.  The previous project was a twin-sized quilt that I made in 1996.  The quilt was made from a pattern, "Weaver Fever" by Jackie Robinson and can be seen on its webpage.  When I had finished that quilt, I very carefully put away all the leftover segments and fabrics.  It turned out that I had enough leftover segments to make 10 more blocks.  And enough leftover yardage to make 10 additional blocks .. which gave me a total of 20 blocks .... enough to make a 50"x65" lap quilt! 


I'm backing this lap quilt with a gorgeous length of royal blue fleece.  I'm going to have a wonderfully cozy personal-sized quilt for me!  Hooray!


I feel quite wonderful that I was able to finish *3* projects in fairly short order .. although, since they had been buried for a very long time, they hadn't even made it to my UFO board.  I don't get the satisfaction of crossing them off .. BUT .. I do have the enormous satisfaction of the completed projects!


Sunday, November 08, 2015

Creative Needle magazine set: 1987, 6 issues


If you are into Heirloom sewing, smocking, embroidery and all those incredibly beautiful garments and sewn items, then you know about Creative Needle magazine.  Each issue is a gem all by itself.   There are garment patterns/instructions, smocking plates, embroidery stitches, vintage needlework discussions in every issue.  When I was subscribed to it, I eagerly looked forward to each issue.

As with many hobbies and interests, times change.  Although I still have a very strong emotional attachment to these magazines and their contents, I realize that I am simply not going to be making more of them.  I *could*, mind you, but I know I'm not going to.

Sooooo .. it's time to bid them farewell and hope they find another good home.  Starting with this post and followed by several more, I will be listing my Creative Needle collections for sale. 

Sadly, Creative Needle is no longer published.  The only issues available have all been published and you need to find them where you can.
All center inserts/patterns are intact and uncut.

I would prefer payment via Paypal but will accept personal checks.  If paying by personal check, I will mail the magazines, after the check clears. 

Since these *are* magazines, I will ship them within the US via media mail, which is the least expensive option I can find.  Unless you are local, of course, then you can simply pick them up. :-)   If you are outside the US, we'll need to discuss how you want the magazines mailed to you.  My zip code is 94597, if you want to estimate the postage beforehand.

All sales are final ... I can't take them back because I absolutely need to reclaim the bookshelf space!

If you'd like photos of anything inside an issue, please let me know and I'll send it to you.


Creative Needle magazine set: 1987, 6 issues.  Condition: excellent.  $42 plus postage

Jan/Feb
* Scotland's Ayrshire Authority.  an interview with Bunty Bryson
* Luxury by the Yard.  designing with embroidered insertions
* Buttonhole, eyelet and herringbone stitches.  Counted thread embroidery series - lesson VI
* Shadow work hems.  Part VI of Fancy Hems & Edges
* Color by the Bay.  Spring looks in San Francisco
* Quilted Legacy.  Handstitched by Zelma Potter
* Creative Smocking.  Fresh ideas on color, fabric and floss
* The Hankie Purse.  Perfect for little girls.
* Beautiful Bishops. Final series on Bishop variations
* Smocking Plate and Parasol.  "Lila" design by Karen Dinkler


Mar/Apr
* A Romantic's Point of View.  interview with Margaret Pierce
* From the Hands of Babes.  teaching embroidery to children
* Anatomy of an Ayrshire Dress.   the style and stitches
* A tisket, a tasket.  Brazilian embroidery flowers
* Antique lace dress.  pattern and instructions
* A bouquet of designs.  Florals to stitch
* Close up.  Margaret Mathews
* Smock Plate.  "Herringbone Basket" by Hope Carr and Cindy Foose


May/June
* The Classic Lay of Children's Clothes.  interview with Kitty Benton
* Spanish blackwork pillow.  complete instructions and stitch diagrams
* Designing made easy.  cultivating exposure, adaptation and technique
* Embroidered yoke.  pattern and embroidery design
* The fun of dressing brothers.  matching outfits
* A day to remember.  a collection of Christening gowns
* Madeira and Shadow applique.  how-to by Mary Ann Osborne
* Needle study.  perfect featherstitching by Trudy Horne.
* Honeycomb Smocking. a different look in smocking by Dale Burke
* Smock plate.  "Mermaids for Jenny" by Sheila Childers.


Jul/Aug
* Linking Contemporary Expression with Family Tradition.  interview with Vima Micheli
* Voided Embroideries.  Counted thread & surface embroidery techniques
* Zoo view.  Yoke dress fashions.
* How to make a basic yoke dress - part I.  Chery Williams instructs
* Dreamy daygowns.  a showcase of ideas plus pullout pattern
* Embroidered Purses.  a variety of styles plus cutwork bag instructions
* Puffing: hand and machine.  by Sarah and Melissa Stone
* Pulled and Drawn thread on congress cloth - part I.  pillows by Susan Porter
* Close-up.  Laura Towery
* Smock plate. "Moonlight Lullaby" by Karen Dinkler


Sep/Oct
* Sharing traditional Japanese embroidery.  interview with Shuji Tamura
* Battenberg for the holidays.  pattern and instructions for table linens
* Threads for canvas - cotton and rayon.  needle study by Cathy Holman
* Attaching lace and making tucks.  by Sarah Howard Stone and Melissa Stone
* Window Smocking.  unique new presentation of smocking by Janet Hyde
* the Harbor Blouse.  Ladies blouse pattern in sizes 6-14
* An old-fashioned Fall.  fashions for children and adults
* Needlecases  instructions in Hardanger and shadow applique
* How to make a basic yoke dress - part II.   Chery Williams instructs
* Pulled and Drawn thread on congress cloth - part II.  pillows by Susan Porter
* Smock Plate.  "Christy" by Patsy Wright.  (a border pattern)


 Nov/Dec
* in the Southern Tradition.  interview with Betty Rast
* Completing the yoke block.  by Sarah Howard Stone and Melissa Stone
* Smocking with silk ribbon.  includes "Christmas Rose" graph
* Baby Bunting.  pattern insert
* Holiday Stockings.  insert with patterns and instructions.
* Christmas crackers.  a tradition to stitch
* Blanket of Buttonhole stitch?  by Marion Scoular
* Embroideries of Mamluk Egypt.  counted thread
* How to make a basic yoke dress - part III.   Chery Williams instructs
* Smock Plate.  "Friendly Santa" by Hope Carr


Monday, October 19, 2015

Lone Star UFO - working on the applique pieces


The top vine has appliqued flowers; the side vine does not.
I'm continuing to work on my current UFO ... a hand-dyed Lone Star that I started in 2011.  Appliqued vines, flowers and leaves are being hand-appliqued around the perimeter.  And that's the phase I'm at right now.

There are all sorts of techniques for hand applique, most of which I thoroughly detest for various reasons.  I don't say this to disparage any one technique but to be up front that I have *tried* many techniques and found that they just do NOT work for me.

UNTIL I was introduced to fusible, water-soluble stabilizers by a quilting buddy of mine, Suze Noonan of California.  Suze uses stuff she bought from Floriani (the exact product name escapes me), which comes on a roll.  I'm using C&T Publishing's "Wash-Away Applique Sheets" which come in 8.5"x11" sheets.  (That size will come in VERY handy in just a minute).   There are others that you can use.  The key thing is that it needs to be FUSIBLE on one side and WATER-SOLUBLE.  My stuff looks very much like non-woven interfacing.

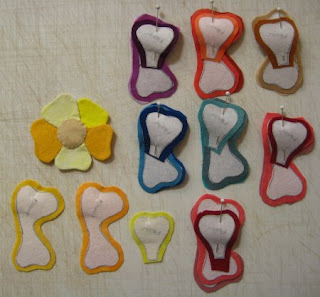
After I had all the flower bud appliques made and I could see all the colors I had, I pinned them in place.
I really do like hand applique.  But the prep work was horrendous.  Suze's method (which she will be the first to admit that she did not invent) has you draw your applique template onto the stabilizer, cut the template out on the FINISHED shape line, fuse the template to the wrong side of the applique fabric, cut out the applique fabric leaving a small seam allowance, wrap that seam allowance to the back of the template and glue the seam allowance down.  Voila .. you're done. 

The beauty of this technique is that you LEAVE the stabilizer IN when you are quintupling the shape to the foundation fabric.  When you launder your project, the stabilizer will *wash away*, leaving just the applique fabric on the foundation fabric.  How easy can that be?  Gosh, I love it.
Finished applique is at top left.  Piece parts are directly below.  The rest are units to be worked on.

What I LOVE about C&T's product is that since it is 8.5"x11" sheets, you can run them THROUGH YOUR PRINTER.  Why is that earth-shattering?  Well ... in your graphics editor program (I use Paint Shop Pro), create a page and draw (or scan in) your applique piece templates.  Copy each of your applique template onto the new page.  Crowd them to maximize the use of the 8.5"x11" because you're going to be cutting them out afterwards.  What you now have is a page-size "picture" of your applique pieces ... that you will now PRINT onto the C&T sheets.  *No need to manually draw each applique template!!!*   Let your printer "draw" them for you!  All you need to do is to cut them out on the lines (which is the final size of your applique piece).
back of the 5-petal flower, showing wrapped and glued seam allowances.

Fuse those templates onto the wrong side of your applique fabric, cut them out leaving a small seam allowance, wrap the seam allowance to the back and glue it down.  You are DONE!   So fast and easy!

So, that's what I'm doing on the Lone Star UFO project.  Making millions of flower and leaf appliques.  Some flowers are single templates, some are multiple pieces that I pre-assemble by appliqueing all the pieces together so that I have a single flower unit ready to be placed on the Lone Star top.  It's slow going because each applique piece obviously needs to be done individually.  But, it's a great way to pass the time while I'm watching a TV show.  :-)

All the leaves I've made so far.
front and back of a leaf


Saturday, October 03, 2015

Donation quilts for 2015


I started looking at the quilts and/or tops I had made for donation purposes this year and was pleased to see that I was productive.  Well ... almost productive.  :-)

Some of the donation quilts are actually ready to donate.  Some are 100% quilted but not bound.  But a lot of them are still tops, needing to be quilted.

And that's how my motivation has been this year: I get all fired up to get a quilt done ... and then run out of steam by the time it comes to quilting it.

However, here's what I've accomplished this year so far.  I suspect that even though it is only October, this is as far as I'll get with respect to the creation of any more donation quilts.  That particular bee in my bonnet has been chased away and I'm more interested in completing other UFOs than this bunch. 

Never fear, though, eventually all of these tops *will* get quilted and the whole bunch will get donated.

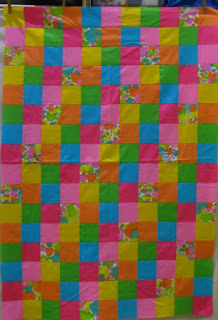
This is "Audrey's Brights" and was made from the stash of my dear sister-in-law's mother who had passed away.

These are REALLY bright cotton-poly squares, just sewn together in no particular order or fashion.

It's still an unquilted top.


Once the above quilt, "Audrey's Brights" was done, I had EVEN MORE of the really bright fabric leftover and created "Audrey's Bright Hearts".

So, I cut hearts from the brightly printed fabric, and fused them as appliques to be the focus squares.  I surrounded the hearts with the really bright fabric.

This is also unquilted.


I had a lot of fun making these fused appliqued cupcakes!  I alternated the cupcake blocks with 4-patch blocks and did an all-over pantograph.

Yup, this one is actually quilted!

The backing is a piece of fleece yardage that is an all-over print of cupcakes ... which is where I got the inspiration for the top.


Somewhere along the way, I picked up some fleece that had dog bones printed all over.  I haven't a clue where it came from, as I'm not really a dog person.

But to coordinate with the dog bone fleece, I dug into my stash and found two chunks of fabric with dog pictures on them .. one with a red background and the other with a blue background.  Once again, I don't know where the dog fabric came from.  It certainly didn't look familiar!  I can only assume it was given to me.

I have accent squares of red and blue fabric and used a paw print fabric as a sashing of sorts.  I *think* this is a disappearing 9-patch pattern, but I didn't say anything about that in my notes, so I'm not completely sure.

In real life, the center part of the quilt looks a bit muddled but I can see from this distance photo, it doesn't look quite as bad as I thought it did close up.  :-)

These are "doodle cloths" that, once I had completely used up the fabric with my doodles and practicing, I cut them up and bound them to be used by my veterinarian as liners in the cages where their animal clients are kept.  These doodle cloth quilts are puffier than the thin terry towels the staff normally uses to insulate the animals from the wire mesh bottom of the cages.

I'm happy to not throw away the doodle cloths; the vet is happy to get substantial cage liners; the animals (I imagine) are happy to lay on something more comfortable.

This donation quilt is a complete disaster, I'm sad to say.  I did have a layout that I used as an inspiration but because I didn't have enough of the pre-printed hexagon fabric to replicate the original layout, I had to come up with something else.

And .. yuck ... this was it.  I'm not happy with it BUT not unhappy enough to rip out all the appliqued hexies and figure what else to do.

It'll remain as it is.  Sometimes quilts just turn out yucky.


This quilt was inspired by another hexie layout that turned out differently from the original.  But in THIS case, I'm happy with the finished quilt!

I used this top as an opportunity to try a different feather motif in the borders.  I really do enjoy quilting feathers.  Once I "discovered" the 'hump and bump" method that Karen McTavish uses, it made sense to me and I could actually *do* them with some degree of attractiveness.

Now, it's the only method I use for feathers.

And here's a close-up of the feather motif.  I'm really rather pleased with the way it turned out.


Thursday, October 01, 2015

Sheep in the Meadow


"Sheep in the Meadow" is a pattern designed by Deonn Stott and appeared in the May/June 2014 issue of Quiltmaker magazine.  I came across it just last month when I needed to make a baby quilt for a cousin.

I used 3" (along the side) hexagons, which resulted in a small top, so I added 2 fabric borders to bring up to acceptable size.

This quilt is Just SOOOOO Cute!   The ears and legs are floppy, free-swinging appendages; the eyes are double layered appliqued circles ..and don't forget the yo-yo's on the sheep's forehead!  The flowers in the meadow are double layer fabric origami and add just the right amount of texture to the quilt.


That was just a teaser for you! Please wander on over to Sheep in the Meadow for more, detailed pictures and verbiage.


Saturday, August 01, 2015

Lone Star UFO from 2011

This is a LONG post!  Get yourself a beverage and sit down to enjoy! :-)
hand-dyes from Tammy Salzman
Way back in 2011,  I attended some quilt show and purchased a hand-dyed fat quarter bundle of 10 fabrics, ranging from a very deep yellow to a deep turquoise.  The colors were absolutely stunning and expertly dyed by Tammy Salzman of Always Unique Hand Dyed Fabric.

my variation of Laura Nownes' Lone Star
Upon my return home, I started on a Lone Star (Star of Bethlehem) using the hand-dyed fabric.  In November 2000, I had taken a class from Laura Nownes at a local quilt store, where we made her Lone Star quilt.  Laura's version has country vines in the border, but I changed mine to be Celtic knotwork.  Laura is the most AMAZING instructor ... endlessly patient and attentive to each and every student.  She actively encouraged me to put the Celtic knotwork in my border and helped me with the math to size the float border correctly.  If you ever get a chance to take a class with her, do so without any hesitation.

It was in Laura's class that I learned how to stitch Lone Star quilts flawlessly.  Yes, you do have to pay attention to what you are doing but it's not difficult.  This is not a quick, slap-dash pattern and if you approach it with the attitude that "it will get done when it gets done", then you won't get frustrated when it's not done in a day.  :-)

So, I had no qualms about making a Lone Star from my hand-dyes .... and off I went.  The colors are simply superb ... I can't describe how brilliant they are or how they seem to glow.   The Lone Star was completed and I'm very pleased to say that it was completely FLAT and all of the intersections matched perfectly.  I *do* pat myself on the back for that accomplishment!  {Sadly, I do not have a photo of *just* the Lone Star.}

For the setting squares and triangles, I decided that I would do New York Beauty blocks with a black background.  NYB blocks are best constructed using paper piecing but I absolutely HATE sewing through the paper and removing the paper afterwards.  It's always a mess and a thoroughly despised step.  Fortunately, I learned the Freezer Paper Piecing method from none other than Judy Mathieson (she of the incredible Mariner's Compass fame).  In a nutshell, you create your paper piecing template from freezer paper, which are then used rather like Post-It Notes.  You do NOT sew through the freezer paper.  There are NO small pieces to remove afterwards.  In fact, you peel off the entire paper pieced template in one REUSEABLE piece.  That's right .. you can REUSE the template.  It is an incredible technique.

New York Beauty block

This NYB has 3 sections: the inner quarter circle with spikes, the middle Flying Geese and the outer spikes.  The Flying Geese and the spiks were sewn using the Freezer Paper Piecing method; each and every segment came out absolutely *perfect*.  Being in Judy's class was one of the more useful and enjoyable classes I've ever taken.  {I have a tutorial on this technique here.)

 However, I *was* incredibly stupid.  Really, really stupid.  Back in 2011, I was all hot to trot to make my Lone Star quilt.  Once the Lone Star portion was completed, I started on the NYB blocks.  BUT ... I was also trying very hard to use fabrics I already had on hand so that I didn't spend any more money than I needed to and I would use up my stash.  Well, I didn't have the right kind of black fabric.  I had a rather heavy (but not home dec) black and a lighter weight black.  I knew the heavier black would make the quilt incredibly heavy and wouldn't play nicely with the paper piecing, so I opted to use the lighter weight black.

I made two NYB blocks and realized that this black fabric was a HUGE mistake.  It was MUCH too lightweight and would NEVER stand up to any kind of use.  I stewed and stewed over what do to.  I still wanted to use stash fabric but realized this black was horribly inappropriate.  To fix it, I would need to either do something to the existing blocks .. like back it with interfacing to stiffen it up ... or rip the blocks apart and re-sew them with better fabric.

I just did NOT want to buy more fabric so I opted for the interfacing route.  I fused a lightweight, black, mesh interfacing to the back of the NYB blocks and took a look at it.   Although the block was stiffer than it was previously, the lightweight black fabric was STILL inappropriate .... it would wear through more quickly and it just wasn't dark enough.  I realized this was a bad solution, so I didn't continue with it.

I was so very, very discouraged.  I bundled up the entire project and put it away.  But I knew it existed and needed to be resurrected.

 Let's fast forward to 2015 ... once again, I am trying very hard to work on clearing up my UFO list and remembered my Lone Star.  I dug it up from the "archives", spent some time familiarizing myself with where I had left off.  Oh yeah .. that black fabric. Well, this time, I pulled up my big girl panties and simply BOUGHT some Kona black cotton.  *YES!*  *This* was the black fabric that I should have used back in 2011!   The perfect, appropriate weight and black-as-black could be!

When I remade the two bad NYB blocks (I was able to reuse the hand-dyed fabric from the bad blocks ... I had to, in fact, as I didn't have a whole lot of that original fat quarter bundle left!), I was just astonished .... and satisfied .. with the result.  That Kona black background was absolutely the PERFECT foil for the hand-dyes!  I made short work of sewing up the remainder of the NYB blocks and set them into the Lone Star.  MY WORD .. did they look fantastic!  :-)


see the weird places to be filled in?
Now, under "normal" circumstances, the corners of the Lone Star get setting squares and the other spaces get setting triangles.  But the layout that I was working from had "arcs" spanning the space between the Lone Star points. You couldn't use triangles ... ALL the spaces between the Lone Star points needed to be squares (which is why the NYB blocks worked so perfectly).  This resulted in a very weird shape that required custom pieces to be individually fitted to the space.

Once again, when I realized that if I just worked patiently and methodically, those weird pieces weren't too difficult at all.  It wasn't too long before I had a (more or less) 65" square Lone Star.  Oh. My. Gosh.   It looked amazing.

arcs/tiaras appliqued.  Wow!
But, I wasn't finished!  The spaces above the NYB blocks were to have "arcs" appliqued.  Using a French Curve ruler, I made those pieces ... which rather look to me like Sleeping Beauty's tiara!   However, I wanted a VERY deep turquoise for those arcs/tiaras.  Fortunately, I had kept Tammy's business card and dropped her an email explaining the fat quarter bundle I had purchased from her, lo those 4 years earlier.

Tammy was *so* gracious!  Although she wasn't currently dyeing that exact color combination any longer, she said that she could re-create it so that I could have a VERY deep tuquoise ... and a deeper green for the vines that I was going to applique in the corners.  I also asked if I could purchase a bag of colorful scraps in order to make the flowers that were going to be appliqued around the vine.  She came through magnificently!  The deep turquoise was perfect; the green was perfect and the "scraps"??  HOLY MOLEY .... I struck the Mother Lode!  She send some utterly fantastic colors for me to work with!  I was delirious with happiness!


The arcs/tiaras were cut out, appliqued in place and admired.  Wow.  Just WOW.   Over the years, I've taken a number of classes and worked through self-guided tutorials on hand applique.  I've despised all of them for various reasons: too fiddly, too many steps, too many supplies .. just too many "toos".   THEN .. I discovered the Pacific Rim Quilting Company's line of Two Color Applique quilts and took a class from Nancy Lee Chong (of Pacific Rim) herself.  *HER* technique for needleturn applique made absolute sense to me and I took to it like a duck to water.  I've never looked back and now I *adore* needleturn applique.  In fact, I've made *several* needleturn quilts using this front-basted method: PeaceAh!  Real Monsters!, Sedona's String of PotsGrapes, another Peace, Podcats.

one more corner to go for the vines!
 The final phase was the vines and flowers in the corners.  Did I want an undulating vine?  Or a curvy vine?  After looking at, I swear, hundreds of vine borders, I was torn between two choices ... a lovely undulating vine and a wonderful curvy vine.  They were both excellent choices and either would be perfect.  It all depended on the effect I wanted.

The more I looked, the more I realized that *most* quilt have the undulating vine.  There is nothing wrong with that look but I do try to make my quilts unique to me in some manner, so I ultimately decided that I would go with the curvy vine.  From the deeper green hand-dyed fabric, I made yards and yards of 1" bias, which finished up between 1/4" and 3/8" wide.  Yeah, it wasn't consistent and I'm not concerned about it at all.

I just finished watching a video about the Tentmakers of Cairo and how they created their masterpieces.  They use an ancient technique to transfer their pattern and I realized this technique would work for me, too.   I made a pattern of the curvy vine I wanted, pricked it so that the paper pattern was perforated, then used a Quilter's Pounce pad rubbed over the perforated paper pattern to transfer the pattern to the black fabric.   And boy, did that technique work!   The little holes allowed the powdered chalk to be deposited on the fabric underneath. 

Once the pattern was transferred to the fabric, it was merely a matter of pinning the green bias strips over the chalked lines.  Since I intensely dislike being poked with pins when I'm appliquing, I opted to thread baste the bias strips in place so the pins could be removed.  Yes, this took another step and more time, but it saved me from being continually stuck by sharp pins!

So, at this point in time (beginning of August 2015), I have appliqued vines to three of the four corners.  Perhaps the vines are a *tad* on the wide side; maybe they would look better if they had been narrower (narrower vines would have made the curves easier to lay flat) ... but I'm sure not going to re-do them.  They are fine with me .. and that's what matters. :-)

Next up is to applique the vine to the final corner and then work on making the applique flowers.

If I had only pulled up my big girl panties in 2011 and bought the black Kona THEN ... this project wouldn't have remained a UFO for 4 years!


Wednesday, July 15, 2015

All Mooshed Together


... is what I did with these same-center hexagons.

and I haven't a CLUE what to do now.  :: sigh ::  But I sure do like the result!

I saw someone else's picture of a quilt, where all the hexagons had the same center.  It provided a continuity to the layout and I really liked it.  So,I began making my own, without a clear idea of the goal. 

Around the time that I was busily and happily making all the hexagons with my own paper templates (left over from another, different hexie project), I was able to purchase the Fiskars hexagonal paper punches with some discount coupons .. always a great deal!

I was *so* excited because with the paper punches, I would be able to make LOTS of paper templates accurately and easily, instead of the tedious way I was currently doing it.

Then .. disaster.   I discovered that the multi-size hexagonal acrylic template that I had been using to cut my own paper templates actually was *non-standard* it its measurements.  The entire hexie world measures a hexagon along the outer edge .. so that a 1" hexie has (6) 1" sides.  *This* acrylic template measured the hexies from top to bottom. Oy Vey.

The size I was using with the acrylic template measured 1-1/2" TOP TO BOTTOM, yielding a 7/8" side.  Who in their right mind makes a 7/8" hexie????

Well, in reality, if you are making your own templates and you are the ONLY person using them and they are being used for a specific project, then it really doesn't matter what actual size they are because you are being entirely consistent for the whole project.

The problem was that once I got my Fiskars paper punch to make my paper template, those hexies DID use the standard measurement along the sides!  The large Fiskars hexie punch produces a true 1" hexie.  Which does NOT match up, in any way, with my homemade templates.  My entire batch of homemade templates is now essentially worthless, as they don't work with any of the Fiskar hexagon punches.

Sooo .. what all this was leading up to with my same-center hexies, was to make only a small number of same-center hexies and finish it up in whatever manner I could device.  Which is where I am right now.

This picture shows my mooshed together hexies into a piece that is roughly 19"x25".  Not exactly a size that is convenient for anything.  I'm tentatively thinking of appliquing it to a larger piece of fabric, put a border around it and make a baby quilt out of it. 

Maybe.  I dunno.  This project is not on my A-List of Things To Do, so it can jolly well just sit and cool its heels for a while.  Probably a good long while.  :-)


Monday, July 13, 2015

I'd rather be sewing


... or what I did on my Monday ...

We have a long driveway.  300 feet, to be exact.  It's about 11 feet wide, more or less.  One one side, there are oleanders and cypress (?) trees that we share with our neighbor who has a similar driveway. 

The cypress (or whatever they are) trees shed.  So do the oleanders.  The leaves fall on the driveway and over time, start to seriously encroach on the width of the driveway.  Such has been happening over time and about 4 feet of the driveway (on one side) has become covered with dead leaves.  Today was the day that I finally pulled up my big girl panties, got my rakes and flat-bladed shovel and attacked the debris.

It's not particularly *difficult* work but it is strenuous and tiring and hot.  By the time I started this morning at 10am, half of the driveway was in the sun and half was in the shade.  I elected to start clearing the leaves from the driveway that was *in the shade*.  My mama didn't raise no dummy!

So, I raked a section about 4 feet long and the width of the debris field (mmm .. 4 feet, more or less).  This was then shoveled into a wagon that has a bed that tips up.  When the wagon was filled with leafy debris, I put a big yard trash bag at the end and up-ended the wagon bed into the trash bag.  Over and over and over. 

Then I realized that .. hmmm .. I don't need to be shoveling the *dirt* into the trash bags .. the *dirt* can be distributed elsewhere in the yard.  So, my raked piles were first separated into leafy debris for the trash bag and dirt for the yard.  Over and over and over.

Over the course of the afternoon, I took two breaks and was forced to call it a day around 4pm when we needed to go retrieve one of our cars that was being repaired.  In all, I cleared about 120 feet by 4 feet of leafy debris and dirt.

Remember that I said our driveway was 300 feet long?  Ummm, yeah.  In the picture here, the red area is what I cleared and bagged.  The green area (which is considerably narrower than the previous 4 feet of debris!) is about 48 feet long.  That won't take too long to clear.  But the blue area in the back?  Don't let the perspective fool you .... that tiny, tiny blue area is really .... 135 feet long by 4 feet wide!  Oy vey.

The reason I didn't start on that section is because *that* was the area that was in the sun when I started!  It'll be in the sun tomorrow morning too .. so I'm going to wait until tomorrow AFTERNOON when the shade hits it before I start on that area.

Eventually, I'll need to clear the other side of the driveway .. about 170 feet worth ... of debris also, but it's not nearly as wide an area.  I'm anticipating that it'll take the major part of whatever day I work on it.

This is all time that I'd really rather be sewing because when I'm sewing, I'm in an air conditioned room and I get to SIT DOWN.  :-)


Saturday, July 11, 2015

hexies is what I'm working on


I have several hexie projects I'm working on right now ...

1. Continuing with my "Reaching Out" Forever Project™.   I've finished all the hexie flower units and "leaves" that I need.  The next step is to start sewing the individual flower units together into a column.  This column of hexie flowers will eventually be connected to vertical columns of applique vines and flowers on a white background.  To make it easy for me to attach the column of hexies to the column of white background fabric, I'm filling the voids along the sides of the hexie columns with white half-diamonds.

I've used this technique before, although it was on a larger size of hexies.  *This* is a smaller hexie and so the half-diamonds are correspondingly smaller.  Exactly HOW much smaller was decidedly demonstrated to me when I attempted to wrap the white background fabric around the paper template.

HOLY MOLEY!  These half-diamonds are SMALL, being 7/8" along the edge.  Somehow, making the 7/8" hexagons wasn't a problem at all but these half-diamonds???  Geez, Louise!  They are definitely a pain.   I'm thinking they aren't going to be as soothing and mindless as the hexies were.

In the picture to the left, I've outlined the white half diamonds I've already done in a dotted blue line.  The red lines show where the next half diamonds will go.   I have about a bajillion of them to do.  Good thing this is a Forever Project™!  :-)

2. From somewhere on the internet, I saw a hexie quilt where all the centers were the same color.  It really tied the entire quilt together and I wished I had seen that picture *before* I started on  Reaching Out!  But, just because that project didn't have a consistent center color didn't mean that I couldn't experiment with ANOTHER hexie project!   (I must have been delusional).

So, using the same paper templates, I started making a whole messload of hexies with a white tone-on-tone center.  I knew I didn't want to make a big quilt like Reaching Out.  I didn't want to make yet another throw pillow.  I didn't want to make a tote bag or purse (I have lots of tote bags; I don't use purses).  Then *what* could I use all these new hexies for?

Well, once again, perusing the internet, I saw what I later learned was a miniature quilt. (On that blog, no credit was given for who made the miniature or if a pattern is available.)  The size of the sample didn't bother me; it was the *layout* that I really liked.   Although the sample showed a center of equally spaced hexies in a grid pattern, I realized that I could replace those hexies with my hexies but all mooshed together into one great humungous center medallion.

Then, I could follow the sample photo of surrounding the center medallion with a narrow border, followed by a simple applique border of hexie flowers.   So, that's the current plan with my same center color hexie flowers.  I'm not quite sure how big my final quilt will be.

3. From the June/July 2015 issue of McCall's Quick Quilts, I saw the most AMAZING hexagon quilt.  From reading the description, I found that it was created using fabric PRINTED with hexagons!   What a sneaky, sneaky way to use a cheater fabric!  I *so* approve!  :-)  I promptly found the fabric used in the magazine and will be making my own version .... ummmmm ... "soon".

In the meantime, I was rummaging around my stash and found ... to my utter astonishment ... two pieces of  *printed* hexie fabric!  Now, to be sure it wasn't the same as what I had just ordered and it wasn't the same scale and it sure wasn't enough to make a quilt using the magazine's layout .. BUT .. surely I could come up with something in the same vein?

One piece was simply small hexies placed smack dab right up next to each other.  If you tried to cut them apart to use them individually, you'd lose most of the fabric.  Instead, I put that small piece on the bottom of a background fabric as a "band".  Unfortunately, it wasn't long enough to go from edge to edge .. but it'll work out.

printed Grandmother's Flower Garden fabric
The other piece of printed hexie fabric were larger flowers in a Grandmother's Flower Garden layout.  To use these hexie flowers, I sacrificed the "path" around the flowers so I could then applique each of the flowers onto the background fabric, above the band of hexies.

As with so many printed fabrics, these hexie flowers were not printed strictly on-grain.  Many of the flower units along the cut edges were askew.  I didn't want to waste any of them and I wanted to use all that were there, so where the flower units were incomplete, I simply stuck them right up against the edge of the background fabric.  As a result, there are several flowers stacked up against each other on both sides ... it was the only way I could reasonably use those flower units.

The rest of the flower units had the edges turned under and were machine appliqued with a narrow zig-zag stitch.

the "band" at the bottom is a different printed  hexie fabric
This layout isn't the most fantastic I've ever done but it was an interesting method to do ... and it gave me some experience before my other printed hexie fabric arrives.

When I quilt this, I'll put some filler stitches in the background fabric area.