Thursday, December 22, 2011

Chicken placemats ... and a center mat .. and coasters. Oh my!

This past September, Tom and I went for a sojourn through Arizona.  At one of the places we passed through, we stopped at a quilt store.  (Tom has a GPS that lists every single quilt store in the US.  He looks for them to stop at when we go on trips.  :-)  )

The quilt store had printed squares of chickens.  When we go on trips, one of our dear neighbors comes over to care for our "livestock".  She loves it.

As a thank-you, I made wedge-shaped placemats for her round dining table, using those chicken squares as the focus.


To fill up the empty space in the center of the table, I made a circular mat with a Mariner's Compass design. 

These items were given to her shortly after we returned home.  She loved them.  :-)


Here's the warning .... Angie ..and you know who you are ... I don't think you read my blog but JUST IN CASE YOU DO ...

... STOP READING NOW..
I'm not kidding. Go read something else. :-)

.
.
.
.
.
.
.
.
.
.
However, it occurred to me that, as a Christmas gift, I could make coordinating coasters!  Fortunately, I still had the fabric that I had used for the placemats.  :-)


I didn't have a small enough box to wrap them in, so I made my own fabric gift bag. :-)


Those pictures are just teasers! For all the gory details, links and more pictures, please visit my web page for the Chicken Placemats.

Teacups and Desserts

This is another long-time UFO that has languished in my To Do pile since August 2010.

The pattern is "Take 5" by The Teachers Pet and is a VERY easy pattern to do:  5 different fabrics, 1 block,

*I* made it more difficult by choosing 2 fabrics that I wanted to fussy cut to highlight them properly. :-)

In early December 2011, I was between customer quilts and decided that since I was in a longarm quilting mood, I would load up this top and get it quilted.

I'm so glad I did!  It's wonderful to be able to cross a project off the list as "finished"! :-)

The outer border looks to be a bunch of narrow stripes, doesn't it?  Well ... I fooled you good!  It's really a floral border stripe.  The brown inner border really *is* a separate piece of fabric.

The border stripe was stitched so that it appears to be separate pieces of fabric; the brown border was stitched in a rope design that is a continuous line.  For that rope design, I used Deloa Jones' Rope-a-Dope template.  The template made it VERY easy to stitch and it came out looking so wonderful.

I did continuous curves in the "solid" squares and outline stitched the teacups and dessert images.


These photos are just teasers! For all the gory details, links and more pictures, please visit my web page for the Teacups and Desserts quilt.

Monday, December 19, 2011

The Last Minute Gift Adventure

I have a home business.  Among other things, I format and submit health insurance claim forms for my clients.  For the past several years, one of my clients has given me home-made cookies as a Christmas gift.  I wish she wouldn't.  I'm sure she and her daughter believe they are making scrumptious goodies but I just do *not* like their health-conscious stuff.

*Of course*, I graciously accept them; my Mama taught me well.  I even put them out as one of our Christmas dessert selections.  Over and over, I have observed people taking one bite and declining to consume the rest.  That really should say volumes.  I'm not alone in thinking they aren't tasty.

In return, I give her a gift.  This year I was in the mood to make something.  It needed to be from what I had on hand, simply because I do NOT want to venture forth into the crowds and I don't want to spend any more money.  Mainly, it's the crowds ... I find I'm not dealing well with the shaggy hordes.


The Coiled Coaster Catastrophe
One of the quilting blogs I read had a list of quick, easy and cute gifts to make; one of them was coiled coasters.  I downloaded the PDF instructions but darned if I can find that blog now to pass along the link and the PDF doesn't give the URL that it came from.  In any case, all you need to do is to Google for "coiled coasters" and you'll get lots of hits.

Basically, you wrap cable cording (the stuff you make piping with) with a strip of fabric, coil the wrapped cording into a spiral and zig-zag the coils together.  Pretty simple.  I have the cable cording.  I have LOTS of bias binding leftover from my quilting projects.  Wrapping the cording with a fabric strip should be easy to do. 

Apparently, I missed the class and hands-on tutorial.  My attempts were dismal.

My first attempt was pretty messy.


My second attempt was pretty messy
My third attempt was pretty messy. 

Geez, Louise!  For something that is supposed to be easily done, this is taking me FOREVER just to get a single coaster done.  I figured that the wrapping was my downfall; it just was never going to look good enough for me to want to give it away as a gift. 


But then I remembered ... wait!  The whole point here is to create an encased cording ... what if I made spaghetti straps??  Those are just tubes filled with cording! 

I hauled out my Fast Turn tubes, scanned the directions and made my first filled tube.  Well, the finished tube was a bit bigger than the cording that filled it so the final result was less than satisfactory. 


For my second attempt, I made the tube narrower and this resulted in a perfect filled tube!  Hooray!

This is my final coiled coaster.  Looking good! 

But along the way, I decided that these coasters just take too doggone long to create.  While I wasn't logging my time, I know I took A LONG TIME to make 4 unacceptable coasters and 1 good one.  This was not a good use of my time.


Criss-Cross Coasters Coup
Then I remembered the Criss-Cross Coasters.    These are squares (or circles) of interlocking fabric strips that make up very quickly and look cute.  The instructions I used for them were written by Jenny Harris of AllSorts Makery.


As they use 4-1/2" squares, they are the PERFECT project for charm squares!

They can be used in two ways: as a standard coaster. as shown above (or maybe to the left .. I'm never quite sure where Blogger is going to place pictures).


OR ,if you plan your colors carefully (which I did NOT), they can be used as identifiers for stemware, as shown in the picture to the right.


These instructions are VERY clear and VERY easy.  I think I took all of 15 minutes to sew them up.  Now, *that* is my idea of a quick and easy gift!  I made 4 of them for my client. 

Although the directions tell you to make the coasters square, crisp corners are always a problem when you are turning the item inside out.  It's much easier just to round the corners instead .... and that is what I did.  My coasters are a rounded square.  :-)

If you were really, REALLY clever, you could use your embroidery machine to stitch a small motif in one of the fabric strips, which would make each coaster unique and useful as a stemware identifier ... never again would you wonder which glass of wine was yours. :-)

As for the coiled coasters .... my client is never going to see the them; I'm contemplating even if *I* am going to keep them!

Sunday, December 11, 2011

Occupy Your Sewing Room! The accomplishments!

Boy, I tell ya, there's nothing like a deadline (even self-imposed) to compel you to get things completed!  Here are the items that I finished, worked on or am still in the processing of finishing:

A Tooth Fairy Pillow.  A young son of friends of mine recently came home to enthusiastically announce that he had a "wiggly tooth!".  I knew I had a machine embroidery design for a tooth fairy pillow and set about to make a Tooth Fairy Pillow for the youngster. 

This was made out of mottled blue fleece, both front and back.  The design came from Sew Teri-fic Designs on the Tooth Fairy Pillow page.  There are several designs to download, so be sure to look for all of them.here is the angel, the verbage (for both woven AND fleece fabrics) and an applique pocket for the tooth/money.

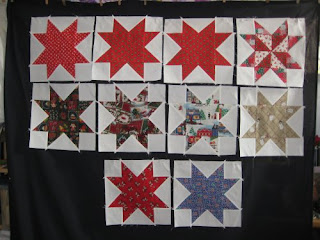
Oh My Stars! Quilt-a-long.  Because I am deranged and have NOTHING ELSE TO DO ::snarf:: but, in reality because the resultant quilt is so doggone cute, I signed up to participate in the quilt-a-long that Sheila (of Thought and Found blog) of Cambridge, Ontario, Canada dreamed up.  Sheila has been posting directions on the quilt requirements, directions for the basic sawtooth block construction and has now added a tutorial on the pinwheel center block. 

I was at a break point on a quilting project and started making the basic Sawtooth Star in the 12" size.  They are very easy to construct and I *just kept making them*.  Eventually, I'll need 15 of the 12" size but there are several variations that Sheila intends to divulge ... I only have the basic and one (lonely) pinwheel block.  I'll make more pinwheel blocks "soon" and even if I don't use all the 12" basic blocks in this quilt, they'll get used someplace.

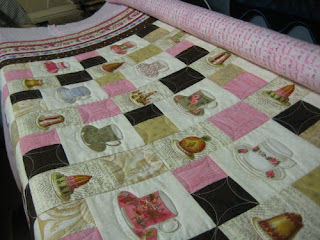
Teacups and Desserts.   This past August 2011, during our annual camping vacation in the California Sierra Nevadas, I try to make an appearance at Country Cloth Shop, the quilt shop that is within reasonable driving distance from the campground.  I was looking at the patterns they had on their spin racks and nothing really caught my interest.  I wandered into their adjacent classroom and ... wowsers!!  What was THAT quilt on the wall??  It was awesome!   I was told it was the pattern, Take 5, (the original versoin, TP200) and it was on the spin rack. 

Say what?  I just LOOKED at the spin rack and sure did NOT see that quilt!   Going back to the spin rack, it was pointed out to me.  Sure enough, that was indeed the quilt in the classroom.  You won't find the fussy cut version from the classroom on the pattern cover.  It just goes to show you how vital that first impression is.  I still think the quilt on the pattern cover is ... blah.  But on the strength of the classroom version (wowsers!), I bought the novelty teacup fabric and the novelty fancy desserts fabric.  The companion fabrics and the backing came from my stash.

The top was rapidly pieced; this is a VERY EASY quilt to do!  There is only ONE block made from the 5 fabrics; you simply turn the block in different directions to get the haphazard look.  My fussy cut version is more structured.

It wasn't too long after we returned from vacation that the top was constructed.  But then it languished.  I was in more of a piecing mood than quilting mood and so the top was placed on the pile of Tops to be Quilted.

It waited and waited and waited.  It wasn't until I had a break between client quilts this December that I decided to use the downtime to quilt Teacups and Desserts.  I used Superior's King Tut as the quilting thread and their Bottom Line in the bobbin.  What looks like a pieced border is really a striped fabric that I faux stitched in the ditch to give the appearance of a pieced border.  I also outline stitched all the little flowers in the border.  Yeah, really.  :-)  The larger brown border was quilted in a rope design, using Deloa Jones' "Rope a Dope" template.  (Love it!)

The patchwork in the interior had continuous curves in the blender fabrics; each and every single stinkin' teacup and dessert was outline stitched.   Yeah, really.  :-)  But, BY GOLLY, I got the quilting finished!  Woo hoo!

Bias Binding.  Not only that, I also made the bias binding .. got that sewn, cut and pressed.  The perimeter of the quilt was about 240 inches; 15 inches of yardage yielded about 290 inches .. more than enough for the job.   It's ready to be used ... just as soon as I get the embroidered label done.  (that's the item I'm still working on).

I have a tutorial on making continuous bias binding that is easy-easy-easy!  The tutorial not only has directions on how to make continuous bias but charts on how much yardage to use to give you the perimeter inches of binding you need.  You can obviously read the tutorial on the webpage but there is also a PDF version on the page for downloading your very own personal copy. :-)


Pirate quilt labels.  For the quilts that I keep for myself or give away as gifts, I have a "personalized" Pirate label that I print onto fabric.  I was all out of them, so I printed out 4 more small ones.  One of these will get used with Teacups and Desserts.  I use this label to hand write all the journaling for the quilt.  Not only the name of the quilt, who it's for, when it was done and by whom .. but, just as importantly, WHY the quilt was made.  I like to hand write this information out because I think in future years, whoever comes to own my quilts will like to see the hand writing rather than printed documentation.

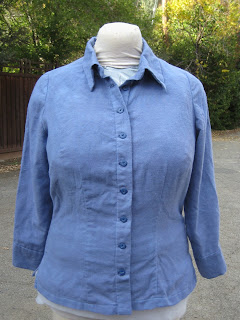
A fitted blouse.  And the very last project that I was able to FINISH (another woo hoo!) was a fitted blouse for my oldest daughter.  Dear Daughter #1 has ::ahem:: an ample figure.  She has always had trouble finding ready-to-wear garments: if they fit across the bust, they are HUGE everywhere else.  Buying a smaller size simply results in a shirt that won't close.  It's very, very annoying.

I can sew reasonably well, but don't know how to alter patterns to extreme figure types.  Minor fixes I can muddle through but if it comes to several aspects that need to be altered, I haven't a clue where to start.  So, this past November 2011, she paid to have a basic blouse pattern fitted to her by a local seamstress, Jane Foster, who is FANTASTIC.  Jane has forgotten more about sewing than I will ever know. 

In very short order, Jane made a mock-up that FIT.  It really fit!  Everywhere.  Perfectly.  It was awesome.

My job was to then trace that master pattern onto permanent tissue and sew a real test shirt.  I had some pale blue lightweight flannel hanging around, so that became our test shirt.  This shirt has man-tailored features such as a collar with stand, a front placket and long sleeves with a continuous placket.  (Actually, strike that last one .. the pattern did NOT call for a continuous placket but instructed the sewer use a completely bogus technique of simply folding the sleeve over.  Ugh.  I put in the continuous placket).

Since the shirt is designed to be worn outside the trousers, it has side slits for ease of wear.

Departing from a man's shirt, this shirt does not have a back yoke; that will be a variation that I will incorporate into the next version.

With some trepidation, Dear Daughter tried on the shirt for the first time.  Would it fit?  Would it look good?  Would it feel right?  And OH MY GOSH!!!  It fit *perfectly*!  I was *so* relieved!

And .. it looked wonderful!  Well, at least, I thought so.  It turned out that Dear Daughter doesn't care for long sleeves (what??!?!??) and she doesn't care for pale blue (what?!?!??!).  Well, she relented to keeping the long sleeves .. since the shirt was made from flannel, long sleeves might come in cozy when the weather is crisp.   Future shirts, however, will be short sleeved. The pale blue was transformed to the medium blue as seen here, by dyeing it.  :-)

The last thing to be done was to place the buttonholes.  These were marked with pins and then .... the shirt got put in the Pile of Projects To Be Finished.   You see, I needed to buy the buttons.  That involved a trip to Joann's and I have been too lazy to do so.  :-)

BUT, Occupy Your Sewing Room gave me the swift kick I needed to do so and get those buttonholes made and the buttons sewn on.  Ta da!  The blouse is now completely FINISHED and ready to wear!

So, dang!  I've done a LOT this past week .. and that included two non-sewing days ... one for allergies that absolutely laid me low and another day preparing for and celebrating a birthday.  I know doggone well that without the Occupy Your Sewing Room challenge, I never would have finished these projects. 

Thank you, Barbara of Cat Patches, for coming up with this delightful event!  :-)

Sunday, December 04, 2011

Moose Knits & Crafts Etsy Store

My middle daughter creates the most lovely, hand-crafted jewelry items.  She has them listed in her Etsy shop, Moose Knits & Crafts   Do check them out for your gift-giving needs!  She has ....


geometric swirl earrings


and rings


and bracelets


and decorative pins and bobby pins for your hair!


and other selections/colors, as well!   All very reasonably priced!  You know you want to go see them. :-)

Saturday, December 03, 2011

Tooth Fairy Pillow

One of my friends has a young son.  The son has just discovered that he has a "wiggly" tooth and is incredibly excited!

I remembered that I had a machine embroidery design for a Tooth Fairy Pillow, so I made it up for the youngster.

The design is from Teri of www.sewterific.com and can be obtained at http://www.sewterific.com/ToothFairyPillow.htm 

I used a cutaway stabilizer in the hoop, *pinned* the fleece to the stabilizer and then put thin Solvy as a topper.   Note that the fleece and the Solvy were *not* hooped ... too bulky.  I have pinned many, many, many projects to the hooped stabilizer with much success.  This certainly eliminates any hoop burn.  The hooped cutaway stabilizer worked outstandingly ... plus the design is just fantastically digitized.  All the pieces of the angel butted up against each other so perfectly .. no gaps or distortion.  I was very, very pleased with the outcome.

The appliqued rounded corner pocket that I used came from another design (source unknown).  I used sparkle tulle for the pocket so the Tooth Fairy can see the tooth.  :-)

I used a mottled fleece for the pillow (both front and back).  To make construction easier for me, I simply pinked the edges of the exposed seam allowance.  It's been my experience that a conventional pillow (one that is turned inside out so the seams are in the inside) results in a rather bulky edge because the fleece seam allowances just do NOT play nicely.

It goes off in the mail today.

Occupy Your Sewing Room: Dec 3 - 10, 2012


Occupy Sewing Room


This "Occupy" movement has taken on a life of its own and this time, it's right up my alley!

Barbara, of Cat Patches blog, has initiated an Occupy event that we ALL can participate in: Occupy Your Sewing Room from December 3 through 12, 2012. 

The demand list is simple;

  1. Leave me alone.  I'm sewing.
 To entice participation, she is also going to have a give-away on December 17 to commemorate the event.  Read about Occupy Your Sewing Room on her blog!

Tuesday, November 22, 2011

The Best Laid Plans

I had JUST announced my intentions to my quilting buddies that after the holidays, I *am* going to finish quilting all the tops that I have piled up and then I *am* going to finish the UFOs that are stacked up.  The accumulation of partially finished projects has now reached the level that is driving me to distraction.  Getting them completed will feel sooooo good!

But then ...  ::sigh::  .... I ran across the blog, "Thought and Found" and the newly started Quilt-a-Long, "Oh My Stars".  There is only one star, a sawtooth star, but the colors and arrangement of her sample are simply wonderful!  I feel myself being sucked in.  (Patti ... don't you DARE start giggling at me!)

Now, eventhough I just love, love, love her colors, they aren't what I have in my stash and/or scraps, so my quilt will look distinctly different from hers.  BUT the layout will be the same ... and that is simply visually attractive!  She did a wonderful job in the placement of the different sized stars.

So, check out Oh My Stars quilt a long .... and join the fun.  You know you want to.  :-)

Monday, November 21, 2011

It was *just* a second ....

Honest to goodness, I stepped away from my computer for JUST A SECOND. 

When I returned, THIS is what I saw.  ::sigh:: 

If you look closely at the monitor, you'll see a BUNCH of extra windows that popped up, including one that had the computer *talking* to me.  

Fortunately, exiting/cancelling/closing down the windows also got rid of the voice.

I guess I shouldn't wonder any longer how I can remove 15 lbs of cat fur from my keyboard.  What IS worthy of a question is how come the CAT never seems to become less furry??

Sunday, November 13, 2011

(2) Friendship quilts for a fundraising auction

My newly-married Dear Daughter #1's mother-in-law runs a not-for-profit day care center. Apparently they have a fund-raising auction near the end of the year (or maybe right after the New Year .. I'm not quite sure). DD#1 said that child sized quilts had been donated to the auction in previous years and would I consider making a quilt?

And so I did. :-)

I chose a Friendship Braid layout, as it is very easy to do ... mindless sewing, really ... and it would be an excellent way to reduce the size of my scrap bins. Quite a while ago (probably several years, actually), I had cut all of scraps at the time into strips, 1-1/2" and 2-1/2" wide. Why I decided on those widths, I can't quite remember, but there were a LOT of them. A Friendship Braid would use up a lot of those strips.

The first step was to sort all of my strips into color families.  I wanted the braids to be basically two colors .. one color on one side and another color on the other side.

What I did NOT realize (but should have) is that using strips of different widths causes the result braid strip to skew one way, then another, depending on how wide or narrow the strip is and what side that strip is on.

I was completely surprised .. and somewhat dismayed ... to see that the assumed vertical of my first braid strip was COMPLETELY skewed.  It wavered back and forth across the width of the strip.

Because there wasn't a true vertical line to use as a base, figuring out where the sides should be was confusing.  But, I knew (um ... from past experience) that if you deliberately continue a "flaw", it ultimately becomes a Design Feature.  LOL!  For all subsequent braid strips, I continued my blatant disregard with respect to the widths and as a result, all the strips showed the same curving vertical line.  At least I was consistent.  :-)

The sashing between the strips and the outer borders are of a beige/pink paisley design that is rather subtle.  From a distance it merely looks like a textured print.  I was pleased that it blended well with all the different colors in the braid strips.

Although the workmanship was fine, it was NOT what I had seen in my mind's eye and so I wasn't sure if the top was "good enough" to donate.  With all the colors in the top, an all-over quilting design would be best, as there was no place for a quilting design to stand out.  I used "Flirtacious" By Timeless Quilting Designs.  It's one of my favorite all-over pantographs.

I used Superior's "King Tut" on the top and their "Bottom Line" in the bobbin.  Because King Tut is a thicker thread, it sits "on top" of the quilt.  I love the variegated colors.

You really can't see it well in the photograph (nor in real life, either!) so here's a photo of the back (which is plain muslin).

Wow .. it is really *difficult* to photograph the quilting design!  My hat is off to all the people who do it so well!

Once the quilt was laundered, I was very surprised to realize that I was very pleased with the final result!  The all-over panto plus the laundering had softened the lines, minimizing the wonkiness of the braid.  The final result is a very cozy quilt indeed!

But ... I just could NOT leave well enough alone.  The fact that the braids wandered all over the strip still annoyed me.  It was fortuitous that one of my fellow quilting buddies had posted a link to a Missouri Star Quilting Company YouTube video on making Friendship Braids with a half-hexagon template.  Here was another way to make the braid, use up a pile of wider (3") strips that I had found AND have the strips turn out straight and vertical!  :-)

I thought the technique intriguing.  I didn't have a half-hexagon template, as the video shows, but I found a hexagon shape using Google Image search.  I copied the shape into my graphics editor, resized it to 6 and printed it out.  Then I glued the shape onto thin cardboard, cut out half of it .. and voila .. I had a half-hexi template.  Good enough for this use, at least. :-)

The reason I sized the hexagon to 6 inches is that I had pre-cut 3" strips.  Half of that whole hexagon would give me a 3" half-hexagon and allow me to use the pre-cut strips.  Boy, did that work out well!  Two cuts across the strip and I had my half-hexie segments!

A little math and a little tweaking showed me that I needed 42 half-hexie cuts to make a strip 60" long.  The finished width would be about 8".

Indeed, the assembly went together exceedingly quickly ... and much more consistent that the technique I had used with the first Friendship Braid quilt.  Because these braids are wider, I didn't need as many as the previous quilt top.  I also did NOT color sort my 3" pre-cut strips simply because I didn't have enough of any color to do that.  This new top is completely random in color placement.

I used a deep maroon solid for the sashing and outer borders.  Once again, I used plain muslin for the backing.  (I buy bolts of 108" muslin because I just love seamless backings.  Muslin gets softer with laundering and it's a traditional backing.  But the real reason I use muslin?  I'm cheap. :-)  I used to use quilting cottons for the backing but I can't afford that any longer.  In reality, no one really sees the back of the quilt, so it doesn't need to be decorative.  Although I have pieced backings before, I really don't care for them, as they cause their own problems when I load them on my frame.  Extra wide muslin is a perfect solution, especially when I have a discount coupon to boot!)

I needed another all-over design for the quilting.  I didn't want to do another pantograph .. my setup with my Tin Lizzie is less that user-friendly for working from the back of the machine, simply due to the constraints of where I needed to put the frame. 

I've always liked Baptist Fan.  I have a set of plexiglass circles that I use to do Baptist Fan and in short order, the quilting was done.

As with the pantograph used on the first quilt, the quilting itself isn't readily apparent.

For this quilt, I used Superior's "So Fine" in the top and their "Bottom Line" in the bobbin.

Because So Fine is a thin thread, it tends to sink into the quilt, which is great when you want to emphasize the piecing design instead of the quilting.

And finally .. a label!  I have a personalized "pirate" label that I put on all the quilts that I keep or give away as gifts.  I created the graphic in Paint Shop Pro and print it with Print Shop on an as-needed basis.

But for charity quilts, I don't want to use that specific label but do want to put "something" on it to acknowledge that I did the work.   So, using my embroidery machine, I created another label to use when I don't want to use the original pirate label. :-)

And for all you nit-pickers out there .. yes, I KNOW that the iconic pirate symbol of the skull and crossbones is called a Jolly Rogers.  But because my surname is RODGERS, I have taken poetic license with the spelling to incorporate my name.  That makes it more personal. :-)

Monday, November 07, 2011

Quoth the Raven ....


... "Nevermore".


The clever folks over at Urban Threads come up with the quirkiest machine embroidery designs.  This one, "Nevermore", caught my eye because Dear Daughter #2 is an English major and she's into off-the-wall stuff.

This design is small (approximately 3-1/2" x 6-1/2") but I had The Perfect pillow insert for it!  I had purchased a standard size pillow insert for a previous project.  Unfortunately, the previous project was a non-standard size and the standard pillow insert was slightly too long.  Not to worry ... I would simply cut off the excess.

But wait!   In looking at the leftover bit, it really was too big to throw away; surely I could use it for "something".  (That is the mantra of horders collectors.  If you could possibly use it sometime in the future, better save it so that you won't have to buy it when you need it.  However, you do need to ignore how much STUFF you are saving.)   So, I saved the cut off piece for later.

Well, "later" came sooner than I thought it would (Hooray!).  The "Nevermore" embroidery would fit nicely on that custom sized, cut off bit!

Digging through my scrap stash, I came up with a lavendar-n-white print which was just big enough for the embroidery.  However, it wasn't big enough for the small pillow insert.  Not to worry, digging through my fabric stash again, I rediscovered 2 pieces of a fabulous deep purple fabric with copper "writing" on it.  Once piece was used for borders on the embroidery design to bring it up size and the other piece was used for the backing.  Combined with the "Nevermore" quote, this ::ahem:: literary fabric would be perfect for my English major daughter.

Just to jazz it up a bit, I used some leftover gold metallic fabric (from a previous vintage ballgown I had made for Dear Daughter #2) for a narrow flange between the embroidery and border fabric and also as the piping all around the pillow.  (Yes, to be coordinated, I should have used a copper fabric, but I didn't have any and didn't want to wait until the next day to buy some.  The gold metallic looks nice anyway and will remind Dear Daughter of her ballgown.)

The stitching was done without a hitch.  I have a Janome 300e, a very basic, stand alone embroidery machine.  It doesn't have many of the bells and whistles that other machines have, but it certainly suffices for my needs and it stitches beautifully.

I like to make my pillow covers with a zipper hidden at the bottom seam.  It makes the back look nice (one single piece of fabric) and makes the pillow cover removable for laundering.  When cutting out the front & back of the pillow, you need to remember to also cut a zipper extension, so there is more than a simple seam allowance to sew the zipper to.

I remembered to cut out the zipper extension on the back.  I remembered to cut out the zipper extension on the bottom front border piece.  When I finally got the front & back sewn together and sat back to admire it .... the zipper was on the TOP of the pillow, not the bottom.

::curses::
::lots of unlady-like words::
::stamping up and down::
::temper tantrums::
::hissy fit::

I had sewn the border piece with the zipper extension to the top of the embroidery instead of the bottom.  I'd love to say that I was a complete idiot to do that but obviously some parts are missing.  :-(

Sooooooooooooooooooooo .... gritting my teeth, I disassembled the pillow: removed the zipper, separated the front from the back.  Luckily, the piping didn't need to be removed.  :-)

However, the front border piece with the zipper extension needed to be repositioned to the bottom of the embroidery piece.  If you look at the finished pillow, you'll see that the embroidery piece is really just an insert ... so to make my life easier (since I did NOT want to mess with the narrow flange fabric), I decided to remove the embroidered "insert", turn it upside down and .. voila! ... the zipper extension is now on the bottom!

The finished pillow is a very small accent size ... 7" x 14".

I love solutions.

From then, it was just a matter of re-assembling the pillow as before.  This time, there were no mishaps and the pillow was successfully completed. :-)   The next time Dear Daughter makes a personal appearance at the Ol' Homestead, she can take possession of it.

And ONE MORE THING .... take another look at the photo at the top .... see that small blue bowl of shortbread cookies?   *THOSE* are not store-bought.  THOSE were made by our Dear Daughter #3, who is the most AMAZING cook and baker.  These shortbread cookies absolutely, positively MELT in your mouth.  They are soooooooooooooooooooooo good.

Gosh, I'm glad she made them for her friends and that they are soon leaving the house.  :-)

Dear Daughter #3 has a food blog, The Adventures of an Epic Baker.  Since she typically takes her photos first and then writes the blog, the entry for the shortbread cookies might not be up yet .... but keep checking back, it'll be there eventually.  In any case, you could always peruse the other food entries she has written about ... they are ALL really, really tasty!  :-)

Tuesday, October 11, 2011

Lots of events have been going on of late .... (no pictures in this post as I am away from home and my photo inventory!) ...

The Pirate's oldest daughter became married to a wonderful man.  The ceremony was on Mt. Diablo; the reception was at the Pirate homestead.  ENORMOUS amounts of time were spent getting the place looking spiffy.  The ceremony and reception were low-key and very enjoyable.  I do believe everyone had a wonderful time.

Almost immediately after the reception, Mr. Pirate & I took off on a LONG-deferred 2 week road trip around Arizona.  I took many, many, MANY pictures (but none available at the moment) and kept a travel journal.  The pictures need to be culled and the good ones posted in the blog.  The notes from the travel journal were transcribed nightly onto the laptop that we took with us.  The original plan was to blog about the day's adventure as they happened, so you, Dear Reader, could experience the trip along with us.  Sadly, internet access was intermittent and, when available, slower than molasses in January.  It just wasn't feasible to blog en route.  Therefore, upon our return, a new set of Adventure pages will be made to document the road trip.

Eventually, the Arizona road trip ended and we did make it back home in one piece, safe and sound.  BUT ...
exactly a week-and-a-half later, we are on the road *again*!

This time ..... ::anticipatory pause:: ... I am going to MQX!    (Machine Quilters Exposition) in Portland, OR!  Mr. Pirate and I decided to make it another road trip ... a couple of days up to Portland, 4 days at MQX, and a few days returning home.  Again .. internet is spotty, so there won't be any concurrent blogs.  I am scheduled to take FOUR hands-on classes with some very big-name, experienced longarm quilters ... Ranae Haddadin, DeLoa Jones, Linda Taylor and Linda McCuean.  Each class is 4 hours long and *each* student gets to stitch at her own longarm machine.  I will be in seventh heaven and delirious with happiness!  Even with a making a doodle cloth in the classes and taking copious notes & drawings, I hope that I will be able to retain all this knowledge that is going to be stuffed in my head.

Again, I am taking pictures along the way and keeping a travel journal.  Upon our return, a much more informative blog will be written. :-)

Stay tuned!  :-)

Sunday, September 04, 2011

a very purdy egg :-)

Long time readers might remember that the Pirate family has a flock of chickens.  Two of these chickens are Ameraucanas.  Ameraucanas typically lay eggs that have pale green or pale blue shells.  (The eggs themselves are normal looking). 

The Pirate Ameraucanas have only EVER laid green shelled eggs.  (Personally, I think the blue shelled eggs are an urban myth cuz I ain't never seen one!)  The green is really much greener than this picture depicts.  This particular green shelled egg has some very lovely speckles on them; I prefer to think of them as "freckles".  :-)

Isn't this egg just plain, ol' purdy?  ;-)  

On the quilting front ... it's not.  I haven't done any quilting since the end of July and I'm definitely feeling the heebie-jeebies from the lack.  But, there is a very good reason: I've been busy sewing the wedding outfit for our oldest daughter, who's wedding will be this coming Saturday (like, a week from now!).  It's been a long haul, doing that outfit.  I am on the 5 yard line and I have firm expectations of being able to FINISH it tomorrow!  oh hooray, she said tiredly.

However, there is no rest for the wicked, for as soon as the wedding outfit is complete, I get to help Mr. Pirate start tidying up the yard.  (The reception is being held here at the Ol' Homestead.)  Tomorrow afternoon, middle Dear Daughter is arriving to help me start tidying up the public rooms in the house.  (True confession time: whenever I have company over, I only clean the "public" rooms .. living room, dining room, kitchen, bathrooms and family rooms.  Company never goes in the bedrooms nor my sewing room, so why waste time cleaning them up? :-)   )

All of this pre-wedding activity is the justification for the lack of blog entries.   After the wedding, I am simply going to collapse.  After that ... I am going to quilt!  quilt!  quilt!  :-)

Tuesday, August 23, 2011

Stats: who knew?

My blog is hosted by Blogger.  I've just been so tickled pink to do the basic blogging thing that I haven't ever taken the time to explore other options offered by Blogger. So, it was a delightful experience to discover that Blogger keeps statistics of various kinds on your blog that you can see.  Who knew that statistics options was available??  :-)

For just *today's* (8/23/11) stats, while I see I've mostly had visitors from the USA, I *also* have had visitors from Canada, Australia, United Arab Emirates, Germany, Spain, Philippines, and Chile!  Imagine that!!

And for this weeks' stats, visitors came from Canada, United Kingdom, Australia, Germany, India, Netherlands, Colombia, Spain, and France!  Wowsers!!

*ALL* *OVER* *THE* *WORLD*.   Primarily English-speaking countries don't necessarily surprise me (I'm waving to Canada, the UK, Australia) but all the other countries, where English might be spoken, but not as the primary language ...   UAE?  Europe?? South America?? Southeast Asia??   and that is just *this week*.   I am deeply grateful for all of you readers!

Thank you so much for reading my blog.  I write mainly to document for myself what I'm doing as a digital diary of sorts.  I love to share my knowledge with others and am very, very happy (and pleased!) to see that so many people from all over the world drop by to read what I'm doing.  I'm just astounded by how far blogs reach.

I know (through Google Reader) that there are many blogs written in languages other than English.  I admire all the eye-candy on those blogs without understanding the verbage.  There was one blog from the Netherlands that prompted me to click through to it and leave a comment.  I had no idea if the author spoke English or not, but figured my enthusiasm and compliments would come through (at least the smiley face, if nothing else!).  To my pleasure, the author responded to my comment in English, so I'm happy she actually understood my words.  :-)

So, to all you quilters Out There .... all around the world ... thank you for reading my blog!  Thank you for stopping by.  Thank you for having *your own blogs*!  I love, love, love reading about what everyone is doing.  While many pieces are inspirational to me, I have come to the stage in my life that I realize I can ADMIRE something and not necessarily need to REPLICATE it.  Please continue to post pictures .. *lots* of pictures!  Seeing all the eye-candy is one of the bright spots of my day!  :-)

Where has the QUILTING gone??

Since (approximately) the late 1960's (honest!), my creative life has centered around sewing and needlework.  When I was in high school, I made most of my clothing.  I took a break during college cuz schoolwork got in my way.  :-)

Once I had graduated and was gainfully employed, I started my needlework phase.  All KINDS of hand needlework and I loved it.

When my girls were born in the mid 1980's, I realized that making decorative, embellished items wasn't a good use of my time, so I resumed garment sewing ... this time for them.  When they entered junior high school and wanted to wear nothing but jeans and t-shirts, I declined to sew those items. :-)    That's when I *really* started quilting.

But for a very brief period in high school (circa early 1970's), I started to crochet.  I'm not sure if I was taught or learned by myself, but I had Grand Illusions of making a granny square afghan for my bed.  I studiously made granny square after granny square, bundling them up in piles of 10s (for easy counting).  I also made a WHOLE BUNCH of granny square centers (only).   At some point, I started to whip-stitch the squares together.  And then ... at some later point .... they all got put away.

I never *quite* forgot about them because when I moved from my parents' house to my apartment ... and then to my house ... and then when I reorganized or cleaned out my sewing room ... that project was always there.

Let's fast forward to current times  ... 2011.  I've been trying to work on finishing up UFOs (UnFinished Objects) and I finally came to grips with the fact that I really, *really*, REALLY ought to finish the granny square afghan.   I hauled out the project bag and (re)discovered that (apparently) the reason I had stopped was due to the fact that I had run out of the white yarn I was using for the final rounds.  Off to Joann's to try to find a compatible white.  I had no illusions that I would find an exact match after (gulp) 30-odd years but I hoped to find something "close".  Under the store lights, I found a compatible match. However ... and you knew this was coming, right? ... back home under natural light, I realized that my new white yarn really, *really*, REALLY wasn't suitable.  ::sigh::

Since it is MUCH easier for me to make bed-sized *quilts* rather than bed-sized afghans, I made an Executive Decision to simply leave the already sewn-together squares as they were; it would make a decent sized baby blanket.   Using the power of the internet, I found a SIMPLE picot edging and was exceedingly pleased to conquer it!

With the previously-made granny square centers, I used the new white yarn to complete the squares.  Again using the power of the internet, I learned I could use a slip stitch to join the squares together.  (The previous squares had been whip-stitched and I didn't particularly care for that technique).  More internet powers revealed a more ambitious (but still do-able for me) lacey edging.

 Voila!!  I know have two baby afghans completed!  (No grandchildren yet .. none in the foreseeable future, but that's OK.)  I will simply pack them away until the appropriate time.  Middle Dear Daughter wanted to know if I was going to donate them to the crisis nursery (where I donate my small quilts); I told her most emphatically 'no way!'.  These afghans took too much of my time to donate them!  They will be for family. :-)

But I still had a bunch of yarn leftover from the granny square project.  I started looking for EASY projects to do and found one, the Cross Stitch Afghan.

[Let me say, at this point ... end of July 2011 ... my oldest Dear Daughter finally decided on what kind of wedding outfit she wanted and asked me if I could/would make it for her in time for her early September 2011 wedding.  It isn't a complicated garment .. a corset top and an A-line skirt .. but Dear Daughter wanted elements that weren't on the pattern and then changed her mind after the base pieces were already cut out ... so I was stressing over the making of it.   I dealt with the stress of problem solving by procrastination ... and working on this new crochet interest.]

I started it with a deep maroon yarn but my sister in law pointed out that maroon was a really dark color for a baby afghan, I agreed ... and changed the focus of this particular project.  What I'll do with this, instead of making an afghan out of just one color (and in a small size, per the instructions), I'm going to make a whole BUNCH of big blocks and stitch them together like a patchwork quilt.  This crochet project has now become my current Forever Project. :-)

But .. as I was looking for companion yarns to work with the maroon, I saw these very soft balls of yarn.  On the wrapper was a diagonal shell stitch pillow that the instructions SAID was easy.  Well .. it kinda sorta was.  Middle Dear Daughter, who is a GENIUS when it comes to knitting and crocheting, helped me out when I couldn't make heads nor tails of the instructions.  I muddled through the pillow project, working on it when I came up against brick walls during the construction of the wedding outfit.

I just now finished the diagonal shell pillow ... and even with all the beginner faux pas and mistakes ... I'm rather pleased with it.

Sadly, I still have some of that very soft yarn leftover .. and need to do something with it.  :-)

On the wedding outfit front, all the problems (up until now!) have been resolved and all I need to do is finish it!  If I concentrate on my sewing, I can get everything done by this weekend .. God willing and the creek don't rise.  :-)

So what am I doing?  Blog entries!  :-)

But after the wedding??  Oh my hallelujah! .... it's gonna be QUILTING TIME!  :-)