Monday, December 08, 2014

ISO: pantograph "Flowers for Linda"


This is a picture of a quilting pantograph, "Flowers for Linda".  I've drawn a red line between the two design rows.

I've found quilting websites that use this pantograph in their longarm quilting services but they do not sell the pantograph itself.

I would very much like to buy this pantograph .. on paper, not a digital version.

Would anyone Out There know where a paper copy of this pantograph can be bought?  I sure would appreciate any help.

You can reply in the comments or email me at pirate AT value DOT net.

Thanks much for any help y'all might be able to offer!


Thursday, September 11, 2014


Never Forget.    NEVER forget.

The radical, extremists who caused this .. not for the good of *anyone* .. but simply to subject the world to their twisted point of view ... have GOT to be stopped, removed and eradicated.

Otherwise, this will happen again.  Somewhere.  

Unless good people stand up, evil will continue.  Make no mistake, these people *are* evil.


Sunday, August 03, 2014

A hexie bag with zippered top


I have recently fallen under the spell of English Paper Piecing.  Not only do I love the absolute uniformity of the pieces but it's a fantastic take-along project.

While on our recent family vacation, I had prepped a bunch of small sized hexies.  No, not the inconceivable 1/4" hexies; I'm not THAT insane. :-)   My "small" hexies are 2" point to point / 1.5" top to bottom.  You may say that those are HUGE hexies but, again, I say 'no' because they ARE small when compared to the 4" point to point / 3.5" top to bottom hexies I'm using in my current Forever Project. :-)  (still a WIP)

My goal for vacation was to "make" the fabric for the front and back of a small zippered bag.  I'm proud and happy to say that I achieved my goal!  I sewed all the hexies together.  I sewed the hexies to the contrast top band.  I sandwiched the layers and even ... hold on to your hats ... *hand-quilted* the front and back "fabrics"!

The hand-quilting bit may not seem like a big deal but *I do not hand-quilt*, so yeah ... it IS a big deal.   There was also an Adventure involved with obtaining the hand-quilting thread, which you will need to read on the web page to find out what happened.  :-)

I eventually got the little bag sewn up, lined with red taffeta.  It has a "wide open" access, which I've linked to on the webpage.


That picture is just a teaser! For all the gory details, links and more pictures, please visit my web page for the Hexie zipper bag quilt.


Monday, July 21, 2014

What I Did on My Summer Vacation. :-)


Do you remember being required to write an essay like this when school started in September?  It was always a chore.

The Pirate family and other (extended) family members always go tent camping.  In years past, it has been a real crowd.  However, as people age, have health issues, obtain jobs, have other obligations,  move away (yes, Lisa and Catherine ... this means YOU!), we have had fewer people being able to participate.  This year, we had the lowest participation rate ever ... and it was very weird.  The most people we had this summer was 8 ... which eventually reduced down to ... 3 ...  by the end.  THREE people!  Inconceivable!

The *only* advantage that I can see to having so few people is that the cooking options dramatically increase when you don't have 18 people to cook for, using only camp stoves or Dutch ovens!  Otherwise ... man, was it quiet!

On the other hand, not having children around meant that we (the parents) didn't have a lot of activities to organize or trips to do, so I had a LOT of time for myself to work on my hand needlework projects, fondly called my Forever Project ™. 

I've had many Forever Projects over the years.  The main purpose of a Forever Project is for me to be productive when I'm not at home ... at doctor's appointments, Little League games, vacations.  My Forever Projects are always hand needlework of some sort.  I really don't care if they never get finished (one Forever Project .. a hand-stitched, twin sized Cathedral Window quilt took me 7 years. :-)  ) but they always do.  This means that I'm always on the lookout for a new Forever Project.

Well, *this* year's Forever Project was actually three different hexie projects.  Last summer (during vacation), I frolicked
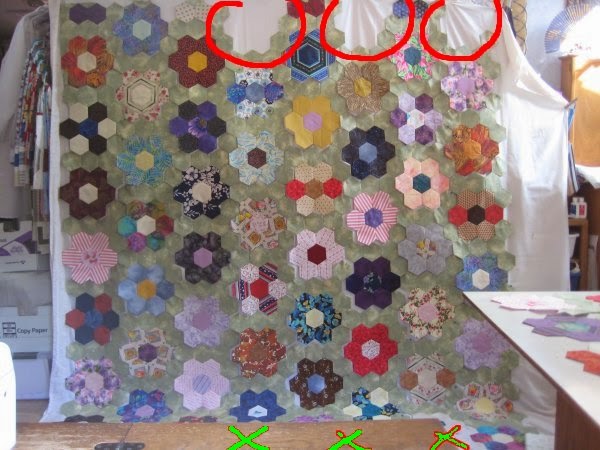
with hexies.  I was kinda intrigued by hexies but wasn't sure if I wanted to commit myself to a big project.  It turned out that I really did enjoy the entire process .. cutting the templates & fabric, prepping the hexies and hand stitching them together.  I still haven't made a complete, finished item from last summer's exploration, but *this* summer I *DID* (almost) finish a 86"x 98" hexie top!   All the hexies have been sewn together .. and that was a MAJOR accomplishment!  I had been working on those hexies for a year! 

I did acknowledge that I was reluctant to work on the *small* hexies as so many quilters do.  I wanted larger hexies, precisely so that I could cover a large amount of real estate in a relatively short amount of time.  The hexies that I used for this project measure 2" along each side and  4" at the widest point-to-point.

Eventually, a border will be sewn all around, so it will be larger, although I'm not entirely certain, at this point, exactly what the final measurements will be.


Since the edges of this top are naturally jagged and I want to put borders on it, the next phase will be to straighten out the jagged edges just for that purpose.

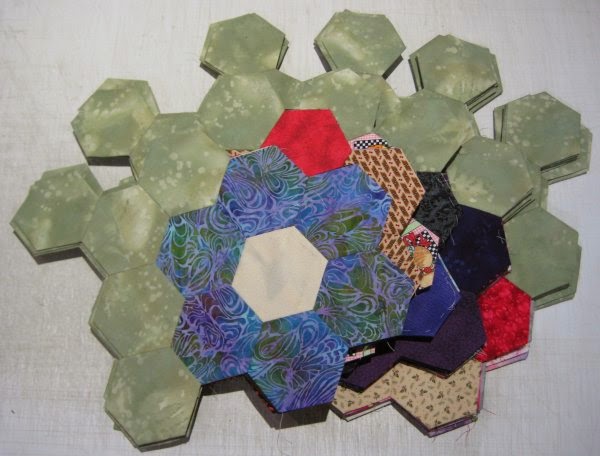
Here's a picture of one corner that I have added the partial hexies to, in order to straighten out the edges.


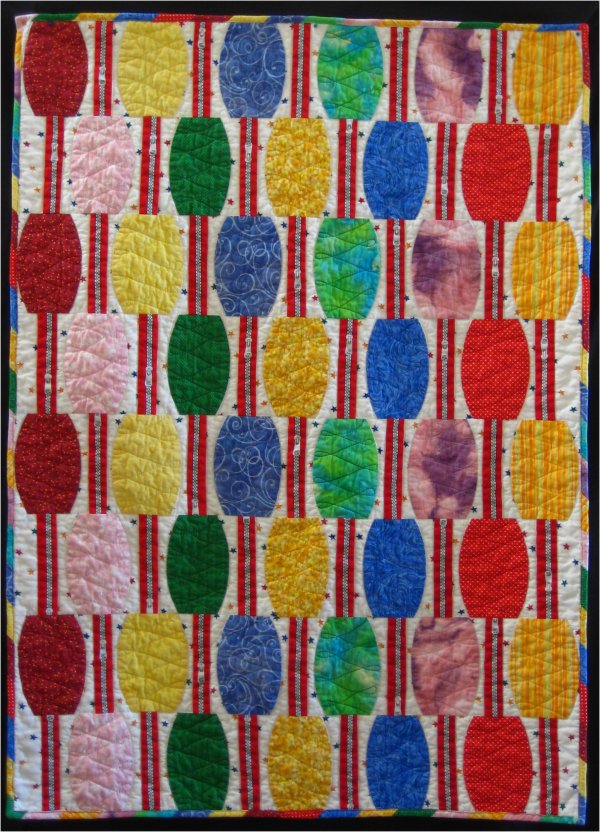
Then, because I was so enamored of the hexie process, I threw caution to the wind and made ... SMALLER hexies!  No,
not those ridiculous 1/4" ones!!!, but certainly much smaller than the top used!   My smaller hexies measure 3/4" along the edge and 1-1/5" point-to-point.

I used these hexies to make single-ring hexie flowers.  The Grand Plan is to use these hexie flowers as appliques along the border of the above big hexie quilt.  So the intent goes.  We'll see.  :-)


A note about the paper hexie templates that I used for the big hexie top and these small hexie flowers ... I have a multi-size hexagon acrylic template by EZ Quilting.

 It's very handy to be able to cut your own templates.  I have a home business that generates scrap paper, which I put to use, among other things, by cutting templates.   You might ask "Isn't that a waste of time and effort?  There are pre-made plastic or paper templates that you can buy." 

And that's a good point, EXCEPT, that hexie quilt top?  That one took a bazillion templates, since you need to leave the templates in place until a hexie is completely surrounded and supported by other hexies.  I would have needed to take out a loan to buy that many!  AND .. I have all that scrap paper *and* lots of time.  Remember, this is a Forever Project, so technically, I have "forever" to get it done. 

But, I will admit that cutting all the templates (even multiple strips with a rotary
cutter) did take up a lot of time.  It was a task I'd do whilst watching TV.  Then, one day when I was wandering around Joann's scrapbook section, I saw a Fiskar's "extra large" hexie paper punch!  Holy moley!  It looked to be exactly the same size as the small hexies I was manually cutting!  How cool it would be to simply PUNCH them!  So I bought the paper punch.  With a discount coupon. :-)

Back on the home front, I was happily punching away.  Then I measured these newly punched templates.  Geez, Louise.  They were NOT the same size as my manually cut hexies.  Oy vey.  :-(   A look at the "large" Fiskars hexagon punch specs revealed that even that one was slightly larger than my manually cut templates.  [insert grimmace]

What THAT meant is that I need to keep the two smaller hexie templates separate from each other; I can't use them in the same project.  :-(  How annoying.


But .. onward and upwards, ya know?

I used my manually cut templates to make this terminally cute zipper bag.  It's still in the UFO stage but I want everyone to
know that .... I am hand-quilting this one!  Oh yes, let's make those church bells peal in joyous sound!  Because .. I just don't hand-quilting anything.  Except I was on vacation and the quilting was the next step.  :-)

The final project is the zippered bag, as shown in the picture below  (which is on the blog page). 

I found it at Quilt Doodle Designs

I may change the handle from a wrist thing to an over-the-shoulder one.  Maybe.  I gotta see how it looks once the back and the front are sewn together. 

I may also box the corners so it has a flat bottom.  Maybe.  I'll have to wait and see.


And my final project I stitched up on my summer vacation is a hexie pincushion ... or, as I thought, perhaps maybe a soft baby toy?

I used the templates created by the Fiskars punch, as they were ever-so-slightly larger than my manually cut ones.  It was easy enough although, be forewarned ..... the small sized hexies do make this a slightly fiddly project to complete.   But, really .. how cute is that?  :-)

The directions can be found at Victoriana Quilt Designs.


Friday, June 20, 2014

Urban Abacus: a baby quilt version


Jenny Pedigo of Sew Kind of Wonderful designs some very interesting quilts. Her quilting is incredibly detailed and dramatic.  I can make her quilts ... don't even attempt her quilting. :-)

Her Urban Abacus really appealed to me and needing to make a quilt for a new baby girl on Mr. Pirate's side of the family gave me the impetus to use that design.
 
Yes, it's curved seams.    The main block is an "abacus bead" and the curved edges are VERY gentle.  A confident beginner should be able to navigate this block successfully.
 
But, just in case you have qualms, I have put in some verbiage and pictures about how I attacked the curved seam aspect.
 
There is a vertical "string" between each bead and when I was on a shop hop with a quilting buddy recently,  I saw the zipper novelty fabric that she had picked out.  I realized that fussy-cutting the zippers would be the PERFECT connector between the beads!  I think it really turned out cute.
 
If you wander on over to the Urban Abacus webpage, you can read about it all and see lots of pictures.


Tuesday, June 17, 2014

Silicon release sheet substitute

I'm working on a quilt that uses fusible webbing to stick the small, persnickety pieces to the background fabric.  For some of the fusible pieces, I've cut them slightly oversized (on the outer edge) so that I will be assured that even the fabric on the edges will be fused down  (the overhang will eventually be trimmed off).    BUT .. that means some of the fusible webbing will overhang the background fabric and be resting on the ironing board.
 
I have a silicon release sheet that I normally slip under the fabric being fused to, so that any errant fusible webbing won't stick to the ironing board.  Well, I can't find my silicon sheet. I'm sure someone snuck in here one night and stole it. Or ... I am storing it in a "Safe Place". But I'm sure some nefarious person stole it.
 
I'm really feeling annoyed and quite put out.  I need that release sheet.  Right now.  I'm thwarted and am heading towards a minor temper tantrum.  When .. a solution popped into my head!  As a potentially Rube Goldberg work-around, I used a piece of cooking parchment paper instead of my silicon sheet.
 
OMG .. it works perfectly! Who knew?  I'm delighted! Parchment paper is always available, whereas that elusive silicon sheet is *still* MIA.
 
so .... pppphhhhtttt!  *there* you silly silicon sheet!


Thursday, May 29, 2014

A Tote and collection of small bags


I haven't been quilting lately.  :: gasp! ::

Instead, I have been working, rather steadily, on sewing a collection of cute little bags and a tote for one of Mr. Pirate's young cousins.

If you look closely at the picture, you'll see
a humbug bag
a tote bag

a "messenger" bag
a drawstring bag
a dumpling bag
a small notebook
a basic zippered bag


all in coordinated colors.

I've made a webpage for this collection and it is there that you will be able to see close-ups of all the items plus LOTS of verbiage and links to all the directions that I used to make them.

I'm not publishing these items on Facebook because the Mom of the young cousin is a "friend" and will see them.  To my knowledge, she doesn't know about nor read this blog.  :-)   I don't want her to be aware of them until I'm done with all the items I intend on sending to them.

But YOU, Dear Reader, *can* read about them and take advantage of the informative links on the webpage.


Tuesday, May 27, 2014

A new Kitchen Aid stand mixer cover


Our favorite youngest daughter has a stand mixer, the Kitchen Aid K5SS model. I offered to make her a cover for it, to protect it from dust and kitchen grime.   Now, I always have the best of intentions but I will admit that frequently, I don't always follow through in a timely manner. Definitely my bad.

 BUT .. for whatever reason, I got a bee in my bonnet today and made her the aforementioned cover. I used the tutorial and pattern at Heart of Mary blog.

Per the tutorial, it's fully reversible, so Dear Daughter will have two completely different looks to choose from, as the whimsey suits her.  

One side is a red/green/gold Christmas plaid and the other side is a red and white heart print.

I modified it slightly so that there is an external pocket to hold the user manual (which ALWAYS gets lost) and another modification in which I sewed the the seam allowances of both fabrics together (on the inside) so that there are no visible seams on either side AND the "lining" isn't loose and floppy. The bottom was finished with double fold bias tape.

The tutorial is very basic; the author, Corinne, tells you up front that there are very few pictures and the tutorial is mostly text.  If you are a beginning sewer, you may or may not have problems following the directions.  But anyone with some sewing experience will have no trouble at all.

Because there are very large expanses of flat surfaces, I was severely tempted to do some sort of machine embroidery or applique for decoration.  But, I had this brainstorm of an idea rather late in the day and knew that if I did any sort of embellishment at all, I wouldn't get the cover finished by the time she needed to leave in the evening.

As it turned out, the Christmas plaid that she chose and the hearts that I chose were much, much too busy to allow any sort of embellishment.  In the end, the fabrics themselves are the focal point. :-)


I used fusible fleece as an "interfacing" so that there would be suitable stiffness and body to the cover.  I could have also quilted the pieces .. that is an option suggested in the blog's tutorial ... but due to the time constraints, I opted not to do even a minimal amount of quilting.  I don't expect the cover to get washed often and if the fusible becomes "unfused" when it (if ever) does get washed, I can always add some quilting then.
There was one minor miscalculation on my part, for which the solution was barely noticeable.  I had offered to put an external pocket on the cover, so she could store her mixer books there.  She agreed and I proceeded with making the cover.  I was so absorbed with getting the cover done .. I was interrupted by dinner preparations and then dinner itself ... that I absolutely forgot about the pocket until the cover was completed.    In the normal course of events, I would have attached the pocket to the cover when the side seams were being sewn and the bottom of the pocket would have been enclosed by the bias binding.   Now, I was unable to use that preferred technique.

Arrrrrggghhhhh!!!   How really, *really*,  REALLY annoying.

BUT, I also really, *really*, REALLY dislike problems.  I try very hard to find solutions to problems.  And so I did with this problem.  I simply made a patch pocket that went from side seam to side seam and butted up against the bias binding on the bottom.  I hemmed the top with bias binding .. the same that I used to finish the bottom edge ... and folded under the remaining three sides.  Then, I top-stitched those folded edges.  Since the folded edges are RIGHT UP AGAINST the side seams and bias binding, unless you look very closely, you virtually can't tell this is a patch pocket.

I must admit to feeling rather smug.  :-)


Wednesday, April 16, 2014

Eye Candy: Strips and Squares


In the grand, overall scheme of things, this was a instantaneous quilt for me ... only 4 months from being pieced to quilted, bound and finished!  Amazing, considering that I have a pile of other tops waiting to be quilted that are several YEARS old.

This past January, I had an overwhelming desire to piece a bunch of flannel tops, of which this is one.  I have no idea why I felt I needed to do this but I gave into the urge.  I used my flannel scraps and flannel almost-yardage.  I did buy the batting.

The almost-yardage pieces yielded almost width of fabric strips, which made up the center part of this quilt.  As a result, this quilt isn't quite as wide as the pattern calls for.  Additionally, it's not quite as long because I decided that I didn't want to repeat any flannel in the strips ... that limited how many I had.

As a result, at 51"x 63", this quilt is bigger than a crib quilt but smaller than a lap/throw sized quilt.  But, it's still large enough to be a cozy cover when laying on the couch or recliner. :-)

That picture is just a teaser! For all the gory details, links and more pictures, please visit my web page for the Strips and Squares quilt.


Thursday, April 10, 2014

Unintended consquences of copyright violations


You may have read of various quilting blogs being copied to another blog site for publication, without the permission of the original quilting blog owners.   I wandered over to this other blog site and, sure enough, there was at least one of my blog posts showing up.  Interesting. 

There have been requests made to us quilting bloggers by other quilting blogger to email the offending blog site and demand that they stop their wholesale hijacking of blogs.

But, *this* blog post of mine isn't about that.  My posts, generally speaking, are just blathering on my part;  talking about the projects I'm working on, problems I'm having and if I found solutions to those problems.  My posts are as though I'm talking in person to each of you .. my quilting buddies.  

I know I should be at least annoyed at this because I sure didn't submit my blog to be published at the other blog site but, ya know, I'm really lazy, so I've let it go.   BUT ..because I'm also a basically  really selfish person (said in the nicest way possible), the eventual fallout from this other blog site *has* gotten me riled up.

When Google Reader was around, I used that to read the blogs I'm interested in.  Google Reader was an "aggregator", which means that it would take a list of URLs that I would supply and present me with something to read whenever anything on that list was updated.  The beauty of using an aggregator .. as opposed to directly looking at a site myself ... is that I don't have check every site every day .. or every hour .. or every anything .. just to see if new content has been added.  Google Reader would know when anything new on my list was published and present those new entries to me to read.  When Google Reader went away, I eventually switched over to Inoreader.   Love it. :-)

For example, every one of you could directly type in the URL of this blog and read it.  But since I write on an VERY uneven schedule ... or no schedule at all ... you have absolutely no idea when something new might be published.  You could check every day but you'd probably be disappointed and annoyed most of the time, since it would be a post you would have already read.

An aggregator looks at your list of URLs for you to see if anything new has been published.  If so, the aggregator makes that blog show up in your feed list.  It's all automatic and oh-so-wonderful, because I don't have to do any extra work for something new to read.  For an aggregator to "pick up" a site, that site has to have an RSS feed .. that's important and required.

Getting back to me being selfish and that other blog site publishing blogs without permission .....  Quilterblogs.com is a "blog of blogs".  The owner of Quilterblogs.com doesn't write a blog him/herself.    You submit your blog to their list and they will publish & distribute your blog entries whenever you have new content.  There are over TWO THOUSAND quilting blogs on their list!  This means that if you read Quilterblogs.com, all those blogs will come to you when there is new content to read; you don't even need to be aware that they exist!  It's awesome! 

I had included Quilterblogs.com as part of my Inoreader list ... i.e. the Quilterblogs.com URL was part of my aggregator list.  Whenever there was new content in Quilterblogs.com (and there always is), I would see those new entries in my Inoreader feed.  They had an RSS feed, which is how it would show up in my aggregator list.

But suddenly .... I stopped getting new content from them.  Inoreader sent me an error message saying that the RSS feed from Quilterblogs.com was no longer working. 

SAY WHAT?!?!??!

How on earth am I going to get my more than daily fix of quilting blogs if Quilterblogs.com isn't feeding Inoreader anything??  Surely, there was some sort of glitch over at Quilterblogs.com.   So, I sent them an email stating the alleged/apparent problem with their RSS feed and could they fix it?

They *promptly* replied and said ..

"Sorry we have discontinued our RSS feed because it was being abused by other sites that was taking the content and posting it as their own infringing on the copyright of the blog authors.

You can still visit quilterblogs.com and see all of the same great posts! Sorry for the inconvenience we just want to make sure we protect our contributors."

And THAT made me really, really, really annoyed.  Stamping my feet on the ground kind of annoyance.  Almost to the point of saying some very unladylike words out loud.  Not that Quilterblogs.com discontinued their RSS feed, per se, but the REASON why they discontinued it.

And THAT unintended consequence of copyright violation is what REALLY makes me angry.  Yes, yes,  I know I should be all up in arms just on the philosophical grounds alone but .... didn't I say up front that I'm basically a lazy, selfish person?   So, while it's not a good thing that blogs are being published by someone other than the author without permission (including mine, by the way), that really didn't get my goat UNTIL my Inoreader feed to Quilterblogs.com was stopped.   NOW you've impacted me in a very negative way.

Now, in order to read all of those collective quilting blogs, I need to go directly to Quilterblogs.com and read the blogs on their website.  They don't have the navigation controls that an aggregator does, so advancing from blog to blog isn't quite as seamless and easy as with Inoreader.  Did I mention that it wasn't as easy?  

Let's be perfectly clear ... I'm all about easy.  Because I'm lazy.  And selfish.  
 
And now I'd like to roast that other blog site over hot coals and disembowel them with a rusty spoon because I've been inconvenienced.   I'll be the first to say that this is definitely a FWP  (First World Problem) but .. doggone it ... I *am* inconvenienced.  Harumph.

Harumph, I say.

Bottom line:  if you have included Quilterblogs.com in your aggregator feed ... you aren't getting anything right now.  And now you know the reason why.

If you want to continue reading the blogs that Quilterblogs.com publishes, you need to go to their website.


Wednesday, March 19, 2014

hexagons: the first column


Well, now, lookee here.    I've stitched together a column of hexagon flowers with a green garden path between them.  :-)

Please disregard the crookedness and the scrunched top & bottom of the picture - I couldn't back up enough to get a decently framed picture.

The black is just the king-sized sheet that I pinned the column to .. it's not the background of the hexagons.

The left side will get filled in with half-hexagons so I have a straight edge.  Ditto with the top & bottom edges; they get a different half-hexagon shape for the fill-in.

The ragged right side will hook into the left edge of the next column.  Kinda looks like castle crenelations,  don't they?  :-)

Seven more columns to go.


Monday, March 17, 2014

Houston: we have a problem


Last time, Dear Reader, you might remember that I had documented that I had finished *all* 60 flower units for my hexagon quilt.   My flower units consist of a single ring flower hexagon plus a 5-hexagon "path" stitched to the top of the flower.

I was so proud of myself.

I was ready to advance to the next step in the process, which is to layout all the flower units so that I can *try* to distribute the colors in a pleasing manner.  ::cough::  ::cough::   What I was trying to avoid was concentrations of any one color or dark colors or light spots.

To do this, I needed a BIG design wall, as this top mathematically measures to be somewhere in the vicinity of 90"x102".  I don't really have a design wall that big, but what I have used, as a stop-gap measure, is a king sized flat sheet secured with clothes pins to a very long curtain rod, which I have jury-rigged to the top of my bookcase, which contains my fabric cubbies.

It has enough length horizontally, but not quite enough height vertically.  The excess vertical amount of the sheet gets stretched out onto the floor.  Unfortunately, when I have a quilt top this big, I don't have quite enough space to back away from it to be able to take a picture without a whole lot of furniture being in the way .. which is why you see my brown sewing cabinet at the bottom of the picture and a corner of my sewing table on the right edge.

But ... it'll do, since I don't have anything else.  I began by just pinning the flower units up in staggered rows, not paying attention to what colors they were.  Once I had everything pinned up, I sat back and began to stare.  Where were the hot spots?  Where were the dark color concentrations?  Where were the areas that had too much of one color?  Flower units were unpinned, repositioned, and repinned.

However, there was a SLIGHT problem.  I had such a great time hand-stitching the green path units to the flower units that I wasn't paying attention to my layout (from EQ).  I actually didn't NEED to sew a path unit to every flower unit.  In fact, I really needed some flower units NOT to have a path.  And I also needed some path units without a flower.

See the picture to the right?  These are the three "extra" flower units .... I don't need them to have a path attached.  In fact, I CAN'T have a path attached.   So, I spent some quality time with Jack the Ripper and removed all of my carefully hand-stitched whip stitches to separate the path from the flowers. 

See the flower units circled in red?  Well, once separated, they went at the top of the quilt, where the corresponding red circles are on the first picture.  See the path units circled in green?  Those pieces were needed at the bottom of the quilt (which you can't really see because my sewing cabinet is in the way) but I marked the spots with green X's.

Once I got that annoyance rectified, I once more sat back and enjoyed the view.  Except ... geez, Louise ... there are some gaps along the edge where I need some single green hexagons.   AAARRRGGHHH!  Fortunately, I have some extra.

And that is what happens when you don't really pay attention to the layout.

I have now, very carefully, made piles of all the flower units in a column.  I have 8 columns, so I now have 8 piles, each  numbered for future reference.  My hand-stitching is now devoted to sewing all the flower units of a column together, so eventually I will have eight column of flower units separated by their green paths.

After that? Why sew all the columns together in order to have (most of ) the top!   I'm probably going to put a border around it but exactly what kind of border or how wide, I haven't decided yet.


Friday, March 14, 2014

Progress on two projects: Hexagons & Eclipse


The Hexagon Forever Project ™.

According to my notes, I started this current Forever Project ™ in July 2013.  These are *large* hexagons (4" at widest point), specifically to cover a vast amount of real estate so that I really could be able to eventually finish it and move on to the next Forever Project ™.  :-)   They are hand-pieced.

At this point, 8 months later, I have absolutely, positively finished the last of the 60 flower units I need to make the top I want.  I think the top will be about 90" x 98" without borders; I'm not sure what sort of borders I will put on.

The picture above is a completed flower unit: a single ring of hexagons sewn to a path.  This completed unit is roughly 12" x 13".

Now comes the difficult part ... layout out all 60 flower units into a "pleasing" color arrangement.  From that point, I can start sewing the flower units together into columns (or rows .. whatever) to construct the top.  Once I start sewing the flower units together, it's going to start becoming more and more unwieldy.

The picture to the right shows all 60 completed flower units stacked up in groups of 10.  I thought I would NEVER finish them!

I'm not quite sure how long this phase it going to last .. hence the name ... Forever Project ™.  :-)

This is kinda/sorta/more-or-less what the completed top is going to look like, once all the completed flower units are sewn together.


Eclipse

Last month, I participated in About.com's annual Quilting Retreat in Phoenix, Arizona.  We've been having this retreat for about the past 13 years, although not always in Phoenix.  All of us are active on About.com's Quilting forum and we all look forward to seeing each other in real life every February.

This is the cover quilt from the Eclipse pattern
This year, a quilt-along was suggested.  One of our members had made Eclipse, a pattern designed by Sandy Brawner.  No project at the Retrreat is mandatory but because the sample quilt was so pretty, I got sucked into buying the pattern and ALL THE BATIKS necessary for a queen size quilt (oh, let it not be said that I stick to the easy quilts).

There is only one block, an easy Drunkard's Path that finishes at 8".  You just keep sewing all the fabrics together to make lots and lots and lots and lots ... and even more lots ... of the one block.  Once all the blocks are finished, then you simply "arrange" them and sew the blocks together.

Although I did try to keep to a kinda/sorta/not exactly organized color scheme, what I ended up with isn't anything that I'm absolutely IN LOVE with.  Which is a doggone shame, since batiks are expensive, even at the sale price I bought them at.


While at the Retreat, I made a certain number of blocks but by no means all of them.  After all, there are a LOT of activities going on!  Upon my return home, I did put my nose to the grindstone and finish sewing all the blocks and even trimming them to uniform size.  

I need 144 blocks to make my queen-sized quilt and the picture to the left shows the 144.  There better be 144!


And this is the pile of trimmings from those 144 blocks.  Somehow, piles of trimming strings like these amuses me.   (It takes so little to do so these days).

And that's where this project lies right now: all the trimmed blocks are stored away in a project bag with the border fabric and pattern.  Since I'm not IN LOVE with it, I'm going to let it marinate a while so I can proceed with quilting all the OTHER tops that have been patiently waiting their turn. :-)


Sunday, February 02, 2014

"Circuit Board" flimsy completed


At Christmas 2012, I offered to make a quilt for my nephew.  After viewing samples of what I considered "masculine" layouts, he decided that he liked Carolina Patchwork's "Groove" best.   He changed the colors to what he liked.  I told him it would be "a while" before I got around to it but since he already had a quilt from me, it wasn't like he was being slighted.
 
As my luck would have it, my nephew liked the KING-SIZE version best.  Oy vey.  When finished, this quilt will be about 99"x117".  That's just a whole lotta real estate.
 
Finally, last month, I came to the conclusion that the quilt shouldn't be waiting any longer, so I started the piecing.  This is a fairly easy pattern, although you MUST pay attention to the layout so you cut the correct size pieces of each color needed. 
 
I started the piecing mid-January 2014 and finished on February 2, 2014.  The actual quilting will be deferred until later this year, when I have finished up other quilting projects that have precedence.
 
The pattern is called "Groove", a reference to the hippy-dippy 60's but to me, the graphic lines looked like circuit board lines, so that it what I am calling mine.  It's also a reference to the computer/technical job that my nephew has.
 
Although I made the largest size possible, the pattern allows for "cut down" sections to create crib, throw, twin and queen size quilts also.  

For example: the crib size is just the upper left corner of the quilt.
 
The throw size expands the crib size slightly.

If you look at the two photos, you can clearly see the crib size is contained within the throw size.


The twin and queen sizes are a similar expansion ... slightly longer and wider than the throw.

The curves are similar to a Drunkard's Path block: there is a concave piece and a convex piece.  Templates for these curves are included with the pattern.  They are *perfectly* drafted and the curves are gentle enough so they can be sewn together without any problems at all.

I am very pleased with this flimsy and look forward to when I actually get around to quilting it.  ALTHOUGH .. at 99"x 117" it's going to be just a long, long slog to get it done.


Wednesday, January 29, 2014

Progress on the hexagon front


Back on July 2013, I happened across an Australian blogger who was doing a hand-pieced hexagon quilt.  I just loved it.  Inspired, I started my own version.  Where she is using white as her background, I had oodles of mottled, soft green fabric already on-hand and that's what I am using for my background.

I made a mock-up in EQ.  I counted the number of hexagon flowers I'd need and started prepping them.  I needed 60.


For the first 35 flower units, I also sewed the background units to them.  They are now ready to be plopped into place.

Then, I got lazy and only wanted to do the fun flower units.  Doing the green background units was boring because it's all the same color.

As I decreased the number of prepped flower units, I was allowing myself to become excited because the end was approaching!  Sure, I still needed to make the background units for these flowers, but I could now anticipate arranging all of the flowers in some sort of pleasing arrangement!

When the very last flower unit was finished, I counted them.  55 ... 56 ... 57.   Wait.  What do you MEAN *57*?!?!?   I need 60.  SIXTY.

Oy vey.  My gratification is now delayed whilst I prep and sew 3 more flower units.  How very aggravating.


Saturday, January 25, 2014

Destashing: fabric & collections for sale.


I can tolerate a lot of clutter but at some point, the sheer amount of STUFF in my sewing room is overwhelming.  That point has arrived for me.  I have girded my loins and gone through various cubbies and pulled some yardage and collections (that I have put together) that I know, deep down in my heart of hearts, that I will never, ever, ever get around to using.

Below I am listing what I have for sale.  Mostly, these are "collections" .. i.e. fabric selections that I have put together for a project .. sometimes I actually had a real pattern in mind but mostly I was just gathering fabric of a theme without anything specific in mind.

All fabric is 100% cotton.  Most is still uncut.  Those pieces that have been cut into are clearly described as such.   If you'd like to see a better resolution picture, just email me.

I accept cash or PayPal.

I am listing the weight of each of the collections.  If you want more than one collection, I will happily combine them into one package to save on postage.  Postage is in addition to the price listed.  I will find the most economical way to mail you your purchases.

Many of these fabrics are now considered "vintage".   And by "vintage", I'm talking circa 2000 or so.  Boy, does that make me feel old.  Many pieces are out of print and very difficult to find.

This is a non-smoking house.  We do have 2 cats but all of these pieces of fabric have been folded, packaged and stored in my covered bookshelves, so the cats haven't been rolling around on them.  All the fabric is dust-free ... or as dust-free as I can make them.  Most of the fabric is right off the bolt and is not washed .. but the pieces that have been cut into *might* have been washed for that "other" project.  I'd treat all the fabric as not washed, just to be on the safe side.

I mail from zipcode 94597.

So, without further ado ... here we go ...

1. The Dale Earnhardt set  SOLD


2. Gone With The Wind  SOLD

3. "Internet" fabric


2-1/3 yards.  "internet" themed.  From Cranston Quiltworks.  uncut.


Black background with blue and white  pinpoint"stars".   Images of 3-1/2 disks, CDs, laptops, lightbulbs, keyboard keys, monitors and various "computer words".

price: $16.00  plus shipping.
weight of fabric: 1 lb.


4. Red Hat Ladies set

pattern: "A Red Hat for All My Friends" by Custom Creations.  Complete, uncut and unused.  Finished size of wall-hanging is approximately 32-1/2" x 44-1/2".

please note that this is NOT a "kit" for the wall-hanging.  The fabric below is what I had purchased to be used with the pattern but is NOT all that the pattern calls for.  I had intended on getting the rest of the fabric at a later date.


The pattern calls for 1 yard of background fabric; 1/2 yard of narrow border & sashing fabric; 1/4 yard of accent border fabric; 1-1/4 yard of wide border & binding fabric; 1-1/4 yards for batting & backing fabric.

I am offering these fabrics only:

Fat Quarter of hats, gloves, shoes, pearl necklaces and words from Block Party Studios.

From their website: "Our quilting
fabric panels are hand printed fat quarters."   This particular "red hat" print is no longer being produced.


fabric: 1-1/2 yards of mottled purple background with red hats, red purses and purple purses.  From Timeless Treasures.  Out of print.  Uncut.  (This is more than the pattern calls for.  I think I had intended on making the wall-hanging bigger.)

total price: $25.00  plus shipping.
weight: 12 oz.


5. Train set    SOLD


6. vintage Veggie Tale set
This set consists of 4 panels of the Veggie Tale gang plus 8 coordinating fabrics.  I had originally planned to make a quilt using the 4 panels as the focal points and fill the the space around them with the coordinating fabrics.  However, my girls have grown up and my window of opportunity for a Veggie Tales quilt for them has long since closed.


I had even printed off a free layout from Andover Fabrics (that wasn't intended to be used with the Veggie Tale fabrics, but I liked the layout.)  The Andover  pattern has more focus squares (6, rather than 4) but I really liked how the pattern used Flying Geese, 4-patches and half square triangles to fill in the spaces between the focus squares instead of the usual sashing.  I'll include this pattern with the fabric, so that if you like the layout too, you can use it.  However, you must realize that you will need to figure out
the sizes of the filler blocks yourself.

Without knowing exactly how much of each fabric I might need, I just bought a "goodly" amount.  :-)  I have every expectation that you'll be able to make a good sized quilt yourself.

All the fabric is uncut.


The panels:
(4) panels.  Each is about 15-12" x 15-1/2".  The fabric around the panels is the same as the yardage I've listed below as "blue background with Bob the tomato".  The entire piece of yardage is about 7/8 yard.  You can cut the panels apart or not.


The coordinating fabrics are from Big Idea Productions, circa 2000, manufactured by Springs Industries.
Prints:
* yellow/orange check with Bob the tomato and Larry the cucumber.  4-1/4 yards.
* blue background with many Veggie Tale characters.  3/4 yard
* blue background with Bob the tomato.  1-1/2 yards


 "Solids": these aren't "Veggie Tale" fabrics but were chosen because they matched the vibrant colors so well.
* red.  1-1/3 yards
* orange 1-1/3 yards
* yellow.  1-1/3 yards
* dark green.  2-1/3 yards
* light green.  1-3/4 yards

price: $110.00  plus shipping.
total yardage: about 14-1/2 yards.  This figure does NOT include the panel prints.
weight of fabric: 5 lbs, 4 oz