Saturday, June 25, 2011

Keep It Zipped! (or What's Behind the Zipper?)

Ever have a crazy idea and create a quilt from it?   Did you ever have an inside joke with someone and create a quilt incorporating the concept?

Well ... I have and I just did!

Mr. Pirate (that long-suffering, solitary male soul in a 4 female household) has always teased me that my quilts are "defective".  He points to sleeping bags as being a "proper" quilt because they have a ZIPPER all the way around.  My quilts do not have zippers and are therefore "defective".

After years of letting the idea percolate in my imagination, I finally was able to implement my one-upmanship idea.  I found a quilt pattern, "Rolling Pin" by Me & My Sisters that was ideal for the inclusion of zippers.


I had a "surprise" to hide behind the zippers.


 And I even  had a machine embroidery design OF a zipper!

The entire construction and quilting of this masterpiece was done entirely under the nose and behind the back of Mr. Pirate.  He never had a clue.  :-)

I hope I've teased you enough so that you'll want to read the entire backstory of how this quilt came to be made!


For all the gory details, links and more pictures, please visit my web page for the Keep It Zipped! quilt.

Thursday, June 23, 2011

Serendipty wall-hanging from a Lone Star border block

Way back in October 2000, I took a Lone Star class from the fabulous, nationally known author and instructor, Laura Nownes.  Turns out she lives locally.  Who woulda thunk it?  :-)

The outer border of her Lone Star is made up of Drunkard's Path blocks ... 3-inch blocks in hot pink and vibrant green.  While many students used scissors to cut out the small Drunkard's Path pieces, I was able to zip-zip-zip through it by using the small 28mm rotary cutter with my plastic templates. The cut-out leftovers were so perfectly formed that I determined to do something ..anything .. with them. At the end of class, I sat at my table and played with the cut-out pieces, moving them around to different configurations. Laura must have noticed and been curious because she walked over to where I was in the corner to watch me play. I explained that the pieces were cut so nicely that I just couldn't throw them away. She chuckled and said that she could actually see the wheels turning in my head!


At home, during the intervening week prior to the next session, I finalized the design and constructed a very simple design with raw edge applique by machine that resulted in a long, narrow wall-hanging. I was actually quite pleased with it.

I backed it with some fabric that I had garnered from my mother's stash .. it had the same vibrant colors as the front, although it was most definitely a 1960's design!

As an aside, my older brother came to visit and admired the wall-hanging. This was truly astounding, since if an item isn't cars or guns or trains, my brother doesn't really pay attention. When I mentioned that the back of the wall-hanging was of our Mom's fabric, he was much intrigued. While he was engrossed in conversation with Mr. Pirate, I quickly put a hanging sleeve on it, as well as one of my nifty pirate labels and gave it to him right then.

He *was* surprised ... but not as much as I was when we visited his house ... he had turned the wall-hanging so that the backing .. our Mom's fabric .. was showing! I was really puzzled and asked him why .. he said that the label was so neat, he thought that was the side that was suppposed to show!!!   ::thunk head on wall::  :-)

Monday, June 13, 2011

companion throw pillow to the Oz Jelly Roll top

I had some leftover pieced corner pieces from the Oz Jelly Roll top.  They were such cute triangle pieces and of such a good size that I couldn't quite throw them away.  So, I combined them with leftover pieces of the other fabric used in the top and made a box throw pillow!


In fact, I had *two* sets of leftover pieced corner pieces and was able to construct two different blocks.  Instead of making two throw pillows, I decided to make one reversible pillow.


 However, the first set of corner pieces resulted in a block that was just >thismuchtoosmall< for the 14" pillow insert I had.  So, I added a very narrow outer border to bring it up to size.  I must admit, it does look at bit odd, being that narrow and all at the perimeter, but it did the job.
 
For the second set of corner pieces, I just made the outer border oversized and trimmed it to size.


I put piping around each edge of the boxing strip and put a zipper in the boxing strip so the cover could be removed for laundering.  HOWEVER (and why is there *always* a 'however'?), I miscalculated or mismeasured or mis-something because the zippered opening is a tad too small to easily put the insert inside the cover.  ::sigh::  I got it in, but hope it NEVER EVER has to be laundered!


For the quilting, I did feathers!  I am enamored of feathers!  After learning how to do Sally Terry's "Hooked on Feathers" and then seeing how Karen McTavish does her Victorian feathers, I now know how to do tradtional looking feathers instead of sausage looking feathers.  :-)  I am so pleased and find myself wanting to do feathers everywhere!  I haven't quite ventured out into the freeform, swirly spine, meandering feathers yet ... but eventually I'll get there. :-)


The really neat thing about pillows is they are, in essense, mini-quilts.  They are small and easily finished.  It sure gives me a nice sense of accomplishment to see (finally!) a finished quilted project instead of another top hanging up, waiting to be quilted!

Friday, June 10, 2011

Needleturn Applique on water soluble stabilizer

Reader Joan asked what the heck I was doing with the double effort of needleturn applique on water soluble stabilizer.  Of course, she asked *so much more* nicely.  :-)

So, here's a more wordy explanation.  I'm going to be using several different examples here to show what I'm talking about.  One example is the flowers I did for my Moondance (designed by Beth Ferrier), one example is a single petal I did just to illustrate the steps and the last example is my Oz Jelly Roll top (which you can also see in the previous blog entry).

*Normal* people applique directly onto the base fabric.  I have only recently become a fan of applique so my self-confidence is not at a high level.  What if I don't put the applique in the right place?  I know me .. I won't particularly want to remove the applique stitches and re-do them.

I thought of doing this water soluble stabilizer technique whilst I was working on a large pieced quilt that had lots and lots and lots and lots (ad naseum) appliqued flowers scattered all over the pieced background (Moondance by Beth Ferrier).  I was absolutely *petrified* that I would put the "wrong" color flower in a particular spot. Since I was using a LOT of different colored fabrics for the flowers, I had no way of knowing what color combination I would be using in the future and it just could be that the flower I would make 1 hour from now would be more perfect for this spot where I just stitched a different flower!   I wanted to be able to have ALL of my appliqued flowers available at the same time so I could then stand back and place each flower where it was best suited.

How to do this?  Well ... I needed the flowers to be free-standing and fully stitched together.  The water soluble stabilizer was my solution.  Yes, in a way, I *am* kinda/sorta stitching the flower twice ... but from different point of view, this is just another way to prep the edges.  (I absolutely, positively detest, detest, detest all the picky spray starch prep ... freezer paper templates ... other finicky methods.  They drove me *crazy*.)

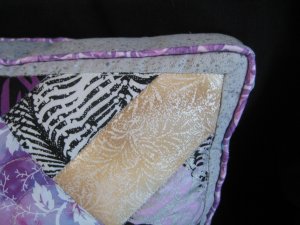
Here's the water soluble stabilizer.  This specific one is Floriani's Wet-n-Gone.  It's a fibrous stabilizer, looks like lightweight non-woven interfacing and handles like fabric.  There are competitors with equivalent products.

Beside it is my scrap of applique fabric with the *FINISHED* edge marked in with a chalk pencil.  (Use whatever marking method you like best.  Sometimes I use a plain lead pencil.  Sometimes a disappearing marker.  Sometimes a Sewline pencil.)

I then trim the applique fabric closely .. about 1-/8" - 1/4" away from the marked line.  This is the seam allowance that I am going to be sweeping under with my needle as the needleturn part.


What I've done here is needleturn the edge under, as marked by the chalk line. 

I'm NOT doing an applique stitch at this point ... I am *basting* the turned under edge down with contrasting thread, which will be removed later. 

While I do try to get a nice smooth curved edge, where appropriate, I'm not *overly* concerned about it because I know that when I do the real applique stitch, I can finesse the curves properly.


Then I trim the water soluble stabilizer.

(I couldn't stand that point in the top curved area.  It look HORRID.  I was embarrassed to show it to you.  :-)  So, I corrected it for this picture. :-)  )


At this point, you have a choice: you can use the prepped piece this way and applique directly through the water soluble stabilizer  OR soak the piece in hot water to dissolve the stabilizer so it won't be in the way.  Remember, the edges have been basted down so they won't be popping back up. 

For this example, I chose to soak the piece.  This is what the back of the piece looks like after the stabilizer has been soaked and dissolved away ... voila .. it's all gone YET the edges are still secured!


And when this piece is actually appliqued in place, here is what it looks like.


BUT .. you could applique right through the stabilizer, which I did for the Oz Jelly Roll top.

Why leave the stabilizer in place?  Oh, because I was just being lazy!  :-)

When the quilt is laundered for the first time, all that stabilizer will dissolve away, leaving a lovely applique.


You see, if you want to dissolve the stabilizer, you soak the piece in hot water .. completely submerge it until it's all gone.  It doesn't take very long .. 3 minutes?  5 minutes?  something like that.

Then you have a wet, soggy applique piece.  That means you need to dry it before you use it.  You can air dry it on a cookie cooling rack, use your hand-held hair dryer or blot it & use your iron.

These are my Moondance flowers.  You can see that there are several layers of fabric for each flower. 

Where there was fabric-to-fabric, I did a real applique stitch to stitch the fabrics to each other.  BUT where there was fabric-to-stabilizer (i.e. along the outer perimeter), I simply turned under the edges and basted.  Once the stabilizer was dissolved, I had the most beautiful, free-standing flowers that I could then place whereever I wanted on the top.

In the end, I *am* doing double-duty .. one stitching to baste the piece to the stabilizer (and/or create the entire applique piece) and the final stitching which appliques the piece to the base fabric.  The basting part is simply a different way of prepping the edges and is less tedious for *me* than other methods.

Oh, and the Moondance top?  yes, I did eventually get it completed in August 2010!  woo hoo!  It's still waiting to be quilted .. I really ought to think more about doing that. :-)

Thursday, June 09, 2011

Oz Jelly Roll *top* finished

Oh yes, indeedy ... I have finished the Oz Jelly Roll top.  Just the top, mind you; it still needs to be quilted.  But now that this is done, I can return to the ever patient Jane Austen quilt. :-)

At first, I wasn't sure that the appliqued vines were going to work with the center part, but now that I've been working on it for a while, it's grown on me.

Because I had showed DD#2 Eleanor Burn's book "Magic Vine Quilt", she picked out some of those flowers to use on the vine.  I was shown a method for needleturn applique that works for me and now I am actually a *fan* ::gasp!:: of applique.  However, when I have a lot of individual items that need to be scattered all over, I don't like to applique them in place, for fear that where I have placed that item might not be the optimum spot.

To ensure that I can scatter and position stand-alone appliques "properly", I stole an item from my machine embroidery supplies ... water soluble stabilizer!  This particular stabilizer is a fibrous sort (Floriani's Wet-n-Gone) that looks very much like a light weight non-woven interfacing but it absolutely dissolves in water. 

For the first few flowers, I did my needleturn onto the water soluble stabilizer.  When the applique is actually stitching onto the base fabric and the quilt is laundered, the stabilizer will dissolve and all that will be left is my applique ... looking as though I had stitched it there originally. :-)   But when I pinned those flowers onto the Oz Jelly Roll top, the scale was *much too big*.  ::sigh::  These flowers won't be used here but will be repurposed in another project.

In this picture, you can see the water soluble stabilizer behind the flowers and my basting stitches that are holding the turned-under edge in place.  The basting stitches are removed when the flower is appliqued in place.

I needed smaller flowers.  I could have reduced the flower patterns but I wasn't too enthralled with the idea of doing them again on a smaller scale.  Then, I had a Light Bulb Moment™!  I could *cheat*!  Oh happy day!  :-)


In a  Broderie Perse sort of way, I fussy cut flowers from fabrics in my stash.  I could have some fabulous looking flowers with minimal effort! 

It also occurred to me that since many of the fussy cut flowers had regular edges/shapes, I could actually machine sew the right side of the flower to the stabilizer, slit the stabilizer and turn the flower right side out.  This would leave a faced edge for me to applique.  Since the stabilizer would dissolve in the wash, there wouldn't even be any extra bulk at the edge!  This turned out to be a very easy thing to do. 

The picture of the butterfly and pink rose (Mary Englbreit!) are examples of this.  Note: the poor little butterfly had his head cut off, so I'll probably hand embroider it back on. :-)

Other flowers had irregular edges or odd shapes that did not lend themselves nicely to being turned out.  For these flowers, I used my original technique of needleturning the fabric onto the stabilizer

You can see this in the red flower and the vertical orange flower stalk.


The pointy things at the edge of the sides are actually Prairie Points.  The blocks of this pattern have angular corners and I carried the shape into the borders.  

The purple/black point is part of the block itself. 

The gold point is part of the inner border and is pieced.  OMG .. that was pure torture!  To get the lines of the gold triangle to line up (more or less) exactly with the gold segments of the block was HORRIBLE. 

I had originally intended to piece the gray triangle also but the experience with the gold one had me change my mind completely.  I then realized .. duh ... that I could achieve the same effect with Prairie Points!  Geez, I wish I would have had that Brilliant Idea before I pieced the gold triangles!  Gold Prairie Points would have been *so* much easier and would have looked the same. 

The purple floral Prairie Point at the outer (left) edge will actually extend beyond the binding when the quilt is finished, is is shown.  Right now, I have it pinned that way.  :-)


I think I hear the Jane Austen quilt whispering to me ... "come back!  come back!"  :-)

Wednesday, June 01, 2011

Hand-Dyes & Lone Stars

Once again, I am playing hooky from Jane Austen.  In times past (when my gray cells actually worked properly), I could really focus on ONE thing exclusively and get it done.  Nowadays, I find myself getting distracted by all sorts of new ideas and I want to work on that new idea RIGHT NOW before I forget it.

I don't particularly care for working on many multiple projects at a time because it clutters up my brain but I've been thinking lately that if I don't do something to capture the idea, it's going to be as elusive as a puff of smoke.

Therefore, when a quilting buddy of mine commented on how much she liked the pack of 10 hand-dyed fat quarters, which were sitting on my cutting table, I decided that I really ought to do something with them RIGHT NOW before they got lost in the morass of my sewing room.

I had purchased this pack at a quilt show a couple of month ago.  I had them sitting out in the open so I could see them and try to figure out what to do with them that would properly show off the gorgeous colors.

I wanted a pattern that would take advantage of the 10 hand-dyes, use UP as much of the fat quarters as possible and not be another Forever Project.  I paged through my quilting books and pages of ideas.  I kinda/sorta narrowed it down to a French Braid or a Lone Star.

I liked the French Braid idea because right there in the book was a pattern that used TEN fabrics!  All I'd need to do is find a fabric for the border.  But I had just finished a French Braid not too long ago (well, the top is finished; it still needs to be quilted).  Making another French Braid, while seeming to be a perfect match with my criteria, didn't excite me too much.

The problem with the Lone Star was that I didn't have a pattern that specifically used fat quarters.  I wasn't sure how big of a Lone Star I could make with 10 fat quarters.  Electric Quilt said I could get a 30" Lone Star using 1-1/2" strips, but I had no way of knowing how much of the fat quarters would be left over.

So, I dug through my stash and emerged with 10 fat quarters of fabric that I wasn't emotionally attached to and that I would be willing to sacrifice to the experiment.  I didn't particularly care if the fabrics "went" with each other or not .. and they sure don't!

Cutting 1-1/2" strips, I indeed was able to make a 30" Lone Star.  I also had a LOT of the fat quarters left over.

I then thought a slightly bigger Lone Star could be made but needed another set of fat quarters ... diving back into my stash, I came up with a second set of 10 fat quarters that had absolutely nothing in common with each other (!!) except that I discovered that I could cut 2" strips for a Lone Star and only have a modest amount of the fat quarters left over.

I sewed just one point together, so that I would remember (in the future) what the sequence was supposed to be.

Both of the experimental fat quarter Lone Star results are quite ugly.  :-)   There is absolutely nothing to recommend them except that they served their purpose.

With courage in hand, I began to cut 2" strips from my hand-dyes.  The 2" strips were assembled into strip sets: 6 colors per strip set.  Six strip sets were needed per point, each one from a different sequence.  When I learned how to construct Lone Stars, I was taught to stagger (offset) the end of the strip set by the width of the strip.  This resulted in a stair step look on the ends ... BUT ... since you were going to cut the strip sets at a 45° angle anyway, why waste the fabric on the very ends??  In this manner, I was able to cut at least 6 crosscut strips from each strip set.  Since I needed 8 crosscut strips (one for each point), I had to construct a partial strip set to obtain the extra 2 strips. 

Eventually I made my hand-dye Lone Star and was pretty happy with it. 

Most Lone Stars simply have corner squares and setting triangles to fill in the star.   I wanted to do something a little different .. something that would also use up the remainder of the fat quarter strips.  Using Google image search, I found a number of different layouts for Lone Stars, but the one that caught my eye was one that used New York Beauty (or similar) blocks. 

So, I drafted a New York Beauty block consisting of rays and Flying Geese, which use up the remaining hand-dye fabric and have a black background to set everything off.  I only constructed 2 of the New York Beauty blocks (and still have to sew the rest of the background to them) before the Guilts attacked me. :-)

I really needed to return to Jane Austen and not fool around with other ideas!  The longer I work on Jane Austen, the sooner I would get done and the sooner I would be able to play around with all these other ideas without feeling guilty. :-)

Here is where the hand-dyed Lone Star sits right now.  It's pinned to a maroon sheet (so ignore that color!).  The curved part of the New York Beauty blocks have been sewn, but are just pinned to the sheet.  With my graphics program, I colored in the black background ... it gives you an approximation of what the final result should look like.

Don't mind the wiggly part of the Lone Star .. that's due to the sheet underneath.  :-)

Not too bad.