Monday, November 29, 2010

On the Design Wall: Carpenter's Wheel

It all started with the trimmed corners of the Snowball blocks from another project (which can't be displayed because it's a Christmas present!).  The trimmed corners yielded a messload of 3-1/2" half-square triangles ... 48 of them to be exact.  These are a sufficient size that SOMETHING could be done with them!

These are pile of 16, which are the number I need to use in the block I eventually chose to use them up.

With so many half-square triangles, I wanted to do SOMETHING with them but not pinwheels ... BTDT and besides, pinwheels are such an ordinary solution; I was looking for something with a little more pizzazz. 

After using Google's Image search function, I settled on the Carpenter's Wheel block as the most suitable for using up my half-square triangles.

This particular pattern came from Marcia Hohn's Quilter's Cache and is the 'easy' version since it uses only half-square triangles and not the traditional Y-seams.  However, after looking at other Carpenter Wheel blocks, I discovered that if you *also* put a half-square triangle at the outer 4 corners, you will get an interesting secondary pattern with or without sashing ... so I made that very slight alteration to Marcia's pattern.

Because Marcia's pattern very conveniently calls for 3-1/2" half-square triangles, all I had to do was find the complimentary third color to work with what I already had and sew *those* half-square triangles.  The resultant block is a monster-sized 24"!  :-)

Marcia's directions are VERY clear and VERY easy to do.  The most difficult part was putting the correct half-square triangle in the correct place!  :-)  

I chose to use a medium green for the third color and was able to pull quite a few from my stash.  Some of them I later decided not to use. 

I was able to make *3*  24" Carpenter Wheel blocks before I ran out of suitable greens.  Because the original half-square triangles came from another project, I was also running dangerously low on those two colors (the light background and the deep coral); fortunately, they came from Joann's calico wall and they were still there!  woo hoo!  :-)

I also found, in the remnant bin at an additional 50% off, another medium green that will make the fourth and final Carpenter's Wheel block.  I don't want to make any more 24" Carpenter Wheel blocks because 1) this was SUPPOSED to be an almost quick-and-dirty project to be done in-between others and 2) after the 4th Carpenter's Wheel block is made, I just don't want to be making any more.

It is at this point I am now stuck.  I like to make "useful" size quilts, which normally translate into bed-sized quilts.  I am also amenable to making a throw size from these 4 blocks ... but what layout?  I can't quite use them as they are as the size isn't "useful".   I love using Electric Quilt to help me with design choices but for this particular layout, I have discovered that I don't have the specific knowledge I need to do what I want ... and that is very annoying.    I may be reduced to doing this old-school .. with paper cutouts!  Fortunately, Electric Quilt can supply me with the blocks to cut out; I'll just move them around on my worktable.  :-)

Since each block is 24" square, using a horizontal grid layout gives me 48" wide (if no sashing is used) or slightly larger (say 50" - 54", if sashing is used).  I need to add top & bottom borders to give me a proper length. 

But what??  I'm still struggling with what to use.

Maybe I could repeat *half* of the Carpenter's Wheel over each block for the top & bottom borders for an 'arch' kind of look.  But, I can't get Electric Quilt to give me the layout I want for the borders!

Then, it occurred to me to see what an on-point layout would give me ... and that resulted in another set of problems ... not only would I still need top & bottom borders for length, but I would have the setting triangles to deal with.  Perhaps some interesting applique work?
 
Or if I split the setting triangles into 2 pieces, maybe put a *quarter* of the Carpenter's Wheel in each small triangle?

See the outer sashing/border in the layout on the left?  Electric Quilt cut the blocks at each corner off .. they are triangles instead of the squares that I wanted.  That's one of the skills I don't have for Electric Quilt, so the layout looks odd.  I just need to remember how I really want it to look.

And instead of finishing up this "quick and dirty" layout, I'm now still in the design phase!  I just may let this one sit on the design wall for a while.

What I REALLY want to be doing is quilting "Lumiere de Noel" with Lizzie .. I have the batting, I have the backing ... but this Carpenter's Wheel project has waylaid me!  :-)

Saturday, November 27, 2010

Can you contribute a Healing Heart for New Zealand?

You may be aware that New Zealand suffered a major mining disaster late this month at Pike River mine on the west coast of the South Island, resulting in the deaths of 29 miners. Many of these miners had young families.

Shirley Goodwin of New Zealand is spearheading and coordinating an effort to make quilts for the families involved.

From part of her blog of November 25th, 
 I am part of Kiwiquilters, an email group for New Zealand quilters. We have a tradition, as do other quilting groups, of making Healing Hearts quilts for members and their families or friends who are suffering personal tragedy or serious illness.
Please consider making a block or several blocks for this cause. It doesn't matter that you don't know the people involved - neither do I. The love and support from strangers that is embodied in these quilts is something tangible that the families can get comfort from for years.

Here are the block details if you want to make some:-
  •       Cream background – calico is fine
  •       6 ½” unfinished size (so they will be 6” finished)
  •       Pieced or appliquéd heart or hearts
  •       Any colours or patterns for the hearts. Some of the quilts will be for children, so children’s  fabrics are fine too.
Please send to me at the address below. Thank you so much.
Shirley Goodwin
51 Charles St
Rangiora 7400
New Zealand
Bobbie (another New Zealand quilter) has kindly made a heart pattern in PDF format to download if anyone wants one.

She posted more information later on ....

Here are the answers to some questions I've received-

1. You can write on the blocks if you want - your country, name or whatever you would like to put.

2. If you are making an entire quilt top, you can make the blocks any size you like. The 6 1/2 " size is just for people making a couple of blocks so that we can standardise the tops.

3. If you have uncompleted quilt tops that you would like to donate, we are happy to take those.
They do not need to have hearts on them.

4. We will be making predominantly single bed sized quilts, big enough to cover the top of the bed. They do not need to come down the sides.

5. If you are putting heart blocks together before sending them to me, you can do them in different ways if you like. For example, you may want to join 4 blocks together, then surround them with sashing. There are no "rules"!

Thank you so much for contributing.

I used this as an opportunity to use some new (to me) techniques and patterns that I found interesting.  Here are the blocks that I've made so far:

Won't you make some heart blocks also?


Tuesday, November 23, 2010

"Lumiere de Noel" top finished!

My version of  Moda's "Lumiere de Noel" .. the top at least! .. is finished. 


To recap: the free pattern is available at Moda.  Lots of online and brick-and-mortar stores offer a kit with the 'official' "Lumiere de Noel" line of fabrics, but I wanted to make it from the fabric in my own stash ... I knew I could. :-)

One very prominent fabric is the linear stripe used as the sashing.  I didn't have anything remotely like it and I discovered neither did any of my local quilt stores. 

Fortunately, the Quilted Cottage in Santa Rosa, CA had it in stock and I ordered it online.  The
fabric was safely delivered promptly, tossed into the washing machine, dried, fussy cut and sewn between the columns.

The outer slab-o-border was sewn on and the top was completed!  (From my blog readings, I have discerned that my Australian compatriots refer to a "top" as a "flimsy" .... which I find to be a simply adorable term!  and so apt!  :-)  )

There is one completely GLARING error in this top, which I didn't discover until I was done with it.  I'm not entirely sure it's going to annoy me enough to fix it. :-)   I knew that my postive/negative fabric was directional.  When I was cutting out and sewing together the Flying Geese segments of the Sawtooth Stars, I was careful-careful-careful to make SURE the orientation of the the stripes was all north/south.  See all those lovely linear stripes all going the same direction?  EVEN in the Flying Geese unit on the right where the 'goose' is the white stripe and the 'sky' is the red stripe ... the strips all go north/south!  I was so proud of myself for remembering that.

The  directions for Lumiere de Noel were careful to let you know that you needed to place the linear stripe carefully so that the same design element was at the same spot across the width of the top.  And I was careful to do so .. see that yellow line?  All the round flower things are nicely aligned.  Dang, I did a good job!  :-)

And then.

And then.

As I was looking at the completed top, patting myself on the back and feeling rather smug about finishing another top, the GLARING mistake hit me between the eyeballs.

See the round flower thingies?  They line up nicely, don't they?  Now look at the leaves below the flower thingies.  One is upside down.   !!!!!

There are *four* sashings from this linear stripe in the top.  By sheer dumb luck ... since I wasn't even AWARE that the stripe was directional ... three of the sashings go in the same direction and the fourth goes the other way.  I was soooo careful to make sure the flower thingies were aligned horizontally, it never occurred to me to check to see about anything being directional!!   aaaarrrrgggghhhhh!

How. Very. Annoying.

I'm thinking that I'll just leave it has it is, as a testament to my hubris for gloating.  Since Dear Daughter has already told me she doesn't read my blog (" ... but Mom, I *see* this stuff as you're making it ... "), she'll never notice it if I never tell her.  :-)

Wednesday, November 17, 2010

Current Forever Project: Dress Me Up, dresses 4 & 5

I always have a "Forever Project" ™ going on.  The term "Forever Project" was originally coined ages ago when I was working on a crewel embroidery pillow, which eventually took about 10 years to finish.  The next Forever Project took substantially less time.  :-)

Nowadays, a Forever Project is whatever handwork project I am working on ... whether or not it takes Forever.  It's a take-along project that I have contained in a 'grab-n-go' project box: a plastic flat tote that contains all the things I need to work on the project.  Whenever I go someplace in the car, whether it was for Little League games, a doctor's appointment or a road trip, the tote was grabbed and we went.   Heaven forbid that I have no sewing to do with large stretch of empty time ahead of me!

My current Forever Project is a quilt that features 12 embroidered 1950's era dresses on mannequins.  It comes from Bobby Socks Quilt Company.

A while ago, I finished dress #4 but neglected to share it.    This is a cute little 2-piece dress, whose French knot bodice features a lovely peplum. 


The peplum has a little drawstring bow at the seamline.


Dress #5 is a sleeveless dress with a darling Peter Pan collar and lace edging. 

The pattern calls for the entire skirt to be covered with French knots but as I had just finished Dress #4's bodice and this bodice, I was real tired of doing massive expanses of  French knots.   Instead, I opted to do a border of French Knots on the skirt.

While I *could* have started on a different dress that did not have any French Knots, that would have entailed doing the dress ... oh the horror! ... *out of order*  ::gasp!:: 

A Little Slow on the Up-take

Have you heard of Framed Hexagons?

I sure hadn't. Apparently they are one of the latest trends on the quilting scene and, once again, I'm behind the times.  :-)

I do know about regular, plain, ol' vanilla hexagons and about all the variations of Grandmother's Flower Garden.   I know what a great take-along project hexagons are.

But all the procedures I've seen are a little on the fiddly side for me.  It's not that I don't like small scale projects or that I won't attempt projects that are detailed, but there's just something about making hexagons with the paper or plastic templates, the basting,  etc, etc that just doesn't float my boat.

And although I appreciate the time, effort and skill that goes into Grandmother's Flower Garden, I just don't care for that setting.  BUT ... when I was at Pacific International Quilt Festival (Santa Clara, CA) this year, I saw a terrific Grandmother's Flower Garden variation that I really liked ... but guess who didn't take a picture of it and now I can't remember what it looked like!   Oh the "advantages" of growing old(er)!  :-)

However, ... back to the hexies ... on Quilted Delights' blog, she talked about a "FRAMED Hexagon".  OMG ... look at that!  That's *awesome*.

Apparently this is a swap block, being hosted by International Friendship Quilters and is something that you sign up for.  I'm not doing swaps these days (heck, I haven't done a swap since 2000 or so) simply because they generate more UFOs and projects for me and I have enough of those on my own list!

But, I sure do like the look of that framed hexie.  I wandered on over to the IFQ site and read the following:

"Putting them together is easy and fun. You'll end up with something that is automatically reversible since the back will be completely different from the front.

The block is made by cutting one large hexagon from one fabric and cutting a smaller hexagon - one each - from a contrasting fabric and from batting / wadding. Place the smaller hexagons in the center and fold the edges over twice and stitch! That's all! And your mitered corners happen naturally!"      (Their hexagon measures 5' finished)
Now, how easy is that???  (If you have one of those nifty die cutting machines, cutting out the hexagons would be a snap.)    You can fussy cut the smaller hexagon and showcase it. (I-Spy, anyone?)  You could use a plain fabric for the smaller one then embellish it in some manner (embroidery, tatting, applique, beads).  You can hand-stitch the folded over edge or use decorative machine stitches to hold it down.

Best of all .. in my book .. this is rather like a Cathedral Window quilt ... each block is completely finished (back and front) when the block is complete.  Whip stitch the blocks together and your quilt is DONE.  Careful use of fabric for the back and specific placement could yield a lovely design on the back .. otherwise you could disregard placement altogether for a totally scrappy look on the back.

What an awesome Forever Project idea! 

Now to be fair, to get the pattern, you need to become a member of the IFQ group and sign up for the swap, BUT the experienced quilter wouldn't necessarily need the pattern to reproduce this block.   I bet any one of my Dear Readers could do this block without having the 'official' pattern.

However, Mary in Orlando, FL (one of my quilting buddies on About.com's Quilting forum), did some internet sleuthing and found directions on the Australian site, Oz Quilts Patchwork & Quilting  Yes, they are also selling hexagon templates on the site but the directions are in the middle of the page.


Jonna in Texas (another About.com quilting buddy) found this French site, which has excellent photographs.  Since a picture is worth a thousand words, you can just disregard the French text if you don't parlez vous.  :-)

One of the blogs that appears in Google Reader (my aggregator), showed a video of a fabric origami technique with a hexagon demonstrated by Ane Matos.   The You Tube video is in Spanish, but the demonstration is self-explanatory (and I suggest muting the playback so you can pay attention to the demo).

AND THEN .... it was a Light Bulb Moment (tm)!  If I could make the origami hexagon the proper size for the framed hexagon, it could be a very cute variation for a framed hexagon!

The paper templates that I had were for an inner 5" hexagon and an outer 7" hexagon.  I had absolutely no idea how much shrinkage the origami process would create, so I arbitrarily drew a 10" hexagon template.  Using that for my origami practice, I was astonished to find out that the finished hexagon was 5"!  Exactly what I needed for my own templates!

Here's my grand total of 3 framed hexagons ... the pink framed ones were my first practice ones and I tried out some of the decorative stitches on my sewing machine.

The maroon framed hexagon is obviously the origami one ... and turned out doggone cute!  :-)  I made a Very Small yo-yo to put in the center of the framed hexie ... an alternative would be a cute button or a small pre-made flower.

This isn't going to be my immediate next project; I have too many things already lined up for that BUT all my practice pieces and documentation have been filed away for future use.

Monday, November 15, 2010

"Lumiere de Noel"

Originally, I saw this pattern in a catalog.  It's a simple enough pattern ... done in a monochromatic color scheme,  Sawtooth Star variants are sewn in columns separated by a linear stripe fabric, all surrounded by a slab-o-border.  I clipped the picture with the intent of figuring out the yardage requirements on my own.  The pattern showcases Moda's "Lumiere de Noel" line of fabrics.

Then, whilst I was doing my research, I found pictures of the actual Moda fabrics used!  woo hoo!  Now I could see if I could find compatible fabrics in my stash.   I knew it wouldn't be an exact match but I was going for the "look and feel" of the pattern, not creating a replica.

More perusing of the internet uncovered LOTS of sites offering the quilt as a kit ... but I most definitely did NOT want the kit.  I even found a website that was selling the pattern only for about $3.00  ... and I bookmarked that site.  This was a real deal in terms of the price for the pattern and it would certainly save me a lot of time.

THEN .. I wandered on over to the Moda fabric site and to my astonishment, I discovered that Lumiere de Noel is a *freely available* pattern to download!  I'd like to say shame on the website that was *selling* the pattern, but I suppose they've done nothing illegal but it sure seems to me that they could make a link to the Moda site for the pattern since they were selling the fabrics too.   (On the Moda site, just scroll down until you see the "Lumiere de Noel" link.)

I saved the pattern and printed it off.  It contains not only pictures of the specific fabrics used, but yardage requirements and complete construction details.  There was nothing left out of the download.  I was extremely pleased to have found it!

I had previously found and purchased two "remnants" of a positive/negative design.  (The "remnants" were 2 yards EACH!).  I'm just a sucker for positive/negative fabrics, even if I don't have a project in mind for them.  When I saw Lumiere de Noel, I knew that I had a use for those fabrics!

I had *more* than enough of both of them so that they could be the main fabrics of the Sawtooth Star blocks.

The rest of the fabrics for the Sawtooth Stars also came from my stash ... toiles, neutrals, sparkles from previous quilts .. even remnants from a Daisy Kingdom pinafore that I made for my youngest Dear Daughter, when she was a mere squirt!  (Anyone remember Daisy Kingdom patterns & garment fabrics?  Gosh, I loved them .. still do.  My girls had a number of Daisy Kingdom garments and they loved twirling around in the full skirts).

This is where I am right now ... all the Sawtooth Star blocks have been made and I've bought fabric for the slab-o-border.  You can't see the entire top in the picture because I couldn't back away far enough to get the whole thing in the viewfinder! 

Also, only the 1st two columns are stitched together; the other columns are just pinned to a sheet, which is my 'design wall'.  You can see that I've left space between the columns for the sashing fabric.

At this point I need one more fabric:  the linear stripe that is used as the sashing between the Sawtooth Stars.  No quilt store in my immediate area (and there are 3 that I frequent) nor Joann's is stocking linear stripes in red/white or red/cream these days.   I *VERY* briefly thought about using my embroidery machine to create a linear stripe ... but the sashing is 70" long.  My biggest hoop is 7" long .. that means I would need to do *ten* hoopings just for one sashing.   If you look back at the pictures, you'll see there are FOUR sashings.  That's a total of 40 hoopings .. and although I love my daughters, I don't love them THAT much!  :-)  (yes, I am just that selfish.  :-)  )

More Googlings for the Moda linear stripe and I found it!  It comes in two flavors: red on "antique" white and red on "pearl" white.  Dear Daughter preferred the antique look, so that's what I ordered.  The online site showed that they had 5 yards left in stock; I only need 2.  I left instructions with my order that if the full 2 yards weren't available, the order would need to be cancelled.  I hope they have at least 2 yards!  :-)

Otherwise, I'll need to order from another site and will have to wait even more!  While this quilt isn't for Christmas, since I am >thisclose< to finishing, any delay in finishing the top would be excessively annoying.   I want to GET IT FINISHED!

The linear stripe fabric is then fussy cut to isolate the stripe and use that as the sashing. 

Because the fabric is 2 yards long, the sashings will be one straight cut of fabric ... I won't have to piece it.  I've pieced sashings before .. I've even pieced sashings and matched the patterns so that you really couldn't tell it had been pieced ... BUT this particular fabric has no convenient break point in the print that would allow for easy piecing.  I wouldn't look forward to needing to piece this fabric together.

I hope they have the 2 yards available!  (crossing fingers!)

Sunday, November 14, 2010

The Ultimate, Practical Christmas Tree

SewCalGal is running a Christmas quilt show starting November 14, 2010. 


This blog entry is my submission to the show, although the quilt itself was made in 2004.  Although this quilt has it's own webpage on my quilting website, Dread Pirate Rodgers, I am copying the information here, so it can be included in SewCalGal's Christmas Quilt Show.


The Ultimate, Practical Christmas tree  
(for apartment dwellers)  
made in 2004


I'm not quite sure how I allow myself to get into these situations, but here's another case of Real Life doing an end run around my plans to stick to my UFO pile.

Earlier this year, my oldest Dear Daughter, who is living in an apartment while she attends college, had bemoaned the fact that she had absolutely no space for a Christmas Tree and she was Very Sad. Being the supportive Mom that I am, I suggested that I could make her a quilted Christmas Tree wall-hanging as a substitute.  With further discussion, it evolved into a wall-hanging that she could actually hang real ornaments on and that real lights could be used. At that point, we just left the discussion where it was.

Over Thanksgiving, she was able to come home and the project was resurrected.


She drew a full-sized pattern for me to work from; we raided my stash (pitifully lacking in appropriate fabrics) and augmented with fabrics from 2 different local quilt stores.
 
I began working on it and steadily over the days, it began to take shape. Dear Daugher returned to school and I continued working on her wall-hanging.  I put an extra layer of batting in the snow boughs so they would be extra poofy.


Originally, my daughter wanted "branch shaped" quilting lines on the snow boughs, but after I showed her a picture of it, she decided that she liked the unquilted snow boughs better and could I please remove the quilting? [sigh]

(aside: isn't this picture awesome??  The light coming in from the side window really shows the poofy "snow covered" branches and reveals just how three-dimensional it is.  It also shows the branchy quilting I had done, which was ultimately rejected.)


Originally, the thought was to put ribbon loops on the tree so that real ornaments could be hung, but in practice, the ribbon loops looked awful. I substituted loops made from perle cotton. I found some extra tiny mini-tree lights, powered by a battery pack at JoAnn's. I made buttonholes in the wall-hanging where the lights could be pushed through to the front.


At night, with the mini-lights turned on, it looks very dramatic. The battery pack was placed in a pocket I sewed to the back of the quilt. Two hanging sleeves where made .. one obviously on the top, but another one on the bottom, so that another rod could be put there for weight ... to help hold the wall-hanging straight.

Addendum:  the quilt was delivered to Dear Daughter,  who has since moved several times.  I hope that this quilt has moved with her, even if all the boxes were never fully unpacked after each move.   When she finally settles in one place for "a while" and the contents of the boxes are rediscovered, I hope the quilt brings back fond memories. :-)

Merry Christmas, Catherine.  :-)


love, Mom

Monday, November 01, 2010

It's Nov 1st ... do you know who won the giveaway?

I wrote out .. by hand, mind you .. everyone who commented (and thank you for doing so!).  Crumpled each name into a little ball and tossed the paper ball into Mr. Pirate's winter hat.

Holding the hat out to Mr. Pirate, I asked him to pick a name.


(drumroll please) .....  and the winner is ..... Sewing Geek!


Sewing Geek .. whereever you are ... would you please email me your snailmail and I will pop the selvages into the mail to you!    Remember ... the project isn't 'for real' until we see pictures!  :-)


Friday, October 29, 2010

oh! oh! a giveaway!

I've seen a lot of selvage things in the quilt world lately.  Truthfully, they don't float my boat.  I've never saved selvages but when I went scrapbox diving today, I found a *modest* amount of scraps where the selvage was intact.

So, since *I* have no intention of doing anything with them, I have decided to play havoc with my surly reputation and GIVE THEM AWAY!  

Oh gosh ... I said that in my outside voice, so it must be true.  :-)

Therefore, if you would like to have a chance to win this *modest* amount of selvages, leave a comment (and be sure that your email is available, OK? ). 

For every commenter who has an email, I'll put that person's name in a hat and have Mr. Pirate do the honors.   The drawing will take place on Monday, November 1st .... what a way to start out the month!

Thursday, October 28, 2010

I can't make this stuff up

Mr. Pirate & I live in suburbia.  No doubt about it.  But we have an older lot ... it's almost an acre of flat land and just across the street (no sidewalks, mind you) is county.  But *we* are in the city limits.  Just barely.

And the only reason I mention this is that we also have chickens.  Mr. Pirate thought they would be a "good learning experience for the children"  (HA!) but now we keep them because Mr. Pirate just plain ol' likes them.  (He always did .... he just wouldn't quite admit it. :-)  )

Our chickens are cage-free and free range.  Heck, with an acre of land, why wouldn't they be?  :-)  Most of the time they are kept in their chicken yard but around 1-1/2 hours before sunset, we open up the gate to their yard and let them 'escape' onto the lawn and field.

And herein is the story .... this little dark Rhode Island Red hen got separated from her buddies.  She was cackling up a storm right outside my home office window.  I opened up the door that leads to the outside, stuck my head out and commented to the fowl creature that her friends were "that way" (pointing to the flock on the lawn) and remained standing quietly in the doorway.

Well, Miss Little Red Hen made her way over to the doorway, looked inside the room and you could SEE that she was intrigued by this new space.  I opened the door a little wider and quietly moved aside to give her more passage space and .. yup! ... into my office she came!

Eventually, I was able to *very quietly* sidle over to my desk where my camera was to capture the moment.

She thought the pickin's were slim ... why would anyone want to live here?  No bugs, no grain, no crumbles .. what a barren source of amusement!  So out she went!

Nope, life around here is never dull.  :-)

Tuesday, October 26, 2010

another finish: Equilateral Triangles

Earlier this year, whilst Lizzie was down for repairs, I went on a mad sprint of piecing tops. Now that family events and obligations are over, I am able to finally get to that pile of tops.

This top is made from 4" blocks, an equilateral triangle in a square block. I used Eleanor Burn's "Triangle in a Square" ruler set to make the blocks.

Lots of blocks.  A tremendous amount of blocks.  Uncountable number of blocks.

They were so very, very easy to make. :-)


Putting the blocks directly together in this orientation created a zig-zag path through the triangles.

Carla Barrett has a wonderful tutorial on some great swirly curly designs for sashings.  I've loved the basic one so much that I never got around to using any of the others.  With this quilt, I deliberately set out to use the zig-zag paths as a sampler of the other designs.


 The triangles themselves got a low-key squiggle design. :-)


The resulting texture on the back is just wonderful. :-)


For all the gory details, links and more pictures, please visit my web page for the Equilateral Triangles quilt.

Sunday, October 24, 2010

Propeller: an "antique" block

Back in May 2010, I found a block that would allow me to use up a LOT of bonus half-square triangles.   From my quilting friends, I found out what the name of the block was .. "Propeller", circa 1928.

I pieced the top and put it on my pile of Quilts to be Quilted.  Well, the day came when that quilt popped to the top of the List ... and I had no other immediate, non-quilting activities to distract me.  :-)

Being a small quilt (42"x62"), it was quick to quilt, although I had a lot of quilting going on.  Even with all that quilting, it is *not* stiff ... it's still nicely drapeable. :-)

While there are *some* pictures here of the quilt, for the ENTIRE saga, please surf on over to my web page, Propeller, and you'll be treated to my usual verbosity :-)  and lots of pictures.  LOTS of pictures.   I describe the thought/design process I used in the making of this quilt, problems encountered & solved. :-)


Although not proficient, I'm definitely getting *better* at this free-motion quilting thing!  I don't mind pantographs so much, but because of my specific set-up, it's a real pain to get to the back of Lizzie to do them, so I have been focusing on free-motion quilting.  It's simply wonderful to be able to do what (you think) you want where you want it! :-)

I really, really, *really* like the way this quilt has turned out!


For all the gory details, links and more pictures, please visit my web page for the Propeller quilt.


Friday, October 22, 2010

Turkey redux

heh ... redux. re-ducks. Except that they're turkeys. :-)

Last year, 'round about this time in fact, we had a flock of turkeys wander on by. I haven't a clue where they had originated. The Pirate family lives in suburbia, but a kinda/sorta "rural" suburbia ... we don't have sidewalks and we border on some large tracts of open land. We do have raccoons and 'possums and skunks and egrets and ... ::sigh:: chicken hawks ... so I *guess* it's not terribly surprising that a flock of wild turkeys happens by.

Interestingly, last year, they had a Very Low Profile around November 28th. :-)


But, by golly, here they are again!  Those are the hens in that picture.  

There's also a guard turkey ... I'm not that well-versed in turkey appearance to determine if the guard turkey is a hen or a tom.

The master bedroom in Casa Rodgers is upstairs.  When we emerge from our sanctuary and reach the ground floor, the sliding French doors to the deck are immediately in front of us.  It's quite a surprise to see these HUMUNGOUS turkeys on the deck first thing in the morning!

And rest assured, these birds are BIG.


Mr. Pirate & I casually wandered onto the front lawn and circled 'round to the back to get these pictures.  The turkeys didn't seem too concerned about our presence.  The hens kept on looking for tasty tidbit and the guard turkey remained vigilant.


It *was* interesting, however, when the turkey flock got within cackling distance of the chicken yard.  I wonder if each group wondered who the bizarre looking creatures were. :-)


And, of course, the burning question is .... will they still be here in late November?  :-)

Gobble, gobble!

Tuesday, October 19, 2010

A client's Angel quilt

Judy is a wonderful friend of mine.  She made a top for a friend of hers and I got the opportunity to quilt it.  Judy didn't want it over-quilted but preferred something on the lighter side.  This is really good because, at this point in my longarm experience, hyper-quilting isn't in my vocabulary. :-)

After auditioning several designs in different areas, we finalized a leafy column in the borders, a swirly-curly in the narrow inner border, a flower meander in the strip set blocks and a leafy meander in the print blocks.

I was happy with the quilting, even after discovering a strip in a strip set block went unquilted (oops ... that got fixed!).  I was able to achieve a uniform density and texture.  I think the quilt looks good from both the front and the back!


For all the gory details, links and more pictures, please visit my web page for Judy's Angel quilt.

Wednesday, October 13, 2010

just marking time ....

I finished quilting 2 queen sized client quilts.  I'm happy with them and hope my client is too!

Normally, I would be loading a new quilt (one from my big, ol' pile of Tops to be Quilted) and putting my Lizzie to work.  Whereas in times past, I would be on a piecing treadmill ... one right after the other .. because I truly do love creating tops ... *now* that I have my own longarm ... a wonderful Tin Lizzie 18 ... I realize that I can't be piecing all the time.  *Some* of that time needs to be spent quilting!

And I would happily be doing just that ... except ... Mr. Pirate & I are going on a small vacation.  I don't want to load a new top onto Lizzie because I won't be able to finish it before we leave.  I don't want to leave an unfinished quilt on Lizzie and  I also don't want to leave it up whilst we are gone.

We've been getting our gear ready for our trip, but in the evenings, I like to relax in front of the TV.  However, I can't JUST watch TV ... I need to be doing something productive.  It is during TV time that I do a lot of piecing.  Normally, I would have an on-going piecing project ... but not right now.  I don't need a new one since all those previously pieced tops are waiting to be quilted  (see the 2nd paragraph above)!

I'm convinced that if I simply watch TV, my mind (what is left of it) will turn to mush.  Who wants a mushy mind?  :-)

So, what to do??  I don't want to start a new pieced project, even though I have LOTS of them waiting to be started.  Then I remembered a scrap project I started who-knows-how-long-ago of a Double Wedding Ring.

Now, don't you start groaning on me!  I *love* Double Wedding Ring quilts!  I've made two of them already: one for our oldest Dear Daughter's high school graduation (2002) and our nephew's Christmas present (2009). 

Both of them were constructed using John Flynn's method.  I particularly love the arcs when they are made with individual wedges (as opposed to a single piece of fabric) but  Would Not Ever cut out all those wedges to make the arcs.  John Flynn's method allows you to create arcs with individual wedges but you start out with strip sets.  It completely circumvents the tedious cutting of small pieces but it is still a fairly laborious method.

Then, "a while ago", I realized that I could make those arcs using freezer paper piecing!!!  Oh, how utterly awesome!  I had learned the freezer paper piecing technique from none other than Judy Mathieson herself.  This method has ALL the advantages that paper piecing provides but NONE of the drawbacks because, since you aren't sewing *through* the freezer paper, there is *no paper to tear off afterwards*.  ::swoon::  As a cherry on top of the whipped cream, the freezer paper template can be reused over and over and over ....until fabric will no longer stick to it.  Her technique is worth it's weight in gold.


And I'm not exaggerating!  [Want to learn how to do it?  I have a tutorial on my website, appropriately titled, Freezer Paper Piecing.  Try it ... you will be Amazed.]

So, back to the Double Wedding Ring .... McCall's quilting has a free downloadable pattern for a Double Wedding Ring.  I copied the arc pattern to freezer paper and began making arcs.

Oh. My. Gosh.  Freezer paper piecing is SO MUCH EASIER than John Flynn's method!  I took down my box of 2" wide strips and began piecing the arcs together last night, whilst watching TV.  Each arc doesn't take very long and at the end of my marathon TIVO watching session (love TIVO!), I had 20 arcs.  Yes, TWENTY arcs ... all with individual wedges ... all scrappy.  I have lots more scraps and a couple of nights before we actually leave, so I anticipate making quite a few more arcs.  :-)

At this point, all I'm doing is mindless sewing of arcs.  It's just a way to be productive and creative whilst passing the time watching TV ... all because I don't want to get involved in a "real" piecing project right now.

I'm not thinking about the melons or the center sections ... I'm just making arcs. 

And having a FABULOUS time.  And using up stash strips. :-)

but mostly having a grand time.  :-)

the Crush

In wine grape growing regions of the world, the time of year when the grapes are harvested and wine-making begins is called 'the crush' .. because, well, the grapes are being crushed to start the wine making process.  :-)

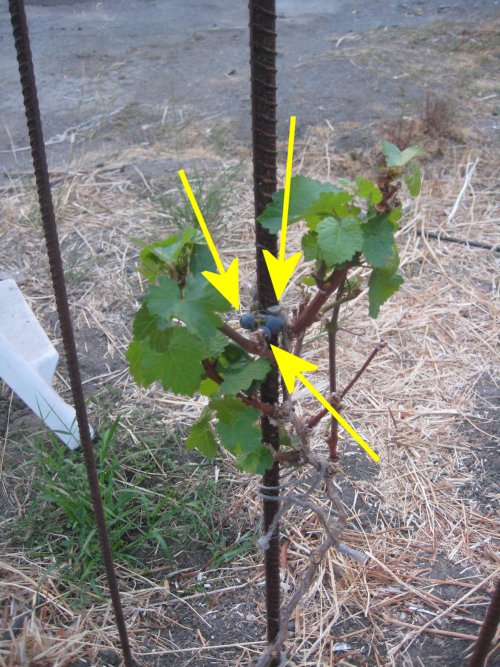
A couple of years ago, Mr. Pirate took a series of classes on viticulture .. the how and why of growing grapes, soil and pests and pest eradication.  He really enjoyed the classes.  At the end of the series, he bought (or maybe the students were given ... I don't quite remember) one vine plant.  Cabernet Sauvignon, if I remember correctly.

He planted his single, solitary vine in our front yard with the vague intent of planting a new vine (or two or three) every year.  He cultivated and fertilized and hugged it (not really) and took very good care of his vine.  And it thrived.  Lovely leaves and a strong, healthy stem.

The deer truly appreciated Mr. Pirate's care because they thought the leaves were Very Tasty.

Mr. Pirate was not amused.

Especially when, as soon as the leaves grew back, the deer came back.  Kinda like a bad penny.

Eventually, Mr. Pirate became smarter than the average deer and put a cylinder of chicken wire around his vine to protect it.

To show its appreciate for the good care and feeding of it, our one vine gloriously put forth its fruit this year!  All three grapes.  :-)  

In case you have difficulty finding the grapes, follow the yellow arrows in the picture.

Since I'm not a wine maker, I'm not sure how long after the crush of our 3 grapes we will have to ferment and age the product.  However, I am absolutely, positively convinced that it will be a Very Limited Production.  :-)

salut!

Sunday, October 10, 2010

During the Process Journaling/Notetaking

Way long time ago, I started capturing information and pictures of the quilts I made.  Before computers, this would have been done in a scrapbook of sorts.  I greatly admire physical scrapbooks and, indeed, have a LOT of resources and supplies to make scrapbook pages.  Have I done so?  Of course not.  :-)

What I *have* done is make website pages, Dread Pirate Rodgers, (i.e. virtual scrapbook pages) for almost every quilt and quilted thing that I've made.  Some of those pages have very skimpy information, as they were made (sometimes decades) after that fact.  I don't care WHO you are ... remembering specific details 25 years later is tough! :-)  (I also have pages for my sewn items .. not so many as I need dig the clothing out of the cedar chests.  My needlework projects is still on the List of Things To Do .... I have a lot of them, scattered all over.  It's going to be "interesting" rediscovering them.)

Those pages detail a LOT of the "why" did what I did and the process I went through, problems encountered & solutions arrived at, in the creation of the item.  Aside: I have to chuckle ... there is currently a movement in quilting Blogland to take the "Process Pledge", which is to talk about, well, the process you went through.  Heck, I was doing that even before there WAS a Process Pledge. :-)

I've always been more interested in where the inspiration came from, my thinking process during the creation of the item, what problems and solutions I went through and who the item was for and why it was important.  Much less important to me is is the "numbers": 57,000 square inch blocks, 1 million spools of thread, 98 thousand years  (yeah, a slight exaggeration, but you get my point).  Unless the quilt is ridiculously simple, EVERY quilt is involved.  We, as quilters, *get* that; what we don't know is the back story.  I think that is the important information to share, not the "numbers".

And that's why my webpages for my quilts are the way they are.

But, during the quilting process, I discovered that I needed to keep track of certain pieces of information. 

At a quilting retreat, one of our goodie bag items was a small notebook with attached pen.   I rarely carry a purse and initially thought "what a useless item for me", but I soon ate my words. :-) 

Thank you, my hostesses, for this WONDERFUL notebook!  :-)   Hugs and kisses to you!  :-)

I found that this small notebook, kept by my sewing machine was the IDEAL place to record the width & length of the quilt, so that I could then determine how much yardage I needed for binding.  I also added other information specific to that quilt that I might need later on for the "real" journal page on my website.

The drawback to this notebook is that the pages are tear-out.  And they do.  This notebook was never intended to be a permanent document, more of the sort of thing you toss into your purse, backpack, glove compartment whenever you need a small piece of paper to jot something down.  Over time, I discovered that as I was paging through it, the pages *were* coming out.  Just like they were supposed to.

Except that, many times, I wasn't READY for those pages to come out and be discarded!  I still needed the information.  Additionally, in the beginning, I wasn't as organized as I learned I wanted to be; I would put down the quilt information in any space that was available.  It was all very haphazard.  While I'm not always (OK ... usually never!) organized about many things, some things just drive me CRAZY when they are disorganized ... and quilting information is one of those things!

Eventually, I discovered that for each quilt I was working on, I really needed just a few numbers and memory joggers for posting the quilt. 

I printed out address labels for this small notebook so that all I needed to do was to write down the numbers.  Now each quilt that I would be working on would have it's own page.  No more Quilt A intruding on the real estate of Quilt B!  Everything was neat and tidy; my eyes were pleased.

(and then after I had printed out the labels, I realized I hadn't included check-off items for the posting!  aargghh!)

But this still didn't address the problem of the pages themselves becoming detached over time.  That is simply the nature of this kind of notebook.  So, I got to thinking what was it that I needed?

I liked the size; it was small.  Being small meant that it wouldn't take up a lot of space next to my sewing machine.  I wanted loose-leaf pages that I could replace.  A ringed binder would be fine ... but was a small binder that like available retail? 

Oh my, it was! :-)   At an office supply store, I found a 3"x5" ringed binder for which loose-leaf pages were available as refills.  Oh, hooray!

The green stickers you see on the inside cover are information to me for formatting the margins when I print out the pages and size information for certain types of quilts.

This particular notebook wouldn't be any good, however, unless I could put those small pages through my printer.  My printer is a Canon MX870.  It has a secondary, rear paper feed, which automatically centers the paper in the feeder. 


I use Word Perfect.  Go, Word Perfect!  :-) 

I formatted a 3"x5" page with the information I wanted and after a little tweaking for margins, I was able to successfully put those small 3"x5" pages through the rear feed AND all the printing came out exactly on the lines of the paper! 

Dang, am I clever or what?  :-)

So, now I have a notebook with the ability of have unlimited pages, pages that are "pre-printed" with labels for me to fill in.

Remember, this small notebook is not a proper journal ... it doesn't have the capability of putting pictures on the pages ... although I suppose I could print out a 3"x5" photo and place the photo in the appropriate spot.  Maybe I'll do that later.    This notebook is primarily for me, to be able to remember binding yardage requirements and did I really post the information to the places I want?  :-)

I haven't started using it yet but am eager to ... but first I gotta go get those tops quilted!  :-)

What memory joggers to you use to remind yourself of the information you need during the creation process?