

Boy, I tell ya, there's nothing like a deadline (even self-imposed) to compel you to get things completed! Here are the items that I finished, worked on or am still in the processing of finishing:
 A Tooth Fairy Pillow. A young son of friends of mine recently came home to enthusiastically announce that he had a "wiggly tooth!". I knew I had a machine embroidery design for a tooth fairy pillow and set about to make a Tooth Fairy Pillow for the youngster.
This was made out of mottled blue fleece, both front and back. The design came from Sew Teri-fic Designs on the Tooth Fairy Pillow page. There are several designs to download, so be sure to look for all of them.here is the angel, the verbage (for both woven AND fleece fabrics) and an applique pocket for the tooth/money.
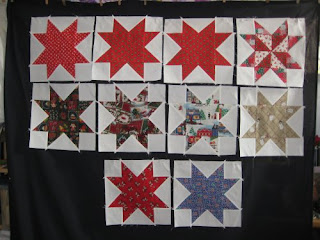 Oh My Stars! Quilt-a-long. Because I am deranged and have NOTHING ELSE TO DO ::snarf:: but, in reality because the resultant quilt is so doggone cute, I signed up to participate in the quilt-a-long that Sheila (of Thought and Found blog) of Cambridge, Ontario, Canada dreamed up. Sheila has been posting directions on the quilt requirements, directions for the basic sawtooth block construction and has now added a tutorial on the pinwheel center block.
I was at a break point on a quilting project and started making the basic Sawtooth Star in the 12" size. They are very easy to construct and I *just kept making them*. Eventually, I'll need 15 of the 12" size but there are several variations that Sheila intends to divulge ... I only have the basic and one (lonely) pinwheel block. I'll make more pinwheel blocks "soon" and even if I don't use all the 12" basic blocks in this quilt, they'll get used someplace.
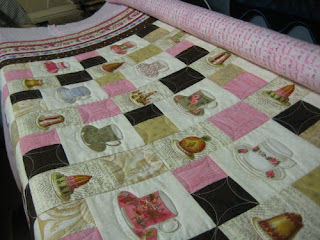 Teacups and Desserts. This past August 2011, during our annual camping vacation in the California Sierra Nevadas, I try to make an appearance at Country Cloth Shop, the quilt shop that is within reasonable driving distance from the campground. I was looking at the patterns they had on their spin racks and nothing really caught my interest. I wandered into their adjacent classroom and ... wowsers!! What was THAT quilt on the wall?? It was awesome! I was told it was the pattern, Take 5, (the original versoin, TP200) and it was on the spin rack.
Say what? I just LOOKED at the spin rack and sure did NOT see that quilt! Going back to the spin rack, it was pointed out to me. Sure enough, that was indeed the quilt in the classroom. You won't find the fussy cut version from the classroom on the pattern cover. It just goes to show you how vital that first impression is. I still think the quilt on the pattern cover is ... blah. But on the strength of the classroom version (wowsers!), I bought the novelty teacup fabric and the novelty fancy desserts fabric. The companion fabrics and the backing came from my stash.
 The top was rapidly pieced; this is a VERY EASY quilt to do! There is only ONE block made from the 5 fabrics; you simply turn the block in different directions to get the haphazard look. My fussy cut version is more structured.
It wasn't too long after we returned from vacation that the top was constructed. But then it languished. I was in more of a piecing mood than quilting mood and so the top was placed on the pile of Tops to be Quilted.
It waited and waited and waited. It wasn't until I had a break between client quilts this December that I decided to use the downtime to quilt Teacups and Desserts. I used Superior's King Tut as the quilting thread and their Bottom Line in the bobbin. What looks like a pieced border is really a striped fabric that I faux stitched in the ditch to give the appearance of a pieced border. I also outline stitched all the little flowers in the border. Yeah, really. :-) The larger brown border was quilted in a rope design, using Deloa Jones' "Rope a Dope" template. (Love it!)
 The patchwork in the interior had continuous curves in the blender fabrics; each and every single stinkin' teacup and dessert was outline stitched. Yeah, really. :-) But, BY GOLLY, I got the quilting finished! Woo hoo!
Bias Binding. Not only that, I also made the bias binding .. got that sewn, cut and pressed. The perimeter of the quilt was about 240 inches; 15 inches of yardage yielded about 290 inches .. more than enough for the job. It's ready to be used ... just as soon as I get the embroidered label done. (that's the item I'm still working on).
I have a tutorial on making continuous bias binding that is easy-easy-easy! The tutorial not only has directions on how to make continuous bias but charts on how much yardage to use to give you the perimeter inches of binding you need. You can obviously read the tutorial on the webpage but there is also a PDF version on the page for downloading your very own personal copy. :-)
 Pirate quilt labels. For the quilts that I keep for myself or give away as gifts, I have a "personalized" Pirate label that I print onto fabric. I was all out of them, so I printed out 4 more small ones. One of these will get used with Teacups and Desserts. I use this label to hand write all the journaling for the quilt. Not only the name of the quilt, who it's for, when it was done and by whom .. but, just as importantly, WHY the quilt was made. I like to hand write this information out because I think in future years, whoever comes to own my quilts will like to see the hand writing rather than printed documentation.
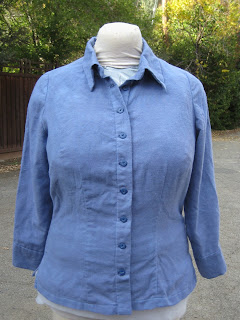 A fitted blouse. And the very last project that I was able to FINISH (another woo hoo!) was a fitted blouse for my oldest daughter. Dear Daughter #1 has ::ahem:: an ample figure. She has always had trouble finding ready-to-wear garments: if they fit across the bust, they are HUGE everywhere else. Buying a smaller size simply results in a shirt that won't close. It's very, very annoying.
I can sew reasonably well, but don't know how to alter patterns to extreme figure types. Minor fixes I can muddle through but if it comes to several aspects that need to be altered, I haven't a clue where to start. So, this past November 2011, she paid to have a basic blouse pattern fitted to her by a local seamstress, Jane Foster, who is FANTASTIC. Jane has forgotten more about sewing than I will ever know.
In very short order, Jane made a mock-up that FIT. It really fit! Everywhere. Perfectly. It was awesome.
 My job was to then trace that master pattern onto permanent tissue and sew a real test shirt. I had some pale blue lightweight flannel hanging around, so that became our test shirt. This shirt has man-tailored features such as a collar with stand, a front placket and long sleeves with a continuous placket. (Actually, strike that last one .. the pattern did NOT call for a continuous placket but instructed the sewer use a completely bogus technique of simply folding the sleeve over. Ugh. I put in the continuous placket).
Since the shirt is designed to be worn outside the trousers, it has side slits for ease of wear.
Departing from a man's shirt, this shirt does not have a back yoke; that will be a variation that I will incorporate into the next version.
With some trepidation, Dear Daughter tried on the shirt for the first time. Would it fit? Would it look good? Would it feel right? And OH MY GOSH!!! It fit *perfectly*! I was *so* relieved!
 And .. it looked wonderful! Well, at least, I thought so. It turned out that Dear Daughter doesn't care for long sleeves (what??!?!??) and she doesn't care for pale blue (what?!?!??!). Well, she relented to keeping the long sleeves .. since the shirt was made from flannel, long sleeves might come in cozy when the weather is crisp. Future shirts, however, will be short sleeved. The pale blue was transformed to the medium blue as seen here, by dyeing it. :-)
The last thing to be done was to place the buttonholes. These were marked with pins and then .... the shirt got put in the Pile of Projects To Be Finished. You see, I needed to buy the buttons. That involved a trip to Joann's and I have been too lazy to do so. :-)
BUT, Occupy Your Sewing Room gave me the swift kick I needed to do so and get those buttonholes made and the buttons sewn on. Ta da! The blouse is now completely FINISHED and ready to wear!
So, dang! I've done a LOT this past week .. and that included two non-sewing days ... one for allergies that absolutely laid me low and another day preparing for and celebrating a birthday. I know doggone well that without the Occupy Your Sewing Room challenge, I never would have finished these projects.
Thank you, Barbara of Cat Patches, for coming up with this delightful event! :-)

This was made out of mottled blue fleece, both front and back. The design came from Sew Teri-fic Designs on the Tooth Fairy Pillow page. There are several designs to download, so be sure to look for all of them.here is the angel, the verbage (for both woven AND fleece fabrics) and an applique pocket for the tooth/money.

I was at a break point on a quilting project and started making the basic Sawtooth Star in the 12" size. They are very easy to construct and I *just kept making them*. Eventually, I'll need 15 of the 12" size but there are several variations that Sheila intends to divulge ... I only have the basic and one (lonely) pinwheel block. I'll make more pinwheel blocks "soon" and even if I don't use all the 12" basic blocks in this quilt, they'll get used someplace.

Say what? I just LOOKED at the spin rack and sure did NOT see that quilt! Going back to the spin rack, it was pointed out to me. Sure enough, that was indeed the quilt in the classroom. You won't find the fussy cut version from the classroom on the pattern cover. It just goes to show you how vital that first impression is. I still think the quilt on the pattern cover is ... blah. But on the strength of the classroom version (wowsers!), I bought the novelty teacup fabric and the novelty fancy desserts fabric. The companion fabrics and the backing came from my stash.

It wasn't too long after we returned from vacation that the top was constructed. But then it languished. I was in more of a piecing mood than quilting mood and so the top was placed on the pile of Tops to be Quilted.
It waited and waited and waited. It wasn't until I had a break between client quilts this December that I decided to use the downtime to quilt Teacups and Desserts. I used Superior's King Tut as the quilting thread and their Bottom Line in the bobbin. What looks like a pieced border is really a striped fabric that I faux stitched in the ditch to give the appearance of a pieced border. I also outline stitched all the little flowers in the border. Yeah, really. :-) The larger brown border was quilted in a rope design, using Deloa Jones' "Rope a Dope" template. (Love it!)

Bias Binding. Not only that, I also made the bias binding .. got that sewn, cut and pressed. The perimeter of the quilt was about 240 inches; 15 inches of yardage yielded about 290 inches .. more than enough for the job. It's ready to be used ... just as soon as I get the embroidered label done. (that's the item I'm still working on).
I have a tutorial on making continuous bias binding that is easy-easy-easy! The tutorial not only has directions on how to make continuous bias but charts on how much yardage to use to give you the perimeter inches of binding you need. You can obviously read the tutorial on the webpage but there is also a PDF version on the page for downloading your very own personal copy. :-)


I can sew reasonably well, but don't know how to alter patterns to extreme figure types. Minor fixes I can muddle through but if it comes to several aspects that need to be altered, I haven't a clue where to start. So, this past November 2011, she paid to have a basic blouse pattern fitted to her by a local seamstress, Jane Foster, who is FANTASTIC. Jane has forgotten more about sewing than I will ever know.
In very short order, Jane made a mock-up that FIT. It really fit! Everywhere. Perfectly. It was awesome.

Since the shirt is designed to be worn outside the trousers, it has side slits for ease of wear.
Departing from a man's shirt, this shirt does not have a back yoke; that will be a variation that I will incorporate into the next version.
With some trepidation, Dear Daughter tried on the shirt for the first time. Would it fit? Would it look good? Would it feel right? And OH MY GOSH!!! It fit *perfectly*! I was *so* relieved!

The last thing to be done was to place the buttonholes. These were marked with pins and then .... the shirt got put in the Pile of Projects To Be Finished. You see, I needed to buy the buttons. That involved a trip to Joann's and I have been too lazy to do so. :-)
BUT, Occupy Your Sewing Room gave me the swift kick I needed to do so and get those buttonholes made and the buttons sewn on. Ta da! The blouse is now completely FINISHED and ready to wear!
So, dang! I've done a LOT this past week .. and that included two non-sewing days ... one for allergies that absolutely laid me low and another day preparing for and celebrating a birthday. I know doggone well that without the Occupy Your Sewing Room challenge, I never would have finished these projects.
Thank you, Barbara of Cat Patches, for coming up with this delightful event! :-)
Dang your right, you had a fabulous week. I just love the teacup quilt. It's such a great feeling to have projects behind you. Let the enjoyment phase begin!
ReplyDelete:-)
what a busy week you had. nice work
ReplyDeleteHello,
ReplyDeleteSome beautiful projects. Especially love the teacup quilt.
Happy days.
Bev.xoxo