

I've created a new page ... it's on the top, right above the date of the latest post. It's labeled "Little Shoppe of Goodies" and that's where I am going to list items I have for sale.
Right now, there are a bunch of books listed ... quilting, embroidery, sewing, history .. both softback and hardbound. I have *SO MANY* books, magazines and patterns that even if I live past all human expectancy, I will never, ever use these resources. So, I'm giving YOU the opportunity to have them.
Gosh, aren't I generous? :-)
In the future, I may list surplus fabric from my stash or even quilts that I've made ... but I haven't made my mind up about those items just yet.
Although I have looked at these books and admired them greatly, I haven't actually used any of them. The insides of all the books are in pristine condition although the outer edges of the covers and/or pages may have minimal shelf wear.
There are a couple of books that I'd like to bring to your attention, simply because they are unusual or I know the author is highly regarded:
* Plain & Fancy: American Women and Their Needlework, 1700-1850 by Susan Burrows Swan. This is a historic telling of the social history of women and the evolution of stitchery. More than 150 photographs and illustrations. Price: $5.00
* Patchwork Puzzle Balls by Jinny Beyer. These are delightful soft, perfectly round 'grab' balls suitable for indoor play, decorative accents, holiday ornaments, baby toys or stress balls. Nine fast, easy patterns and 4 challenge patterns. These balls require only basic sewing skills; no math! If nothing else, the photography is exquisite. Price: $6.00
* Civil War Women: Their Quilts, Their Roles, Activities for Re-Enactors by Barbara Brackman
Price: $17.00
* The Art of Machine Piecing by Sally Collins. Sally is the MASTER of miniature piecing. I've seen her quilts up close and personal. They are AMAZING. This book has patterns for 49 traditional blocks in 3", 4" and 6" sizes. There are instructions for making a sampler quilt from all 49 blocks. If you like miniatures or want to learn how to perfectly piece miniatures, then this book is for you. Price: $15.00
* Start Quilting with Alex Anderson: Six Projects for First-Time Quilters, 2nd Edition. Are you just starting out? Or do you know someone who is? Alex Anderson is one of the BEST teachers and this book will get you started on the right foot. Price: $2.50
* Artful Applique: The Easy Way by Jane Townswick. Do you like applique? This book gives detailed, step by step instructions for 16 gorgeous 9" blocks of flowers, birds, leaves, wreaths and vines. Instructions for appliqueing points, curves, narrow stems & vines. Price: $6.50
There are many other books that are extremely inexpensive. All of them are nifty. :-)
Subscribe To

 Posts
All Comments
Posts
All Comments
Saturday, January 29, 2011

Monday, January 24, 2011
Bias Giveaway Results
I have to admit that I am amused. :-) There were a grand total of 3, count 'em, THREE comments from readers who wanted a chance at the 1.5" bias. Each of them had a 33.3% chance of winning. Pretty good odds!
I used random.org to generate a random number between 1 and 3 (inclusive) for me. Heh ... seems kinda silly, doesn't it? But, everyone can rest assured that a true random number *was* produced. :-)
 Without further ado .... Mimi! You are number 3! I'll send you an email to let you know (if you don't read it here) that you won. Would you please send *me* an email with your snailmail? (pirate AT value DOT net) Do *not* post it in a comment! I don't want your address to be visible all across the internet!
And then there's Quiet Quilter & Peach Rainbow .. dang ... it's so disappointing when you lose. BUT ... I have a consolation prize for both of you, if you are interested. I have two other bias bundles (smaller amounts); one is 1.25 inches and the other is 1 inch.
Conceivably, the 1.25 inch bias could be used for very, very TINY bindings .. wider if you use it as a single fold binding. The 1 inch bias could be used as single fold binding OR (as I used it) for a decorative, accent flap right next to the binding.
So, QuietQuilter and Peach Rainbow ... do let me know if you are interested in one of the other bundles by email and, if so, please include your snailmail. :-)
As for a 'normal' blog entry .. yeah .. I gotta get back to doing that. I have some tops that I've finished that would be good fodder for a blog. :-)
I used random.org to generate a random number between 1 and 3 (inclusive) for me. Heh ... seems kinda silly, doesn't it? But, everyone can rest assured that a true random number *was* produced. :-)
And then there's Quiet Quilter & Peach Rainbow .. dang ... it's so disappointing when you lose. BUT ... I have a consolation prize for both of you, if you are interested. I have two other bias bundles (smaller amounts); one is 1.25 inches and the other is 1 inch.
Conceivably, the 1.25 inch bias could be used for very, very TINY bindings .. wider if you use it as a single fold binding. The 1 inch bias could be used as single fold binding OR (as I used it) for a decorative, accent flap right next to the binding.
So, QuietQuilter and Peach Rainbow ... do let me know if you are interested in one of the other bundles by email and, if so, please include your snailmail. :-)
As for a 'normal' blog entry .. yeah .. I gotta get back to doing that. I have some tops that I've finished that would be good fodder for a blog. :-)
Saturday, January 22, 2011
Oh! a give-away!
I like making bias to use for my double fold binding for my quilts. A bias binding, especially double fold, is absolutely the most durable edge treatment you can put on a quilt.
I have a tutorial on how to easily make yards and yards of bias, all neatly diagonally seamed, in one continuous strip. It's just amazing how convenient this technique is. I sure didn't invent it but happily pass my tutorial along to the sewing community. (and just FYI, that last seam? where you join the two tails of your binding? I have a SUPER easy tutorial to get it correct every doggone time! That seam will be FLAT and indistinguishable from any other seam in the binding. I grin to myself every time ... it's just that clever. :-) )
However, this blog entry is not about my tutorials ... although they *are* awesome. :-)
THIS entry is about the bias I've made. Because it's just so danged easy to make bias (with my tutorial!), I always make my own bias, whether for binding or for piping or inserts or whatever. Generally speaking, I end up making more bias than I need .. which is better than not having enough. All of the leftover bias gets rolled up and put in to a cubby. I have vague ideas of using it for Celtic knotwork, applique designs, crazy quilts, anything and everything.
But have I actually gone back and USED any of it? Rarely. Those rolls of bias sure do look pretty, though. :-)
Well, one of my quilting associates mentioned that she is facing the arduous task of making bias to finish off her charity quilts. I had a Light Bulb Moment ™! If she wanted them, I could send her my 2-1/4" & 2" bias for her charity quilts! She does, so I am. I'm happy they are finally going to be used up.
 However, I still have quite a collection of bias of other widths and this is where the subject of today's blog is ... a giveaway. I sorted all my bias into whatever widths they were and this is the pile of 1-1/2" bias.
I know realize that I am never, *never*, NEVER going to get around and use all this bias. It's just not going to happen. So .... I would like to give them away to someone who actually has a use for them.
This pile is mostly custom-made bias by me. Some of it is still flat. Some has already been folded and pressed in half lengthwise, so it's ready for being used as double-fold binding. There's even some "vintage" store-bought bias, purchased before I knew how to make my own.
What can you use it for? Well .. *really* narrow quilt binding for one. Make bias tubes for Celtic knotwork or applique work. Accents for quilt blocks. Use your imagination.
If you would like a chance at winning this collection of 1-1/2" wide bias, leave a comment. I'll pick a winner on Monday morning, January 24th.
Any takers? :-)
I have a tutorial on how to easily make yards and yards of bias, all neatly diagonally seamed, in one continuous strip. It's just amazing how convenient this technique is. I sure didn't invent it but happily pass my tutorial along to the sewing community. (and just FYI, that last seam? where you join the two tails of your binding? I have a SUPER easy tutorial to get it correct every doggone time! That seam will be FLAT and indistinguishable from any other seam in the binding. I grin to myself every time ... it's just that clever. :-) )
However, this blog entry is not about my tutorials ... although they *are* awesome. :-)
THIS entry is about the bias I've made. Because it's just so danged easy to make bias (with my tutorial!), I always make my own bias, whether for binding or for piping or inserts or whatever. Generally speaking, I end up making more bias than I need .. which is better than not having enough. All of the leftover bias gets rolled up and put in to a cubby. I have vague ideas of using it for Celtic knotwork, applique designs, crazy quilts, anything and everything.
But have I actually gone back and USED any of it? Rarely. Those rolls of bias sure do look pretty, though. :-)
Well, one of my quilting associates mentioned that she is facing the arduous task of making bias to finish off her charity quilts. I had a Light Bulb Moment ™! If she wanted them, I could send her my 2-1/4" & 2" bias for her charity quilts! She does, so I am. I'm happy they are finally going to be used up.

I know realize that I am never, *never*, NEVER going to get around and use all this bias. It's just not going to happen. So .... I would like to give them away to someone who actually has a use for them.
This pile is mostly custom-made bias by me. Some of it is still flat. Some has already been folded and pressed in half lengthwise, so it's ready for being used as double-fold binding. There's even some "vintage" store-bought bias, purchased before I knew how to make my own.
What can you use it for? Well .. *really* narrow quilt binding for one. Make bias tubes for Celtic knotwork or applique work. Accents for quilt blocks. Use your imagination.
If you would like a chance at winning this collection of 1-1/2" wide bias, leave a comment. I'll pick a winner on Monday morning, January 24th.
Any takers? :-)
Thursday, January 20, 2011
Just fussin' around
A couple of posts ago, I wrote about a throw pillow I had made from felt circles. The background for that pillow was a scrappy combination of neutral diamonds. It turned out that the neutrals that I chose were *really* close in value and after I put them all together, you just couldn't see any difference at all! What showed up was the stitch-in-the-ditch quilting. Attractive, but not quite what I had in mind.
 So, I pulled out the next bin in my stash and cut more diamonds from gold-toned fabrics. Still neutral but with more color. Since I was just messing around, I didn't want to commit any *real* yardage, so I just cut as many diamonds from the appropriately colored scraps as I could. Some colors had more diamonds than others.
I must admit I have a real problem doing "random". My mind (as chaotic as Mr. Pirate claims that it is) doesn't DO random. So, I fell back to an orderly, columnar arrangement, which is where I ran into problems. Because I didn't have a LOT of a variety of colors, what I ended up with was a long, skinny rectangle ... good for a wall-hanging, but not what I wanted.
 Then it occurred to me .. what DID I want? And ya know? I didn't know. LOL! :-) More messin' around ensued and I decided that I would make throw pillows out of what I had.
Here are the works-in-progress ... 2 mostly square pillow tops and one rectangular pillow top (just for variety). Gosh, one of these days, I just might get *really* wild and do a circular pillow!
 I still need to put "something in the middle" ... applique, embroidery .. something .. but I haven't decided yet. I'm thinking this would be an excellent opportunity to play around with my Sizzix die cuts.
I own the original Sizzix, which has a limit to the size of the dies it will accept.
BUT, I fortunately have a neighbor who is into scrapbooking and making greeting cards BIG TIME. She has the Sizzix Big Shot Express, which is the *electric* version. Wowsers, it's awesome having the die cut machine move the dies for you! :-) She lets me use her Big Shot Express when I need it, as well as any of her dies that I find interesting. In return, I have purchased some dies for use with the Big Shot that I *hope* will be suitable for applique and she will certainly be able to use my dies.
And I'll wait until Joann's has a sale on pillow inserts before I get them, since I don't "need" these pillows for any particular occasion or any specific person.

I must admit I have a real problem doing "random". My mind (as chaotic as Mr. Pirate claims that it is) doesn't DO random. So, I fell back to an orderly, columnar arrangement, which is where I ran into problems. Because I didn't have a LOT of a variety of colors, what I ended up with was a long, skinny rectangle ... good for a wall-hanging, but not what I wanted.

Here are the works-in-progress ... 2 mostly square pillow tops and one rectangular pillow top (just for variety). Gosh, one of these days, I just might get *really* wild and do a circular pillow!

I own the original Sizzix, which has a limit to the size of the dies it will accept.
BUT, I fortunately have a neighbor who is into scrapbooking and making greeting cards BIG TIME. She has the Sizzix Big Shot Express, which is the *electric* version. Wowsers, it's awesome having the die cut machine move the dies for you! :-) She lets me use her Big Shot Express when I need it, as well as any of her dies that I find interesting. In return, I have purchased some dies for use with the Big Shot that I *hope* will be suitable for applique and she will certainly be able to use my dies.
And I'll wait until Joann's has a sale on pillow inserts before I get them, since I don't "need" these pillows for any particular occasion or any specific person.
Friday, January 14, 2011
More Finishes.

However, the reception was quite different than what I expected. Graciously received but not liked. After some discussion, we determined that it just wasn't liked (one specific reason and a couple of general ones). Curiously, I was not unhappy eventhough I had thought it would be a real hit. The one specific reason was the picture I had put in the center ... but even with it's removal, the top was still not liked. (I've blanked out the center image in the above photo.)
Upon ruminating, I have decided that I *will* finish the top and put it up for sale. I hope I will be able to connect with a buyer.
During the construction, I accumulated a LOT of half-square triangles, as all of the blocks with pictures are made snowball-style. The half-square triangles were of a sufficiently decent size that there was now way I could toss them. :-) I was left with ANOTHER unintended project: use up the half-square triangles.
This entailed an internet search and ended in my good friend Marcia Hohn's "Quilters' Cache" website. I swear, if her site doesn't have a block, it doesn't exist anywhere! I found "Carpenter's Wheel" and was able to make THREE blocks from the surplus half-square triangles. A quick trip to Joann's and I obtained some more of the necessary fabric for a fourth block ... luckily, both fabrics are a standard on the calico wall.

All the applique was needle-turn. Since I found a technique for needle-turn applique that I like (from Pacific Rim Quilt Company's two fabric quilt line of patterns), I no longer avoid applique. I am a happy camper when it comes to applique. [You can see the first project I made from their pattern here. The technique is AWESOME.]
Eventually, the applique was finished and I pinned the first border to the center medallion of Carpenter's Wheel blocks. Then I hung it up on my design wall to admire.
And it looked weird ... but in a good way. It was different from my EQ graphic ... how?

The problem with EQ version? When the cluster of green diamonds is next to the sawtooth border, there is a lot of empty space between the sawtooth blocks and the swirly applique. This simply did not register with me.
But look at the physical quilt above (yes, the quilt is too long for my design wall, so the bottom border is dragging on the floor). You can see that the empty space is now at the outer edges of the borders, which is more visually pleasing ... at least to me. Since it's my quilt, that is what matters. :-)
This Carpenter's Wheel top will now join its sibling tops in the pile of Quilts to be Quilted. ::sigh:: There are quite a few of them.
I really gotta get back to Lizzie to restart quilting. :-)
Monday, January 10, 2011
Felt circle overload
To refresh your memory, I made a Christmas tree felt pillow, copying one I saw in an upscale home dec & dust collector store. The Christmas tree is made from circles of felt.
Because I was a doofus and didn't really realize that I did not HAVE to cut ALL the circles on the Sizzix die (I could cut a piece of felt & position it on the *one* size of circle that I wanted ... knowledge comes late in life, ya know?), I had a whole MESSLOAD of different sized green felt circles. What could I possibly DO with them? I didn't want to make another Christmas tree. BTDT.
Well, I thought a stylized topiary would be kinda cute. And why not put it on a fabric background, rather than a felt pillow cover?

As I was finishing the posies, it occurred to me that a colorful piping to match the flower colors would be nifty. I love putting piping in seams; it's a terrific detail that doesn't take much time to do. You get a lot of bang for your buck. And as long as we were being colorful, why not edge the pillow in different colored Prairie Points? I like making Prairie Points. :-)

Normally, I like to put an inconspicuous zipper on the back of the pillow cover, at the bottom, so the cover can be removed for laundering. However, the seam allowance where the zipper would be sewn to was hugely bulky: the pieced background fabric (3 layers), the piping (2 layers), all the Prairie Points (4 layers each Point and the Points overlap). I didn't think I would be able to get a nicely applied zipper to that seam.
So, I simply sliced the backing fabric in two, about 3" from the bottom, just so I would have a seam to put the zipper in there. That worked out just dandy.
All the bulk in the seams was graded (cut to different levels so the bulk would taper off gradually instead of being a "cliff"), a slit was cut into the corners to the corner seam allowances could be lapped to make a better pillow corner.
 Also, please note ... my square pillow is *square*. Why is this significant? Well, most of the pillows I have seen (both retail and home-made) have dog-ear pillows ... (see picture at left). See how the edges of the pillow curve from corner to corner? That's not a good pillow. This happens because the pillow pattern is *square*. You need to alter the corners of the pattern to create an optical illusion of square corners.

It's an easy enough problem to fix though ... on your pillow pattern you simply remove part of each corner and curve the cutting line to the new corner. On the pattern, the new corner definitely curves *inward* and looks wrong. BUT, once you've inserted your pillow form (or stuffing the cover), those corners will be nice and square!
I'm rather pleased with the final result. :-) And I still want to make the topiary pillow from all those GREEN circles! :-)
Edited on 2/1/11 to add Rachel Hauser's "Blogger's Pillow Party" contest link -

Because I was a doofus and didn't really realize that I did not HAVE to cut ALL the circles on the Sizzix die (I could cut a piece of felt & position it on the *one* size of circle that I wanted ... knowledge comes late in life, ya know?), I had a whole MESSLOAD of different sized green felt circles. What could I possibly DO with them? I didn't want to make another Christmas tree. BTDT.
Well, I thought a stylized topiary would be kinda cute. And why not put it on a fabric background, rather than a felt pillow cover?
And then mid-stream, I switched gears. I haven't a clue why, but I did. Instead of topiary, which would USE UP my already cut green circles, why not make flower posies of different colored felt? It just didn't matter that I didn't HAVE any color of felt besides the leftover green ... that's what Joann's is for!

A trip to Joann's provided an entire rainbow supply of felt squares. I spent the better part of one evening using Sizzix to cut out the circles I needed (just the one size, this time!).
As for the fabric pillow cover, instead of using just a single piece of fabric, let's create a pieced background! Oh why not ... we can simply forget that there is a huge pile of tops waiting to be quilted. :-) So, I made some strip sets of a bunch of neutrals and cut a whole bunch of 60° diamond strips. Sewing those together gave me my background fabric. I sandwiched that and stitched in the ditch along all seam lines to quilt everything down, I didn't want a pattern, which might distract you from the flowers.
I drew circles on the pieced background ... these would be the shapes I would fill with my felt circles in the same way I created the Christmas tree. I free-form cut out some stems and machine stitched them down with one of my buttonhole stitches. I used my Leaves Galore ruler (since I have one) to cut out the leaves and they were stitched down also.
All the circles were filled with the felt circles, creating a 3D flower "posey". The circles were attached with a bar tack.

As I was finishing the posies, it occurred to me that a colorful piping to match the flower colors would be nifty. I love putting piping in seams; it's a terrific detail that doesn't take much time to do. You get a lot of bang for your buck. And as long as we were being colorful, why not edge the pillow in different colored Prairie Points? I like making Prairie Points. :-)

Normally, I like to put an inconspicuous zipper on the back of the pillow cover, at the bottom, so the cover can be removed for laundering. However, the seam allowance where the zipper would be sewn to was hugely bulky: the pieced background fabric (3 layers), the piping (2 layers), all the Prairie Points (4 layers each Point and the Points overlap). I didn't think I would be able to get a nicely applied zipper to that seam.
So, I simply sliced the backing fabric in two, about 3" from the bottom, just so I would have a seam to put the zipper in there. That worked out just dandy.
All the bulk in the seams was graded (cut to different levels so the bulk would taper off gradually instead of being a "cliff"), a slit was cut into the corners to the corner seam allowances could be lapped to make a better pillow corner.


It's an easy enough problem to fix though ... on your pillow pattern you simply remove part of each corner and curve the cutting line to the new corner. On the pattern, the new corner definitely curves *inward* and looks wrong. BUT, once you've inserted your pillow form (or stuffing the cover), those corners will be nice and square!
I'm rather pleased with the final result. :-) And I still want to make the topiary pillow from all those GREEN circles! :-)
Edited on 2/1/11 to add Rachel Hauser's "Blogger's Pillow Party" contest link -
Sunday, January 02, 2011
Quilting Endeavors of 2010
What exactly was accomplished, quiltwise, during 2010? (Oh, and a small disclaimer, the software that I used to create these montage pictures apparently has cropped some of the longer pictures so that all of the pictures could fit into a nice little pigeon hole. None of the quilts shown are really cut off, as depicted by the thumbnail!)
 Well, I finished and delivered 15 charity quilts. You can read about them on my Charity Quilts page.
 I finished 5 more charity tops, but they still need to be quilted.
The bottom 2 are oriented as they are supposed to be .. the stripes really do go horizontal on one and vertical on another!
No pages to read about them because they haven't been finished yet.
 On the personal quilting front, i.e. quilts that I kept for myself or given away as gifts, I completed 18. They are all different sized, ranging from placemats to throw-sized to queen-sized. I am very pleased to see that my longarm quilting really HAS gotten much better than from when I first started. :-) You only see 11 pictures here because the 2nd picture in the 3rd row is actually 8 quilts folded up (they are thick, quilted cage liners for my vet's office).
You can read about these quilts on my Quilting Page, just scroll on down, down, down to the 2010 section.
Oh wait .. that's not exactly correct ... I haven't updated that index page to reflect all of the quilts shown here. I have thumbnails of the quilts but not all the finished quilts have a page written for them yet!
For me, finishing the quilt is only PART of the process ... I still like to take pictures and document the process so that I can write a web page for each quilt. Goodness .. that's a whole other project in and of itself!
 And finally, there are the quilt tops that I finished piecing but haven't gotten around to quilting. There are 7 of them.
And in fact, although the picture is cropped, the last one truly is a "work-in-progress" and the top border is still being appliqued and the matching bottom border hasn't even been started yet!
That makes 33 completed quilts (charity & personals) and 12 completed tops waiting to be quilted.
 And finally, I quilted 4 quilts for commission! woo hoo!
But wait .. you see only 3 quilts here! What's with that? Well, I did two of the ladybug quilts, each with different quilting motifs. It was very interesting to see the difference that quilting makes. One of the ladybug quilts had highly customized designs and the other ladybug quilt was an edge-to-edge.
You can't see any of the quilting in these small thumbnails but they are quilted! :-) And no, pages for these quilts haven't been done either. I *told* you that making pages is a completely separate project! :-)


The bottom 2 are oriented as they are supposed to be .. the stripes really do go horizontal on one and vertical on another!
No pages to read about them because they haven't been finished yet.

You can read about these quilts on my Quilting Page, just scroll on down, down, down to the 2010 section.
Oh wait .. that's not exactly correct ... I haven't updated that index page to reflect all of the quilts shown here. I have thumbnails of the quilts but not all the finished quilts have a page written for them yet!
For me, finishing the quilt is only PART of the process ... I still like to take pictures and document the process so that I can write a web page for each quilt. Goodness .. that's a whole other project in and of itself!

And in fact, although the picture is cropped, the last one truly is a "work-in-progress" and the top border is still being appliqued and the matching bottom border hasn't even been started yet!
That makes 33 completed quilts (charity & personals) and 12 completed tops waiting to be quilted.

But wait .. you see only 3 quilts here! What's with that? Well, I did two of the ladybug quilts, each with different quilting motifs. It was very interesting to see the difference that quilting makes. One of the ladybug quilts had highly customized designs and the other ladybug quilt was an edge-to-edge.
You can't see any of the quilting in these small thumbnails but they are quilted! :-) And no, pages for these quilts haven't been done either. I *told* you that making pages is a completely separate project! :-)
Friday, December 17, 2010
Specialty Longarm rulers
Note: yes, there *are* pictures ... but you need to wade through the verbage first. Just sayin'. :-)
The big quilt show where I live is Pacific International Quilt Festival, held in the Fall of every year. It's honkin' big show. Really big. Not quite as big as Houston, but it does take a full day to cover all the vendors and another full day to give at least a cursory look at the quilts. If you want to study or admire the quilts, give yourself another day. :-)
This year, as in the past, I was able to attend with a fellow quilter. She's not a longarm quilter but graciously allows me to gush and pontificate about longarm topics. At least she doesn't roll her eyes when I'm looking at her. :-)
One vendor that I really noticed this year was the Quilter's Rule booth. The items that caught my eye were the templates/rulers that can be used with longarm machines. Since I'm really still a neophyte when it comes to longarm quilting, I'm always on the lookout for new and nifty toys that will make my quilting life easier.
I found two templates this year ... a tool that stitches circles *inside* the template and a tool that stitches a 5 line cable in a continuous stitch.
The circle tool .... it's one of several that allow stitching of circles of various sizes. I bought the set that will stitch circles from 1" to 4", in inch increments. What's the big deal about stitching circles? Well, in a nutshell, at some point your arm is going to be in the way of the machine.
Think of a full circle template. Plop that template down onto your quilt. Hold it there with one hand .. let's say at 9:00. Now, start stitching around the outside of the template ... say at 12:00 ... remember to hold that template firmly so it doesn't move! .. and when the machine head gets to 9:00 .. OOPS!! your arm is in the way. You need to stop stitching .. keep that needle in the down position to keep your place! ... move your arm elsewhere ... then resume stitching. If you are talented or lucky or if you've practiced enough, you'll be able to resume stitching without a noticeable break in the stitching.
The point being that, as long as you are stitching along the outside of the template, at some point, your arm is going to be in the way because you are stitching a 360° design. It's annoying.
Quilter's Rule has come out with a nifty line of nested rulers that will allow you to stitch the ENTIRE circle *inside* the template! It's a very ingenious design. (They have other shapes using this nested feature, but I only bought the circle template.) This means that as you are holding the template firmly, your arm never gets in the way .. you can stitch the entire circle without stopping.
The vendor manning the booth was doing demos and she showed me how to use this template. She had me hooked with just the basic circle! But she also showed me how to do variations, one of which she called "String of Pearls", which is a line of circles that just kiss each other.
I'm working on a quilt right now that I decided I would try the circle template. Actually, I was cleaning out my sewing room and rediscovered them. ::ahem:: I didn't realize they had been MIA for 3 months. :-)
I probably should have tested the template on a doodle cloth first, starting with stitching a single, stand alone circle. But, oh no ... I want to work on a quilt! This particular quilt has two narrow borders, 2" wide. I would put the 1" circles in a line in those two borders. Furthermore, I wanted to put a String of Pearls in the border. Nothing like cutting your teeth on the fancy stuff. :-)
Now when you use templates with a longarm, you need to push the template against the hopping foot while at the same time, pushing the hopping foot against the template. This keeps the machine nice and snug against the edge of the template for accurate stitching. Apparently I push quite firmly. :-) What I discovered is that I tended to move the circle template so that, when I needed to backtrack (necessary for the String of Pearls), I wouldn't always be exactly on the previously stitched line. But, I figure this is a case of Practice Makes Perfect and for my first attempt, I was pretty doggone pleased with the result.


The big quilt show where I live is Pacific International Quilt Festival, held in the Fall of every year. It's honkin' big show. Really big. Not quite as big as Houston, but it does take a full day to cover all the vendors and another full day to give at least a cursory look at the quilts. If you want to study or admire the quilts, give yourself another day. :-)
This year, as in the past, I was able to attend with a fellow quilter. She's not a longarm quilter but graciously allows me to gush and pontificate about longarm topics. At least she doesn't roll her eyes when I'm looking at her. :-)
One vendor that I really noticed this year was the Quilter's Rule booth. The items that caught my eye were the templates/rulers that can be used with longarm machines. Since I'm really still a neophyte when it comes to longarm quilting, I'm always on the lookout for new and nifty toys that will make my quilting life easier.
I found two templates this year ... a tool that stitches circles *inside* the template and a tool that stitches a 5 line cable in a continuous stitch.
The circle tool .... it's one of several that allow stitching of circles of various sizes. I bought the set that will stitch circles from 1" to 4", in inch increments. What's the big deal about stitching circles? Well, in a nutshell, at some point your arm is going to be in the way of the machine.
Think of a full circle template. Plop that template down onto your quilt. Hold it there with one hand .. let's say at 9:00. Now, start stitching around the outside of the template ... say at 12:00 ... remember to hold that template firmly so it doesn't move! .. and when the machine head gets to 9:00 .. OOPS!! your arm is in the way. You need to stop stitching .. keep that needle in the down position to keep your place! ... move your arm elsewhere ... then resume stitching. If you are talented or lucky or if you've practiced enough, you'll be able to resume stitching without a noticeable break in the stitching.
The point being that, as long as you are stitching along the outside of the template, at some point, your arm is going to be in the way because you are stitching a 360° design. It's annoying.
Quilter's Rule has come out with a nifty line of nested rulers that will allow you to stitch the ENTIRE circle *inside* the template! It's a very ingenious design. (They have other shapes using this nested feature, but I only bought the circle template.) This means that as you are holding the template firmly, your arm never gets in the way .. you can stitch the entire circle without stopping.
The vendor manning the booth was doing demos and she showed me how to use this template. She had me hooked with just the basic circle! But she also showed me how to do variations, one of which she called "String of Pearls", which is a line of circles that just kiss each other.
I'm working on a quilt right now that I decided I would try the circle template. Actually, I was cleaning out my sewing room and rediscovered them. ::ahem:: I didn't realize they had been MIA for 3 months. :-)
I probably should have tested the template on a doodle cloth first, starting with stitching a single, stand alone circle. But, oh no ... I want to work on a quilt! This particular quilt has two narrow borders, 2" wide. I would put the 1" circles in a line in those two borders. Furthermore, I wanted to put a String of Pearls in the border. Nothing like cutting your teeth on the fancy stuff. :-)
Now when you use templates with a longarm, you need to push the template against the hopping foot while at the same time, pushing the hopping foot against the template. This keeps the machine nice and snug against the edge of the template for accurate stitching. Apparently I push quite firmly. :-) What I discovered is that I tended to move the circle template so that, when I needed to backtrack (necessary for the String of Pearls), I wouldn't always be exactly on the previously stitched line. But, I figure this is a case of Practice Makes Perfect and for my first attempt, I was pretty doggone pleased with the result.

In the picture above, you can see the green centerline I chalked in .. this lines up with the guideline on the template. The top half of each circle is stitched twice; this is due to the technique necessary for String of Pearls. You can see that some circles are dead-on and some are slightly off.
[To stitch the String of Pearls, you first stitch a complete circle, stopping at the starting point. Then you *re-stitch* either the top or bottom half of the circle get to the point where you want the next circle to begin. In my case, I started stitching at 9:00, coming full circle back to 9:00. I then restitched from 9:00 to 3:00 ... at which point, the 3:00 position became the new circle's 9:00. Lather, rinse, repeat.]
The other nested shapes that stitched on the inside are diamonds, ovals, stars and a spider web! The oval one is pretty tempting.
Bottom line: I'm very happy with this template. I do have other, traditional full circle templates, which I can still use but I think it's going to be nice to have this option. The other available shapes offer me design options that I currently don't have and are worth looking into.
Then, the cable tool. This incredible tool allows the longarm quilter to use a *continuous line of stitching* to create a 5-line cable! Whoever thought of this template is a genius. The drawback is that it's a fiddly template to use. There are several pieces that must be removed (and replaced) in order to stitch the cable properly. It's not difficult but you do need to figure out how and where to hold the pieces so the hopping foot doesn't jump on top of the template. (It's scary when that happens!)
Once again, I didn't bother to practice on a doodle cloth and, as a result, the cable wasn't centered properly in the space. While instructions on how to USE the template are, thankfully, printed right on the template, there are no guidelines or directions (printed or on their site) on how to gauge positioning. (There are also some extra markings on the template that are not referenced in the printed instructions on the template. I intend on contacting Quilter's Rule for clarification.)
As for using the template, once I figured out where to hold it so that the hopping foot wouldn't jump on top of it, it allowed me to stitch out several 5-line cable segments that looked pretty doggone good for a first time! More practice will let me align the template properly so the lines that are re-stitched aren't obvious.

Bottom line: this template is fantastic! Allowing for the fact that there *are* loose pieces, this is a terrific tool.
In the picture above, you can see (at the bottom of the picture) the seam line that I used as my horizontal guideline. I didn't position the template correctly, so the last stitched arc extended past that seamline ... that was my mistake in not centering it. But, DANG! Don't those cables look terrific??? I'm really pleased with how they look from a distance! I figure, once the quilt comes off the frame, is washed and has a chance to wrinkle up, you won't notice most of my goofs. :-)
And I want to re-iterate ... that ENTIRE cable was stitched as a CONTINUOUS LINE. There was a tail to bury at the start and a tail to bury at the end ... and *that was it*. There were no other starts or stops along the way. Pretty doggone clever.
Wednesday, December 15, 2010
Drum roll, please! Accomplishments!
Y'all might have thought I have been doing a very good imitation of a slug. A sluggardly slug, at that. I've been talking about working on projects but not a whole lot in the way of pictures.
Well, this post is to show what I've been working on ... and in some cases .. completed!
First ... and no pictures here (because it's a Christmas present!) ... I have finished the hand-stitching for a quilt top. Whew. Because of household logistics, I was only able to work on this project on certain days and only during a certain window of opportunity. At last, this one is done! The actual quilting will be done after Christmas.
 Next: Lumiere de Noel. This is both a free pattern from Moda *and* a line of fabric. I liked the pattern but didn't want to spring for the fabric. Instead, I mostly used stash fabric ... the only fabric from the Lumiere de Noel line is the dark tan/red linear stripes. I just couldn't find anything, anywhere to substitute for it. But, the quilting for this is now FINISHED! woo hoo! I railroaded the top (i.e. the length of the quilt is parallel to the rails) so that I could quilt each column in one pass. I deliberately didn't quilt into the star points because I wanted them to be poofy. I hope they remain so after washing.
 I love, love, LOVE the border ... a two-arc swag with beadboard and a 4-lobed flower inside the swag. I *finally* learned how to do beadboard correctly! :-)
 I even like the corner treatment! :-)
Oh, I used Quilter's Dream Puff for the batting .. a first time for me. I'm looking for a poofy batting that will yield a cozy quilt capable of draping nicely. I hope that the Dream Puff will fit this requirement.
 Next: Carpenter's Wheel. When last we looked at the Carpenter's Wheel top, the 4 blocks had been sashed and to allow it to be a useable bed-sized quilt, I decided to put a border on the top & bottom. I am now working on the top border. This hand-appliqued scroll will be mirrored on the right side of the border. The bottom border will look the same as the top.
 Next: Dress Me Up. This is my current Forever Project and is a collection hand embroidered quilt blocks. This is dress #6. I have already started dress #7. There are 12 dresses in all.

Last: I was doing some Christmas shopping at an upscale do-dad store .. the store that has all sorts of lovely, lovely china, crystal, flatware, accessories, kitchenware .. even furniture ... that will never see the light of day in my household. :-) But I do so enjoy looking at their stuff.
Whilst wandering around, admiring all the lovelies, I saw a felt pillow with a three dimensional Christmas tree on it. Upon closer inspection, the Christmas tree was made up of lots of little felt circles that had been tacked onto the felt background but horribly bunched together so that they stood cheek-by-jowl with each other and made a wonderfully dense Christmas tree. What an incredibly fantastic idea!
And why should I BUY it, when so clearly I could MAKE it? :-) Well, in retrospect, it probably would have been less expensive to buy it. :-) Also, I was only willing to consider making it myself because I have a Sizzix machine (the original one) which would make cutting all those felt circles a snap. Alas and alack, I don't have a circle die the right size. To the rescue comes my neighbor, Angie, who has a Big Shot Pro Sizzix machine. This one takes the bigger dies *and is electric*!! which means that you do NOT have to crank a handle to get the dies through. ::swoon:: I fell in love. Cutting out all those circles was absolutely effortless.
If I didn't have access to a Sizzix machine & a circle die, there is NO WAY, José, that I would have EVER cut all those felt circles by hand.
I didn't have any felt, therefore I needed to buy some. The tree was made up of LOTS of different shades of green felt. Wool felt. Did you know that wool felt is deadly expensive? That was a revelation to me. I used acrylic felt instead. :-) Did you know that there are not a whole lot of DIFFERENT shades of green felt available? Joann's had 6, but 3 of the greens were so close in color as to be indistinguishable from each other. I opted to add a yellow for a little "sparkle".
Luckily, I already had a pillow insert, otherwise, I would have had to buy that also.
While I was examining the store pillow (without trying to LOOK like I was inspecting it), I saw how the tree was constructed but was unwilling to really take the time to count out the rows and spacing .. so I just kinda guesstimated. Back on the home front, I cut out the felt background, made a triangular outline shape for the tree and pencilled in a grid. One felt circle was tacked to each intersection.
Since I did only a cursory inspection of the store pillow, it turned out that I made my grid MUCH TOO DENSE and my pillow has many MORE felt circles than the store pillow! Ah well ... better than being too sparsely populated. And I think it turned out cute.
Now, since I have lots of green felt circles left over, I'm collecting ideas of what to do with them. Any suggestions are gratefully requested. :-)
And that is what I've been working on lately. :-)
Next up:
Well, this post is to show what I've been working on ... and in some cases .. completed!
First ... and no pictures here (because it's a Christmas present!) ... I have finished the hand-stitching for a quilt top. Whew. Because of household logistics, I was only able to work on this project on certain days and only during a certain window of opportunity. At last, this one is done! The actual quilting will be done after Christmas.


Oh, I used Quilter's Dream Puff for the batting .. a first time for me. I'm looking for a poofy batting that will yield a cozy quilt capable of draping nicely. I hope that the Dream Puff will fit this requirement.


Last: I was doing some Christmas shopping at an upscale do-dad store .. the store that has all sorts of lovely, lovely china, crystal, flatware, accessories, kitchenware .. even furniture ... that will never see the light of day in my household. :-) But I do so enjoy looking at their stuff.
Whilst wandering around, admiring all the lovelies, I saw a felt pillow with a three dimensional Christmas tree on it. Upon closer inspection, the Christmas tree was made up of lots of little felt circles that had been tacked onto the felt background but horribly bunched together so that they stood cheek-by-jowl with each other and made a wonderfully dense Christmas tree. What an incredibly fantastic idea!
And why should I BUY it, when so clearly I could MAKE it? :-) Well, in retrospect, it probably would have been less expensive to buy it. :-) Also, I was only willing to consider making it myself because I have a Sizzix machine (the original one) which would make cutting all those felt circles a snap. Alas and alack, I don't have a circle die the right size. To the rescue comes my neighbor, Angie, who has a Big Shot Pro Sizzix machine. This one takes the bigger dies *and is electric*!! which means that you do NOT have to crank a handle to get the dies through. ::swoon:: I fell in love. Cutting out all those circles was absolutely effortless.
If I didn't have access to a Sizzix machine & a circle die, there is NO WAY, José, that I would have EVER cut all those felt circles by hand.
I didn't have any felt, therefore I needed to buy some. The tree was made up of LOTS of different shades of green felt. Wool felt. Did you know that wool felt is deadly expensive? That was a revelation to me. I used acrylic felt instead. :-) Did you know that there are not a whole lot of DIFFERENT shades of green felt available? Joann's had 6, but 3 of the greens were so close in color as to be indistinguishable from each other. I opted to add a yellow for a little "sparkle".
Luckily, I already had a pillow insert, otherwise, I would have had to buy that also.
While I was examining the store pillow (without trying to LOOK like I was inspecting it), I saw how the tree was constructed but was unwilling to really take the time to count out the rows and spacing .. so I just kinda guesstimated. Back on the home front, I cut out the felt background, made a triangular outline shape for the tree and pencilled in a grid. One felt circle was tacked to each intersection.
Since I did only a cursory inspection of the store pillow, it turned out that I made my grid MUCH TOO DENSE and my pillow has many MORE felt circles than the store pillow! Ah well ... better than being too sparsely populated. And I think it turned out cute.
Now, since I have lots of green felt circles left over, I'm collecting ideas of what to do with them. Any suggestions are gratefully requested. :-)
And that is what I've been working on lately. :-)
Next up:
- square up and bind Lumiere de Noel. Take pictures. Make webpage.
- continue working on the applique border for the Carpenter's Wheel
- make webpage for the Christmas pillow
contemplate next pieced projectNO! NO! NO! I need to load the next quilt top onto Lizzie and get some of those tops turned into QUILTS! No starting another pieced project!
Sunday, December 12, 2010
The Rubber Chicken is Shelved
We have chickens. We've had chickens for darn near 20 years. (egads, I can't believe it's been that long!) Not because *I* like chickens but because Mr. Pirate contended that it would be a good "educational experience" for our children.
Yes, that really does mean that *we* now take care of the chickens. :-) To be fair, our girls are now 27, 22 & 22 and don't necessarily live at home any longer. Mr. Pirate also likes chickens. I will admit to be vastly amused by the stupid creatures. :-)
 Our latest flock contains 2 Ameraucanas, which are a breed that lays colored shell eggs (color other than brown). Well, at least that is what the store labeled them as. There is conflicting information available as to exactly what is an Ameraucana, the ancestral Auracana and the 'mutt' Easter Egger chicken. ::shrug:: I really don't care ... our chickens look like pictures I've seen of Ameraucanas and so we shall call them. :-)
 We've had Ameraucanas before and knew that they produce green shelled eggs. This current batch has been recalcitrant about sitting down on the job. I've threatened to bring the Rubber Chicken into the hen house, to serve as an example of What Could Happen To You. I guess the threat worked because two days ago and today, we have collected a green egg. :-)
I haven't a clue which chicken is producing ... and they are covering for each other ... so I suppose that all of them are safe at this point. :-)
 Two days ago was the bumper crop of eggs so far ... we collected 10! In addition to the ordinary white Small size (between 35 & 43 grams) that our bantam chickens lay, we get a wide variety of brown shelled eggs (we get all different sizes: medium, large, extra large and jumbo) .. and now! our green shelled eggs!
One of the brown shelled eggs is noticeably darker than the other brown shelled eggs. We do have Maran chickens, which are supposed to lay "chocolate eggs", i.e. very dark brown shells. Since not all of our hens are laying at this point, I'm not entirely sure if the really dark egg in the picture above is one of the "chocolate eggs" or not.
 One of the hens has been named Roadrunner because that is EXACTLY what she looks like as she scurries from the other hens. She's one of the smaller hens and probably lays the medium sized eggs.
I haven't a clue what breed she is, since they all took off their name badges shortly after we bought them. Silly chickens. If they don't look like any pictures I see to identify them, then all I can say is that they are chickens! :-)
Yes, that really does mean that *we* now take care of the chickens. :-) To be fair, our girls are now 27, 22 & 22 and don't necessarily live at home any longer. Mr. Pirate also likes chickens. I will admit to be vastly amused by the stupid creatures. :-)


I haven't a clue which chicken is producing ... and they are covering for each other ... so I suppose that all of them are safe at this point. :-)
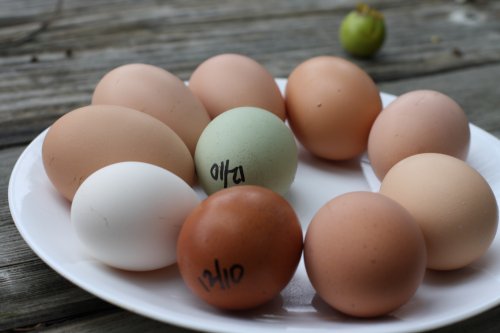
One of the brown shelled eggs is noticeably darker than the other brown shelled eggs. We do have Maran chickens, which are supposed to lay "chocolate eggs", i.e. very dark brown shells. Since not all of our hens are laying at this point, I'm not entirely sure if the really dark egg in the picture above is one of the "chocolate eggs" or not.

I haven't a clue what breed she is, since they all took off their name badges shortly after we bought them. Silly chickens. If they don't look like any pictures I see to identify them, then all I can say is that they are chickens! :-)
Saturday, December 11, 2010
What I Put Up With
Let's see ... I'm trying to work on a needle turn applique project. It's going to be the top and bottom border of a 60" wide quilt, of which I have already made the center 60" wide square. I vacate my chair to get "something" from "somewhere" and THIS is what I return to.
 Yes, that is Little Paw, occupying the EXACT spot where my applique is. See that placemat in the background? THAT is where I would like to her be ... I have grudgingly sacrificed the immediate useability of a placemat just so she could have some warm fabric between her furry little bottom and the surface of the cutting table. (The "sacrifice" is because after she sits on ANYTHING, that item immediately needs to be laundered. She is NOT a tidy cat.) Apparently, the placemat was deemed Unacceptable .. probably because the "sun" (in the form of the light source ... wasn't there.) Where was the sun? On my applique, hence that's the spot to be in.
All righty then ... let's abandon hand sewing for a while. Let's mosey on into my office. I can read my email ... catch up on my forum messages ... read the blogs I follow in Google Reader.
But hark! What do I see in my office? What IS that dark furry spot in the middle of my office chair??
 Why, none other than Sneaker, our Mighty Hunter. Obviously tuckered out from a day's honest labor of Hunting and Protecting Our Honor. I don't dare disturb the Mighty Beast of Armagossa for fear that my fetlocks could be severely menaced. Oh, and don't click on that link if you are easily grossed out. It most definitely contains Grisly Matter. ::yuck::
My two favored past times are temporarily put on hiatus .. I'm not quite sure what to do with my "free" time.
Don't suggest housework; that just ain't happenin'. :-)

All righty then ... let's abandon hand sewing for a while. Let's mosey on into my office. I can read my email ... catch up on my forum messages ... read the blogs I follow in Google Reader.
But hark! What do I see in my office? What IS that dark furry spot in the middle of my office chair??

My two favored past times are temporarily put on hiatus .. I'm not quite sure what to do with my "free" time.
Don't suggest housework; that just ain't happenin'. :-)
Tuesday, December 07, 2010
Why is it ....
that I am finding ALL these really nifty Christmas patterns to make NOW? It's not necessarily that the patterns were created now but I *found* them now.
For Christmas Day, we always use Mr. Pirate's Mom's cream-and-gold china. It's gorgeous. I have a dark royal blue tablecloth that sets the dishes off beautifully. I was thinking that a cream/gold/blue table runner in the middle of the table would be a nice change of decorations this year. I've found a couple of suitable ideas .... but where am I going to find the TIME to do them???
They aren't terribly complicated (well ... hopefully not TOO complicated :-) ) but I'm still finishing up a major Christmas present (no details ... "people" actually read this blog!) and all the other stuff for Christmas that needs to be done.
I can just see me starting a nifty table runner and getting MOSTLY done but not in any condition to be used. heh .. maybe I just should do that so that I will get it finished for *next* Christmas! :-)
For Christmas Day, we always use Mr. Pirate's Mom's cream-and-gold china. It's gorgeous. I have a dark royal blue tablecloth that sets the dishes off beautifully. I was thinking that a cream/gold/blue table runner in the middle of the table would be a nice change of decorations this year. I've found a couple of suitable ideas .... but where am I going to find the TIME to do them???
They aren't terribly complicated (well ... hopefully not TOO complicated :-) ) but I'm still finishing up a major Christmas present (no details ... "people" actually read this blog!) and all the other stuff for Christmas that needs to be done.
I can just see me starting a nifty table runner and getting MOSTLY done but not in any condition to be used. heh .. maybe I just should do that so that I will get it finished for *next* Christmas! :-)
Thursday, December 02, 2010
On the Design Wall: Carpenter's Wheel, part 2
When last I left you, Dear Readers, I was in a quandry as how to expand or use 4 large Carpenter Wheel blocks in a "useful" sized quilt. I didn't want to make any *more* Carpenter Wheel blocks.
 After letting the 4 blocks stew in the back of my mind (or what is left of it) for a while, I came up with this layout.
Putting a half-square triangle in the corners of of the block allows for a secondary design of a Shoo-fly block at the intersections.
The borders echo the outer band of the Carpenter's Wheel, although the green half-square triangles are darker.
Why? Well, I ran out of the light green and I had the darker stuff. :-)
At this point, the top is 60"x60", an excellent width for a "useful" sized quilt, but not nearly long enough. Therefore, a top & bottom border will be attached to give me the length I need.
Right now, according to the design I've done in Electric Quilt, I am going to put a large scale scroll applique in the top & bottom borders. I *think* I like the scroll design ... it was in Electric Quilt's library, making it very easy for me to use. Yes, sometimes I'm all about easy, especially when venturing into an area that is new to me, as applique is. :-)
I'm not showing the applique design right now because I just might change my mind. :-)

Putting a half-square triangle in the corners of of the block allows for a secondary design of a Shoo-fly block at the intersections.
The borders echo the outer band of the Carpenter's Wheel, although the green half-square triangles are darker.
Why? Well, I ran out of the light green and I had the darker stuff. :-)
At this point, the top is 60"x60", an excellent width for a "useful" sized quilt, but not nearly long enough. Therefore, a top & bottom border will be attached to give me the length I need.
Right now, according to the design I've done in Electric Quilt, I am going to put a large scale scroll applique in the top & bottom borders. I *think* I like the scroll design ... it was in Electric Quilt's library, making it very easy for me to use. Yes, sometimes I'm all about easy, especially when venturing into an area that is new to me, as applique is. :-)
I'm not showing the applique design right now because I just might change my mind. :-)
Monday, November 29, 2010
On the Design Wall: Carpenter's Wheel

These are pile of 16, which are the number I need to use in the block I eventually chose to use them up.

After using Google's Image search function, I settled on the Carpenter's Wheel block as the most suitable for using up my half-square triangles.
This particular pattern came from Marcia Hohn's Quilter's Cache and is the 'easy' version since it uses only half-square triangles and not the traditional Y-seams. However, after looking at other Carpenter Wheel blocks, I discovered that if you *also* put a half-square triangle at the outer 4 corners, you will get an interesting secondary pattern with or without sashing ... so I made that very slight alteration to Marcia's pattern.
Because Marcia's pattern very conveniently calls for 3-1/2" half-square triangles, all I had to do was find the complimentary third color to work with what I already had and sew *those* half-square triangles. The resultant block is a monster-sized 24"! :-)
Marcia's directions are VERY clear and VERY easy to do. The most difficult part was putting the correct half-square triangle in the correct place! :-)

I was able to make *3* 24" Carpenter Wheel blocks before I ran out of suitable greens. Because the original half-square triangles came from another project, I was also running dangerously low on those two colors (the light background and the deep coral); fortunately, they came from Joann's calico wall and they were still there! woo hoo! :-)
I also found, in the remnant bin at an additional 50% off, another medium green that will make the fourth and final Carpenter's Wheel block. I don't want to make any more 24" Carpenter Wheel blocks because 1) this was SUPPOSED to be an almost quick-and-dirty project to be done in-between others and 2) after the 4th Carpenter's Wheel block is made, I just don't want to be making any more.
It is at this point I am now stuck. I like to make "useful" size quilts, which normally translate into bed-sized quilts. I am also amenable to making a throw size from these 4 blocks ... but what layout? I can't quite use them as they are as the size isn't "useful". I love using Electric Quilt to help me with design choices but for this particular layout, I have discovered that I don't have the specific knowledge I need to do what I want ... and that is very annoying. I may be reduced to doing this old-school .. with paper cutouts! Fortunately, Electric Quilt can supply me with the blocks to cut out; I'll just move them around on my worktable. :-)

But what?? I'm still struggling with what to use.
Maybe I could repeat *half* of the Carpenter's Wheel over each block for the top & bottom borders for an 'arch' kind of look. But, I can't get Electric Quilt to give me the layout I want for the borders!

Or if I split the setting triangles into 2 pieces, maybe put a *quarter* of the Carpenter's Wheel in each small triangle?
See the outer sashing/border in the layout on the left? Electric Quilt cut the blocks at each corner off .. they are triangles instead of the squares that I wanted. That's one of the skills I don't have for Electric Quilt, so the layout looks odd. I just need to remember how I really want it to look.
And instead of finishing up this "quick and dirty" layout, I'm now still in the design phase! I just may let this one sit on the design wall for a while.
What I REALLY want to be doing is quilting "Lumiere de Noel" with Lizzie .. I have the batting, I have the backing ... but this Carpenter's Wheel project has waylaid me! :-)
Saturday, November 27, 2010
Can you contribute a Healing Heart for New Zealand?
You may be aware that New Zealand suffered a major mining disaster late this month at Pike River mine on the west coast of the South Island, resulting in the deaths of 29 miners. Many of these miners had young families.
Shirley Goodwin of New Zealand is spearheading and coordinating an effort to make quilts for the families involved.
From part of her blog of November 25th,
She posted more information later on ....
I used this as an opportunity to use some new (to me) techniques and patterns that I found interesting. Here are the blocks that I've made so far:

Shirley Goodwin of New Zealand is spearheading and coordinating an effort to make quilts for the families involved.
From part of her blog of November 25th,
I am part of Kiwiquilters, an email group for New Zealand quilters. We have a tradition, as do other quilting groups, of making Healing Hearts quilts for members and their families or friends who are suffering personal tragedy or serious illness.
Please consider making a block or several blocks for this cause. It doesn't matter that you don't know the people involved - neither do I. The love and support from strangers that is embodied in these quilts is something tangible that the families can get comfort from for years.
Here are the block details if you want to make some:-
- Cream background – calico is fine
- 6 ½” unfinished size (so they will be 6” finished)
- Pieced or appliquéd heart or hearts
- Any colours or patterns for the hearts. Some of the quilts will be for children, so children’s fabrics are fine too.
Bobbie (another New Zealand quilter) has kindly made a heart pattern in PDF format to download if anyone wants one.Please send to me at the address below. Thank you so much.Shirley Goodwin51 Charles StRangiora 7400New Zealand
She posted more information later on ....
Here are the answers to some questions I've received-
1. You can write on the blocks if you want - your country, name or whatever you would like to put.
2. If you are making an entire quilt top, you can make the blocks any size you like. The 6 1/2 " size is just for people making a couple of blocks so that we can standardise the tops.
3. If you have uncompleted quilt tops that you would like to donate, we are happy to take those.
They do not need to have hearts on them.
4. We will be making predominantly single bed sized quilts, big enough to cover the top of the bed. They do not need to come down the sides.
5. If you are putting heart blocks together before sending them to me, you can do them in different ways if you like. For example, you may want to join 4 blocks together, then surround them with sashing. There are no "rules"!
Thank you so much for contributing.
I used this as an opportunity to use some new (to me) techniques and patterns that I found interesting. Here are the blocks that I've made so far:
Won't you make some heart blocks also?
Tuesday, November 23, 2010
"Lumiere de Noel" top finished!

To recap: the free pattern is available at Moda. Lots of online and brick-and-mortar stores offer a kit with the 'official' "Lumiere de Noel" line of fabrics, but I wanted to make it from the fabric in my own stash ... I knew I could. :-)
One very prominent fabric is the linear stripe used as the sashing. I didn't have anything remotely like it and I discovered neither did any of my local quilt stores.
Fortunately, the Quilted Cottage in Santa Rosa, CA had it in stock and I ordered it online. The
fabric was safely delivered promptly, tossed into the washing machine, dried, fussy cut and sewn between the columns.
The outer slab-o-border was sewn on and the top was completed! (From my blog readings, I have discerned that my Australian compatriots refer to a "top" as a "flimsy" .... which I find to be a simply adorable term! and so apt! :-) )


And then.
And then.

See the round flower thingies? They line up nicely, don't they? Now look at the leaves below the flower thingies. One is upside down. !!!!!
There are *four* sashings from this linear stripe in the top. By sheer dumb luck ... since I wasn't even AWARE that the stripe was directional ... three of the sashings go in the same direction and the fourth goes the other way. I was soooo careful to make sure the flower thingies were aligned horizontally, it never occurred to me to check to see about anything being directional!! aaaarrrrgggghhhhh!
How. Very. Annoying.
I'm thinking that I'll just leave it has it is, as a testament to my hubris for gloating. Since Dear Daughter has already told me she doesn't read my blog (" ... but Mom, I *see* this stuff as you're making it ... "), she'll never notice it if I never tell her. :-)
Wednesday, November 17, 2010
Current Forever Project: Dress Me Up, dresses 4 & 5
I always have a "Forever Project" ™ going on. The term "Forever Project" was originally coined ages ago when I was working on a crewel embroidery pillow, which eventually took about 10 years to finish. The next Forever Project took substantially less time. :-)
Nowadays, a Forever Project is whatever handwork project I am working on ... whether or not it takes Forever. It's a take-along project that I have contained in a 'grab-n-go' project box: a plastic flat tote that contains all the things I need to work on the project. Whenever I go someplace in the car, whether it was for Little League games, a doctor's appointment or a road trip, the tote was grabbed and we went. Heaven forbid that I have no sewing to do with large stretch of empty time ahead of me!
My current Forever Project is a quilt that features 12 embroidered 1950's era dresses on mannequins. It comes from Bobby Socks Quilt Company.
 A while ago, I finished dress #4 but neglected to share it. This is a cute little 2-piece dress, whose French knot bodice features a lovely peplum.
 The peplum has a little drawstring bow at the seamline.

 Dress #5 is a sleeveless dress with a darling Peter Pan collar and lace edging.
The pattern calls for the entire skirt to be covered with French knots but as I had just finished Dress #4's bodice and this bodice, I was real tired of doing massive expanses of French knots. Instead, I opted to do a border of French Knots on the skirt.
While I *could* have started on a different dress that did not have any French Knots, that would have entailed doing the dress ... oh the horror! ... *out of order* ::gasp!::
Nowadays, a Forever Project is whatever handwork project I am working on ... whether or not it takes Forever. It's a take-along project that I have contained in a 'grab-n-go' project box: a plastic flat tote that contains all the things I need to work on the project. Whenever I go someplace in the car, whether it was for Little League games, a doctor's appointment or a road trip, the tote was grabbed and we went. Heaven forbid that I have no sewing to do with large stretch of empty time ahead of me!
My current Forever Project is a quilt that features 12 embroidered 1950's era dresses on mannequins. It comes from Bobby Socks Quilt Company.


 Dress #5 is a sleeveless dress with a darling Peter Pan collar and lace edging.
 The pattern calls for the entire skirt to be covered with French knots but as I had just finished Dress #4's bodice and this bodice, I was real tired of doing massive expanses of French knots. Instead, I opted to do a border of French Knots on the skirt.
While I *could* have started on a different dress that did not have any French Knots, that would have entailed doing the dress ... oh the horror! ... *out of order* ::gasp!::
A Little Slow on the Up-take
Have you heard of Framed Hexagons?
I sure hadn't. Apparently they are one of the latest trends on the quilting scene and, once again, I'm behind the times. :-)
I do know about regular, plain, ol' vanilla hexagons and about all the variations of Grandmother's Flower Garden. I know what a great take-along project hexagons are.
But all the procedures I've seen are a little on the fiddly side for me. It's not that I don't like small scale projects or that I won't attempt projects that are detailed, but there's just something about making hexagons with the paper or plastic templates, the basting, etc, etc that just doesn't float my boat.
And although I appreciate the time, effort and skill that goes into Grandmother's Flower Garden, I just don't care for that setting. BUT ... when I was at Pacific International Quilt Festival (Santa Clara, CA) this year, I saw a terrific Grandmother's Flower Garden variation that I really liked ... but guess who didn't take a picture of it and now I can't remember what it looked like! Oh the "advantages" of growing old(er)! :-)
 However, ... back to the hexies ... on Quilted Delights' blog, she talked about a "FRAMED Hexagon". OMG ... look at that! That's *awesome*.
Apparently this is a swap block, being hosted by International Friendship Quilters and is something that you sign up for. I'm not doing swaps these days (heck, I haven't done a swap since 2000 or so) simply because they generate more UFOs and projects for me and I have enough of those on my own list!
But, I sure do like the look of that framed hexie. I wandered on over to the IFQ site and read the following:
Best of all .. in my book .. this is rather like a Cathedral Window quilt ... each block is completely finished (back and front) when the block is complete. Whip stitch the blocks together and your quilt is DONE. Careful use of fabric for the back and specific placement could yield a lovely design on the back .. otherwise you could disregard placement altogether for a totally scrappy look on the back.
What an awesome Forever Project idea!
Now to be fair, to get the pattern, you need to become a member of the IFQ group and sign up for the swap, BUT the experienced quilter wouldn't necessarily need the pattern to reproduce this block. I bet any one of my Dear Readers could do this block without having the 'official' pattern.
However, Mary in Orlando, FL (one of my quilting buddies on About.com's Quilting forum), did some internet sleuthing and found directions on the Australian site, Oz Quilts Patchwork & Quilting Yes, they are also selling hexagon templates on the site but the directions are in the middle of the page.
Jonna in Texas (another About.com quilting buddy) found this French site, which has excellent photographs. Since a picture is worth a thousand words, you can just disregard the French text if you don't parlez vous. :-)
One of the blogs that appears in Google Reader (my aggregator), showed a video of a fabric origami technique with a hexagon demonstrated by Ane Matos. The You Tube video is in Spanish, but the demonstration is self-explanatory (and I suggest muting the playback so you can pay attention to the demo).
AND THEN .... it was a Light Bulb Moment (tm)! If I could make the origami hexagon the proper size for the framed hexagon, it could be a very cute variation for a framed hexagon!
The paper templates that I had were for an inner 5" hexagon and an outer 7" hexagon. I had absolutely no idea how much shrinkage the origami process would create, so I arbitrarily drew a 10" hexagon template. Using that for my origami practice, I was astonished to find out that the finished hexagon was 5"! Exactly what I needed for my own templates!
 Here's my grand total of 3 framed hexagons ... the pink framed ones were my first practice ones and I tried out some of the decorative stitches on my sewing machine.
The maroon framed hexagon is obviously the origami one ... and turned out doggone cute! :-) I made a Very Small yo-yo to put in the center of the framed hexie ... an alternative would be a cute button or a small pre-made flower.
This isn't going to be my immediate next project; I have too many things already lined up for that BUT all my practice pieces and documentation have been filed away for future use.
I sure hadn't. Apparently they are one of the latest trends on the quilting scene and, once again, I'm behind the times. :-)
I do know about regular, plain, ol' vanilla hexagons and about all the variations of Grandmother's Flower Garden. I know what a great take-along project hexagons are.
But all the procedures I've seen are a little on the fiddly side for me. It's not that I don't like small scale projects or that I won't attempt projects that are detailed, but there's just something about making hexagons with the paper or plastic templates, the basting, etc, etc that just doesn't float my boat.
And although I appreciate the time, effort and skill that goes into Grandmother's Flower Garden, I just don't care for that setting. BUT ... when I was at Pacific International Quilt Festival (Santa Clara, CA) this year, I saw a terrific Grandmother's Flower Garden variation that I really liked ... but guess who didn't take a picture of it and now I can't remember what it looked like! Oh the "advantages" of growing old(er)! :-)
However, ... back to the hexies ... on Quilted Delights' blog, she talked about a "FRAMED Hexagon". OMG ... look at that! That's *awesome*. Apparently this is a swap block, being hosted by International Friendship Quilters and is something that you sign up for. I'm not doing swaps these days (heck, I haven't done a swap since 2000 or so) simply because they generate more UFOs and projects for me and I have enough of those on my own list!
But, I sure do like the look of that framed hexie. I wandered on over to the IFQ site and read the following:
"Putting them together is easy and fun. You'll end up with something that is automatically reversible since the back will be completely different from the front.Now, how easy is that??? (If you have one of those nifty die cutting machines, cutting out the hexagons would be a snap.) You can fussy cut the smaller hexagon and showcase it. (I-Spy, anyone?) You could use a plain fabric for the smaller one then embellish it in some manner (embroidery, tatting, applique, beads). You can hand-stitch the folded over edge or use decorative machine stitches to hold it down.
The block is made by cutting one large hexagon from one fabric and cutting a smaller hexagon - one each - from a contrasting fabric and from batting / wadding. Place the smaller hexagons in the center and fold the edges over twice and stitch! That's all! And your mitered corners happen naturally!" (Their hexagon measures 5' finished)
Best of all .. in my book .. this is rather like a Cathedral Window quilt ... each block is completely finished (back and front) when the block is complete. Whip stitch the blocks together and your quilt is DONE. Careful use of fabric for the back and specific placement could yield a lovely design on the back .. otherwise you could disregard placement altogether for a totally scrappy look on the back.
What an awesome Forever Project idea!
Now to be fair, to get the pattern, you need to become a member of the IFQ group and sign up for the swap, BUT the experienced quilter wouldn't necessarily need the pattern to reproduce this block. I bet any one of my Dear Readers could do this block without having the 'official' pattern.
However, Mary in Orlando, FL (one of my quilting buddies on About.com's Quilting forum), did some internet sleuthing and found directions on the Australian site, Oz Quilts Patchwork & Quilting Yes, they are also selling hexagon templates on the site but the directions are in the middle of the page.
Jonna in Texas (another About.com quilting buddy) found this French site, which has excellent photographs. Since a picture is worth a thousand words, you can just disregard the French text if you don't parlez vous. :-)
One of the blogs that appears in Google Reader (my aggregator), showed a video of a fabric origami technique with a hexagon demonstrated by Ane Matos. The You Tube video is in Spanish, but the demonstration is self-explanatory (and I suggest muting the playback so you can pay attention to the demo).
AND THEN .... it was a Light Bulb Moment (tm)! If I could make the origami hexagon the proper size for the framed hexagon, it could be a very cute variation for a framed hexagon!
The paper templates that I had were for an inner 5" hexagon and an outer 7" hexagon. I had absolutely no idea how much shrinkage the origami process would create, so I arbitrarily drew a 10" hexagon template. Using that for my origami practice, I was astonished to find out that the finished hexagon was 5"! Exactly what I needed for my own templates!

The maroon framed hexagon is obviously the origami one ... and turned out doggone cute! :-) I made a Very Small yo-yo to put in the center of the framed hexie ... an alternative would be a cute button or a small pre-made flower.
This isn't going to be my immediate next project; I have too many things already lined up for that BUT all my practice pieces and documentation have been filed away for future use.
Subscribe to:
Posts (Atom)