Wednesday, May 01, 2013

"Peace": another project finished!


The Reader's Digest version is that in July 2012, I completed the hand work on a needleturn applique wall-hanging.  The top was put on the Pile of Tops to be Quilted and there it sat.  And sat. And sat.

Eventually, it became an item on my (infamous) List of 17 (tops to be quilted).  And still it sat there.  Very patiently waiting its turn.

Which I can NOW happily say has come!  I have finished the quilting and the binding and the labeling AND the hanging sleeve!  Woo hoo!!  This puppy is done!   :-)

I'm pleased with the stitch in the ditch around the appliques; this is no mean feat with a longarm!  I *much* prefer SITD on my home sewing machine; the control is much greater.  

I'm not entirely certain I chose the absolutely, 100% "correct" quilting for the background around the applique.  It works; I think it looks fine but wonder if I couldn't have found something better if I had only looked for about a gazillion hours longer. :-)  I tend to get impatient after only a bazillion hours.

I'm *very* pleased with the binding.  There is a long, vertical, high-contrast division between the background fabric and the applique fabric.  I didn't want the binding to be a distraction so I used the applique fabric on the applique and the background fabric on the background.  Normally, when I join the ends of my binding, I do a diagonal seam.  This distributes the bulk of the seam allowance over a greater distance and makes for a flatter binding.

But if I did that on this project, the diagonal seam would be horridly obvious.  Instead, I made a straight, vertical seamline in the binding to match up with the division on the wall-hanging.


Those pictures are just teasers! For all the gory details, links and more pictures, please visit my web page for the Peace wall-hanging.


Wednesday, April 17, 2013

Manzanita: an applique project


I had finished my Hawaiian Applique project and needed a new handwork Forever Project™.  Looking in my pile(s) and list(s) of projects that I really want to do (someday, sometime), I spied a very interesting pattern, Manzanita by Random Threadz. 

[aside: there is a very similar pattern, Branching Out.  That one looks to be the same applique tree as Manzanita but the finishing details are different.  For whatever reason, I chose Manzanita .. I suppose I must have liked its finishing more than Branching Out.  I think it's too bad that we consumers would need to buy essentially the same pattern just to get the different finishing options.]

While the overall impression is rather dark and stark, the leafless branches intrigued me nonetheless.  As with any new project, I'm also trying to use supplies from my stash.  Not that I don't want to support my local stores, but I *do* have All This Fabric and should make an effort to use it.

At the beginning of this March, I found two different toned blacks for the tree and a multi-colored batik for the background.  Using the front-basted applique technique I learned from Nancy Lee Chong of Pacific Rim Quilting Company, I basted my trees to the batik background and started the applique process.

This particular project is small; the finished size is 25"x29".  The applique part is only 12"x16".  It fits nicely in my Forever Project™ box that I take with me in the car.  When I visit with my Dad on Wednesdays, it comes with me and I'm trying to *KEEP* this as a portable, away-from-home project.  (If I work on it at home, then I'll finish it in short order and then, not only will I have another top to be quilted but I'll need ANOTHER Forever Project™!).

So, progress was going slowly .. but that was OK.

Then, I was watching some TV movies and some TV shows that I had recorded but hadn't watched yet.   Generally speaking, I like to be working on some sort of hand-work when watching TV, otherwise I feel as though I'm not being productive.  Well, the only hand-work I had available was Manzanita, so out it came.

Needless to say, the applique work is now finished.

I must say that while it might not be award-winning work, *I* am exceedingly pleased with the overall look of it.  I really do love the gnarly and non-symmetrical look of the branches and stubs.  I love the little bumps and lumps.  Even with the dark fabric, these bare branches somehow feel more "alive" to me than a perfectly symmetrical and perfect design.

Now that the hand-work is completed, I have the machine piecing to do .. which means that pretty soon, I'll have another top to put on the pile.  This isn't exactly what I had in mind ... while at home, I really do want to work on the List of 17 tops to be quilted and *NOT* add another one to it!  Therefore, employing the ostrich head in the sand methodology, I am going to set Manzanita aside for a while.  All the fabric and pattern instructions are bundled together so I can easily pick it up again at some future point ... but for now .. into the UFO stack it goes.

And .... I now need a new hand-work Forever Project™!


Tuesday, April 16, 2013

Just Ducky!


I had the next top, from my infamous List of 17, to be quilted when we received an invitation to a family baby shower for one of Mr. Pirate's first cousins once removed.  Everything came to a screeching halt whilst I pondered what to make for the baby quilt.

I looked through my baby quilt ideas and finalized on a recent addition.  Does anyone else waffle over what their NEXT!  FAVORITE! project is going to be, based on what you just looked at?  It drives me nuts.

Anyway, the background is a mosaic of squares.  Along the top is a strip with appliqued rubber duckies.  All of that is surrounded by a frame and around *that* is another round of squares.

For the appliqued duck, I turned under all the edges then did a narrow zigzag (but not a satin stitch) in matching thread to hold the applique one.  Looks tidier to me than a fused and edge-stitched raw edge applique.

For the quilting, I did a continuous curve in the outer border, feathers in the yellow border and the duck wings, clouds in the sky above the ducks, stitch in the ditch around the ducks and a water ripple in the "water" area.

That picture is just a teaser! For all the gory details, links and more pictures, please visit my web page for the Just Ducky quilt.


Saturday, April 06, 2013

all my ducks lined up in a row...


Not wanting to be scrambling to finish the baby quilt at the last minute, I started thinking about which pattern to use the minute we received the baby shower invitation, this past Tuesday.  I have a directory on my computer where I stash pictures for inspiration, along with the designer and pattern information.  It's kinda like my own personal Pinterest.  :-)

I had a bunch of almost fat quarters, left over from a previous project and realized that I could use most of them up with "Just Ducky", a delightful pattern by Cheri Leffler Designs. 

The ducks are fused appliques with the raw edges held down by several rows of edge-stitching, which looks rather like a small child outlining a coloring book design.  It looks adorable .. but .. I worried about it for two reasons. 

1. This quilt was going to be a gift.  Raw edge applique, although an intriguing "new" technique, does look unfinished.  I would hate for my recipients to think that I was using some slap-dash method.

2. Since this *was* a baby quilt and I haven't done a raw-edge applique design before, I was very concerned that with repeated laundering, the fusible would detach itself, leaving the applique body to "bubble" and that the edge-stitching would come undone.  Either scenario would be horribly, horribly embarrassing.

So, I decided to machine applique those cute little ducks in place.  I turned under the edge and did a very narrow zig-zag in matching thread along the folded edge.

Furthermore, I changed up the actual ducks I used.  Since I was going to be machine zig-zagging the edge in place, I wanted a smoother edge to work on.  The ducks in the pattern have delightful tail feathers, but I wanted a simpler design.  I found exactly what I wanted at Quiltmaker; the PDF for the duck appliques can be downloaded here

I'm sure that it took longer to turn under the edges of the applique & zig-zag them down than it would if I had simply fused and edge-stitched the ducks!  But, the final result pleases me ... and that makes me happy.

I finished the piecing over 1-1/2 days .... as is typically so, I had a LOT of distractions and interruptions whilst I was piecing, so it wasn't a continuous 1-1/2 days.  This really is a very easy pattern to do.

Now that the top is down, I'll need to go get some appropriate backing.  I'm thinking of some flannel with ducks on it  .. I'm not sure if this is in vogue these days, so I'll have to see what my local stores have in stock.

As for the quilting designs .. preliminarily, I'm thinking of Water Ripple for the patchwork water, some clouds in the sky area and Carla Barrett's "Curly Swirly" in the yellow frame.

Hmmmm .. maybe not for the yellow frame.  That yellow frame is 4" wide .. certainly wide enough to do something interesting ... maybe the alternating feathers that I recently did on another quilt.  

But first .. gotta go buy that backing fabric & batting!


Wednesday, April 03, 2013

Lovely Year of Finishes: April goal


How things change in a hurry!

I have small wall-hanging that I was originally going to use as my April goal for the Lovely Year of Finishes.  The top is a needleturn applique.  I have the batting and the backing.  It's ready to be loaded.

But I procrastinated by allowing myself to be distracted by another revived hobby of mine: family genealogy & scanning of family photographs.

It was serendipitous that I did procrastinate ... we just got an invitation to a baby shower for a family member!

Now, I don't keep baby quilts on hand, so now the push will be to go through the ideas I've filed away for interesting baby quilts, pick one, pull the fabric, piece the top, quilt it, label it and bind it .... all by April 21st!!

I have no doubt that I can do this *once I decide on a pattern*!  ::knock on wood:: 

Really .... Just how difficult can a baby quilt be?   :-)


Friday, March 29, 2013

Lovely Year of Finishes: March is done!

As I stated in my previous Lovely Year of Finishes post, this top was pieced in 2008.  And now, I can finally exclaim that it is FINISHED!  woo hoo!!

Quilted. 

Labeled. 

Bound. 

Web page created!  

done, done, done, done!  :-)

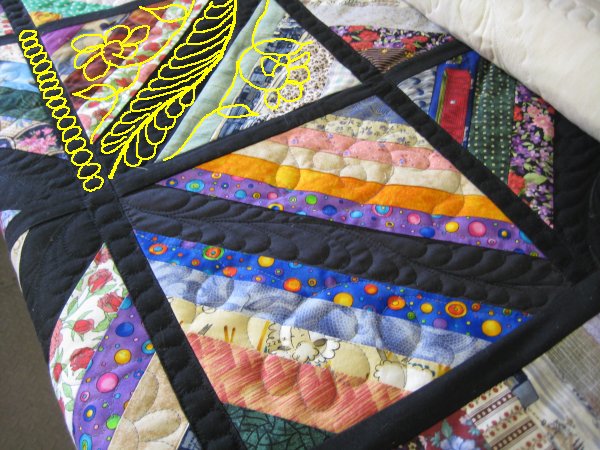
I used a new-to-me thread, "Premium Select" by NanoFiber and is their Soft Antique line. It's a 40wt polyester but is finished to have a matte cotton look. So far, it's working nicely with my Lizzie, not only on this quilt but on subsequent quilts as well.

According to the time that I have to keep track of time, it took me about 9 hours spread over 3-1/2 days to do the quilting. 

Most of that time was doing all the stand along motifs in the scrappy triangles.  Each one of them required its own start and stop because I was using a thread that would have shown on the black if I had tried to sneak through.  Ugh.

I urge you to wander on over the the webpage created for this quilt.  Honest to goodness, there is more verbage and LOTS more pictures for you to look at.  :-)


Those pictures are just teasers! For all the gory details, links and more pictures, please visit my web page for the God's Eye quilt.


Friday, March 22, 2013

another donation quilt finished (almost)


After a quick start on this final donation quilt from the crate, I became distracted (oh look!  a dust mote!) by family photos and my on-going genealogy project.

But finally, I put my nose to the grindstone and finished the quilting today.  It doesn't have binding yet .. only because I don't think I have a good candidate for that.

This started out in 2011 as a mock-up for a Jane Austen quilt.  As such, I was more concerned about how to match up the diamonds across the sashing rather than making a "real" quilt.  So, I just kinda grabbed the fabric I had on hand that would do the job .. which was white sashing and muslin setting triangles.   Not exactly the most scintillating choices in the world.


But, the funny thing is .. the more I looked at it, the more I liked it.  :-)  So, I put some actual *thought* into finding border fabrics to bring it up to a useable size.  Then, it got put into the crate and waited.  And waited.  And waited.

Until now.  :-)   It's finally quilted .. oh, hooray! 

I didn't have enough batting in one piece to use, but I did have a bunch of smaller pieces.  So, I Frankensteined them together and it worked out rather well.

The backing is a lovely, soft, butter yellow flannel.  (I think this fabric contributed to some "issues".)

I loaded it on Lizzie and decided to stitch in the ditch around each and every diamond, as well as the perimeter of the white sashing.  I figured this would stabilize the entire top.  Then I'd stitch in the ditch around the inner border.  And as I advanced the quilt, I stitched down the outer raw edge to secure them, as I always do.

My thinking was that when I got to the end of the top and stitched the bottom edge, I could then release that rail and only have one layer to work with.  I could roll that one layer back and forth to get the rest of the quilting done.

I *KNOW* that I've read of others using this technique.  I'm almost sure that I've done it before.  But this time?  Problems. 

The upper half was no problem ... everything was tensioned nicely and the stitch in the ditch was progressing well.  However, once I got to the bottom half, I realized that the top was unduly "poofing up".  What the heck??  It took me some effort to quilt that without it looking ugly.

It wasn't until I had advanced the quilted part on the take-up rail that I saw there was a horrendous, ginormous horizontal tuck in the backing.  Oh. My. Gosh.  Just let me thunk my head on the wall. Repeatedly.  But other than that tuck, the quilting from the back looks pretty nice!

I have absolutely no frickin' idea how that tuck got there, much less the "poofiness" in the top.  The tuck *is* quilted down rather nicely  but ::sigh::  it's still there.  Yuck.  Dang .. and it seemed to be going quite well.  :-(

I quilted a feathered wreath with curved cross-hatching basketweave in the center.   I saw a picture of a very similar design somewhere/someplace.  Their version was nicer than mine.  :-)  I obviously need more practice on this curved cross-hatching *and* basketweave thing.

All the stitch in the ditch made the white sashing puff up very nicely .. I really do like the effect.


The striped border got widely spaced straight lines that disappear into the printed stripes.  I really hadn't a clue what to do on this fabric.  In retrospect, perhaps I should have continued the diagonal lines from the white sashing, but I wasn't sure how the diagonal quilting lines would look against the striped fabric. 


I put feathers in the setting triangles and feathers in the outer border.  Because the border fabric is a print, you can't see the feathers too well, but by this point, this was really the easiest thing I could think of doing to finish the quilt. 


Once I find some binding fabric, I'll get the label & the binding on and pop it into the washer/dryer.

Then all the donation quilts that I've been holding onto will be given to the Bay Area Crisis Nursery, which is a local one-up charitable organization that I like to support.  When they're gone, that will open a nice, big area in my sewing room.    Current status to the contrary, I really *do* like limiting the visual clutter.  (go ahead and chuckle .. y'all know what I mean!)


Monday, March 18, 2013

the ugly quilt


Well, I think the most positive thing I can say about this child-sized quilt is that it is finished.  Otherwise, I must admit that it must be the ugliest quilt I've ever done.

It wasn't intentional, though.  I'm not even sure when I made the blocks.  I think I was fooling around with strip sets and kaleidoscope/wedge rulers just to see what they were like.

Because you really can't do too much with an octagon shape until you square it up .. oh, wait, you COULD just butt them up against each other like you do with hexagons, but that would have created an ever uglier quilt, if that could possibly be imagined.   So, I squared up each block with a solid and used those same solids for sashing.

I know I picked the rust and brown fabrics simply because I had enough of them in the stash and they didn't look *terrible* with the string blocks.  Is that an awful way to pick fabrics or what? But, again, it wasn't intentional. 

Generally speaking, I like to use the test blocks and the 'fooling around' blocks that I make.  These blocks were of a good enough size that I could actually make a reasonable sized quilt with them.  I know I would have had horrible pangs of guilt had I just thrown them out, although on second thought, maybe I should have cut them down to make veterinarian cage liners ... the animals certainly wouldn't have minded.

But, I didn't make cage liners, so a child-sized quilt it is.  It'll keep some child warm and that counts for something, right?  Can you tell I'm desperately trying to find a silver lining?

I did a lot of free motion quilting on this one.  I probably should have done a pantograph, but pantograph work with my Lizzie is awkward due to the physical place I needed to put her.  So, I tend to avoid pantographs.

In retrospect, I think I just made this entire quilt with the wrong approach.  I'm not terribly pleased with it, although I *am* pleased that the top is quilted, labeled and bound.  It'll be out of my house pretty soon, which clears up some space.


This just shows you that my quilts don't always come out eye-pleasing and I do make errors in judgement .... although not usually all in the same quilt!  :-)


Sunday, March 17, 2013

Google Reader ... :-(


You've read elsewhere that as of July 2013, Google Reader is going away.  Apparently it's not pulling its weight, as other Google applications do.  ::sigh::

It works.  It works well.  It does what I want it to do.  Perhaps it's because of people like me who only need a desktop computer Reader?   (I don't have a smartphone, so I obviously don't need a mobile app for that).

But, even if Reader doesn't make any money for Google, why not just let it *stay* as-is?  Don't do any more updates.  Assign one programmer to handle the situations that break Reader, otherwise, just leave it be!   It can happily sit in the background of Google and let people use it.  Let it be a deprecated product.  As long as it still works, users will be happy.

Heck,  I'm such a stick-in-the-mud that my email program has been deprecated for *years*.  I started, years and years and years ago, with Eudora.  I like Eudora. It does everything that I want it to do for a email program.  I'm used to the way it looks and works.  Qualcomm got rid of it years ago and Corel doesn't support it any longer.  But ya know what?  I don't care.  *IT STILL WORKS*.  And so, I continue to use Eudora as my emailer.

 But, except for death and taxes, all things change.  If Google is going to yank Reader, I'll need to find a replacement.  I've looked at the suggestions for an alternative.   There have been many blogs with such suggestions .... just Google for them.

Many of the replacements that I've seen focus on mobile apps.  That doesn't interest me.  What I want is something that gives me the look-and-feel of Reader so that I don't have to jump through a whole bunch of new hoops to figure out how to read my blogs.  And I definitely don't need a touch-screen appearance ... gah!  that would drive me nuts!

Enter "The Old Reader".   The following description is from a Life Hacker blog entry by Alan Henry:
The Old Reader may be in beta, but it was built to be a suitable replacement for Google Reader. And not just Google Reader as we know it now, the old Google Reader, that still had plenty of tools for sharing and organization. You can log in via Google or Facebook, and import your feeds from Google Reader or any other service via OPML. If the interface looks familiar, it should: it looks a lot like Google Reader, complete with folders down the left side, your list of stories in the main pane (click any to read), and one-click subscription to new feeds. You get many of the same keyboard shortcuts, and even get the same ability to follow other Old Reader users and share interesting stories with them—the way you used to be able to with Google Reader. The Old Reader is fast, free, and super simple to use. There are no mobile apps yet, but the web site works well on mobile devices, and the developers behind it note they're working on it. There are, however, Chrome and Safari extensions for it.
Hear that???   It has the same look-and-feel as Reader!   Oh, be still, my beating heart!   Truthfully, I never knew there was a Google Reader appearance before the one I'm currently using.  Or maybe the Google Reader I'm using *IS* the old format.  Who cares?  All I know is that The Old Reader is familiar enough for me to feel immediately comfortable.

Apparently 18,776 other people feel the same way because that's how many are in front of me in the import queue.  I have no idea how many users there are, currently.   The Old Reader people said that their user base increased 7 times at once, so understandably, they are having "just a bit" of an import log jam.  They are very good about keeping users apprised of the situation, so we won't think that our import file has become lost in cyberspace.

Not to worry, Google Reader is good until July.  By that time, The Old Reader will have worked out the queue length; I'm happy to wait.  If I find new blogs between now and then, I can individually add them, just like I currently do with Reader.  When my import file is processed, those individually added blogs  will not be clobbered.

So, I think I've found my replacement.  As much as I really, really, really dislike changing computer components, this one is looking pretty good.


It was National Quilting Day


.. which was yesterday, of course, but I never quite got around to writing a blog entry about it on time.  Story of my life, ya know?

However, I was busy!  Quilting, no less!  When I was excavating my sewing room recently, I came across a long-buried crate that contained 5 quilt tops that were tagged to be given to a local charity that I like to support, the Bay Area Crisis Nursery.

These tops have been ... ::ahem::  "aging" for quite some time.  I decided that it was time I got them quilted.   This would not only allow the Crisis Nursery to have more quilts to give to their charges, but it would free up a crate in my sewing room!  

The top that I actually DID quilt on National Quilting Day was (.. of course ...) finished rather late at night so that there was absolutely NO decent lighting to take a picture.  Y'all will need to wait until tomorrow (or later) to see that particular quilt.

I have 3 of the tops to share with you right now.  One nice thing about all these child's quilts is that, being so small, they do quilt up VERY fast.  It's certainly instant gratification for me!  :-)

Back in January 2012, I participated in a quilt along, called Oh My Stars! 

I made many more star blocks than I needed for the project quilt, so that I was able to create a bonus baby quilt. 

Because I just wanted to get these tops quilted and not spend a whole lot of time devoted to intricate quilting, I actually used a pantograph for this quilt. 

I usually don't do pantographs very often.  The physical constraints of the layout where I have my Lizzie make for a very cramped area.  It's awkward to work in, so I tend not to want to do pantographs so much. 


 This quilt, and the one after, were created from some very unusual yardage.  Back in 2010, I found fabric that had rows of quilt blocks printed from selvage to selvage, rather like a pre-printed row robin.  It was called "Borders and More".  The intent was that you would cut the rows apart and use them as instant borders for centers that you piece yourself.  It was an intriguing idea, so I bought some yardage (I don't remember how much). 

But as time went by, I realized that I was just never going to use the fabric as it was intended.  Instead, I simply used it as-is. 

For the first quilt, I cut off a chunk of the yardage and quilted it, using the edges of the printed blocks as pseudo-seams.  What you see in the picture to the right is exactly what the yardage looked like, right off the bolt, except that .. trust me ... the quilt in the picture at right really IS quilted!

I did "stitch in the ditch" in all the pseudo-seams.  It really wasn't as difficult as you might think ... there weren't any real seams to be concerned with.  I used black thread, which disappeared into the black background, so if my stitch in the ditch was exactly gnat's eyelash perfect, it really wasn't noticeable.

However, this does mean that you can't really SEE any of the quilting at all from the front!   For this quilt, and the next one, I just wanted to get it quilted and wasn't terribly concerned about fancy stitching.  The printed rows were nifty enough; I felt that overt quilting would be a distraction.


The second quilt made from this yardage had a different treatment: because the leftover yardage wasn't large enough to be a quilt on its own; I needed to stretch it with a very wide border. 

I found enough of the purple fabric in my stash for the border.  Although there is no purple in the print yardage itself, I think the border works surprisingly well.  :-)

As with the first border print quilt, I also did a stitch in the ditch along all the pseudo seams.  I quilted an embellished meander in the purple fabric; a double loop-de-loop.

All of these quilts are small .. about 45" x 60" or so.  They are intended for the younger kids that the Crisis Nursery cares for.

I haven't made webpages for these quilts yet, so I can't *quite* count them as 'done'.  And because there are no webpages, there aren't any up-close, detailed pictures nor any of the typical gory details that I usually provide.  All of *those* items will be on the webpages!  You'll just need to wait.  :-)

The main reason for posting the pictures now was to prove that I am still alive and kicking!


Friday, March 01, 2013

Lovely Year of Finishes: March project


Looking at my List of 17 Tops to be Quilted, I have pulled out one of the big ones, the God's Eye top.

This was an attempt at scrap management back in 2008, when I pieced it.  I assume that I went through more than one messload of scraps because not only are there (48) 10" God's Eye blocks but there is a bargello-type border. 

I wasn't paying too much attention to the overall size when I made the top because it finishes with really weird dimensions: at 80"x100", it's either an overly long double or a slightly too-narrow queen.  It'll take a queen size batt, though.

So, the goal for March is to get this thing quilted, labeled, bound, laundered and the webpage created.

I'm anticipating the wonderful feeling of being able to cross another entry off the List.  :-)


Sunday, February 24, 2013

"Podcats" ... a throw pillow


Helene Knott is a prolific designer of applique quilts.  One such set of blocks is her "Garden Patch Cats".  They are of cats depicted as various vegetables and are simply terminally adorable. As the "Garden Patch Cats" is probably going to be about 35 patterns, you can pick and choose which ones you want to put in your own quilt.
I don't NEED another quilt project right now.  At the current time, I'm working on my List of 17 Tops that need to be quilted, so I am NOT NOT NOT piecing any new tops!

But I still need something to do in the evenings when I am watching TV.   So when I saw Podcats, I knew it was something that I could do that wouldn't result in another quilt.  I could make it as a throw pillow instead!

Rather than use predictable, normal colors for the cats' faces, I opted to make them in red, purple and blue.  No, don't be aghast .. there's a reason for this!

You see, when our girls were little, I "color coded" them.  Just about everything I bought them was in shades of those colors so that even before they could read, they *knew* which items belonged to them simply due to the color.

So when I saw Podcats ... those three cute little cat faces ... I immediately saw them in those colors.  :-)

This was a very fast project for me.  Even faster than I had anticipated.  I started it on February 12th, after I returned from my Quilting Retreat.  I got the applique done in three days, took a break, then finished it up yesterday (February 23rd).

I'm surprised but pleased that this project is done ... but now I need another project for the evenings!


That picture is just a teaser! For all the gory details, links and more pictures, please visit my web page for the Podcats throw pillow.


Wednesday, February 20, 2013

Outdoor Rotisseire Chicken: it's what's for dinner!


Mr. Pirate is a man of many curiosities and abilities.  Of late, he has been enamored of outdoor cooking fires.  He built us a keyhole fire pit, around which we have had many enjoyable campfires, right in our own backyard.

Tonight, he skewered a chicken (no! not one of *ours*!) and cooked it over a battery powered rotisserie.  He's doing this not only for the novelty aspect but also for when we go camping this summer, doing a rotisserie dinner will be on our menu.

This is the chicken when it first started out ... looking kinda pale and inedible.

But look at it an hour later!  Nicely browned and well on its way to be eaten.

Here's what we were entertained by whilst sitting by the fire, enjoying each other's company and the ambiance.

And, dang, if this isn't us!  A toast!  Skol!


Monday, February 11, 2013

Hawaiian applique Forever Project: top finished!


Honestly, "they" just don't make Forever Projects™ like they used to.  :-)

This pattern is "You Are In Our Hearts" from Pacific Rim Quilting Company.  My notes tell me that I started this 42" square applique project on 1/9/2013.

While I was at my annual quilting retreat in Phoenix, AZ this past weekend (2/10/13), I was able to finish it due to working on it at the airport, on the flight and at the retreat.

That's just about ONE MONTH.  Wowsers!  :-)

I just love it.  Love it.  LOVE IT.  :-)

The only drawback is that it *is* 42" square.  This is a great size for a wall-hanging  ... and in fact, this is what the pattern is designed to be ... but I don't particularly want another wall-hanging.  I have lots of wall-hangings.  I love them all.  I like looking at them all.  I don't want to take ANY of them down to look at a new one ... and I don't have any more wall space.

42" square is also a great size for a toddler quilt but there isn't any toddler in the world that is going to get THIS applique quilt!  Not even a future grandchild, who isn't even on the horizon at this point.  (note to daughters: NOT that I'm even suggesting this possibility, so stop being anxious about it. :-)  )

Yeah, I know ... these really are serious problems to deal with, huh?  :-)

So ... I was thinking of the possibility of adding on a top & bottom border.  I have enough of the base fabric to do so.  I have more of the batik fabric to so a linear Hawaiian applique border.  But, I am woefully uneducated as to what an appropriate Hawaiian applique linear border should look like. 

I've been doing some Google/Image searches and I've sent an email (with a picture) to Nancy Lee Chong (the designer & co-founder of Pacific Rim Quilting Company) for advice.

For the time being, the top will be put in the WIP stack so I can cogitate on the solution.  It's also time to look at the List of 17 UFOs and decide who wins the "tag!  you're it" game. :-)


Wednesday, February 06, 2013

Grapes (and not 'of Wrath'!)


I've mentioned before that I have list of 17, count 'em *seventeen*, UFOs that I want to finish up before I start any new projects.  I've been making pretty good progress with a current count of 6 of those projects now completed.  It's sure a good feeling!  :-)

This needle-turn wall-hanging is one of the 6 that I've completed.  The pattern is from Nancy Lee Chong of Pacific Rim Quilting Company (this pattern is about half-way down the page).  You don't need to do needle-turn, Nancy offers other applique methods as well.

But back in June of 2012, I need a Forever Project™ and this was it.  Since it was a Forever Project,  I wasn't concerned about how long it would take me.  Even then, I was finished a month later.

Seriously, I love, *love*, LOVE Nancy's needle-turn method!  It just makes sense to me; it's uncomplicated, not messy and *no pins*!  :-)

Once the top was done, it got put away, as I wasn't in the mood for quilting.  But now that I am working from my List of 17 UFOs, this top popped to the top and now it's getting its 15 minutes of fame. :-)

Since this wall-hanging is for us, I wanted to do something different and not the same ol/same ol ... kinda like expanding my horizons.


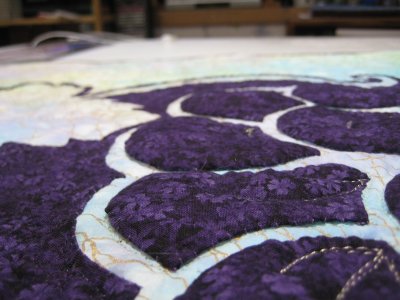
So, I did a faux-trapunto on the grapes.  I've done this technique before and it turns out so nicely.


The new-to-me was quilting a design in the negative space.

What??  "That's not new!", you say.  And you'd be correct but .. it *is* new to me.

I usually quilt a background filler in the background space.  That's what background designs are for, right?

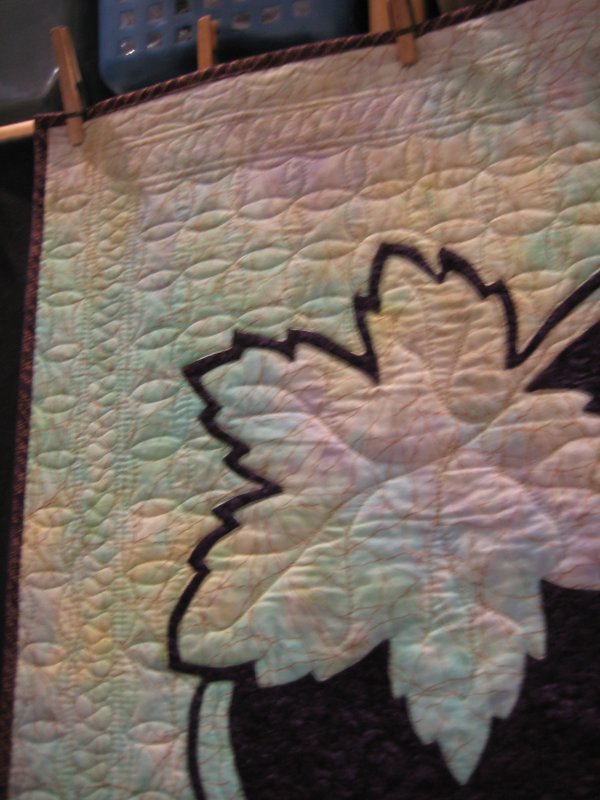
Thinking of an overt design was the new part.  I chose to "frame" the applique in a triple frame: narrow/wide/narrow.  On either side of the frame, I quilted Continuous Curves.

When I was marking the foundation grid prior to stitching the Continuous Curves, I discovered that I was less than accurate in my placement of the applique fabric on the background fabric.  ::sigh::  I ended up with less space at the top than at the bottom.  ::shrug::  I'll live with it.

This project is also my February finish for the Lovely Year of Finishes.

Those pictures are just teasers! For all the gory details, links and more pictures, please visit my web page for the Grapes wall-hanging.


Friday, February 01, 2013

Lovely Year of Finishes: February 2013


Melissa of Sew BitterSweet Designs  and Shana of  Fiber of All Sorts started an interesting concept to encourage us quilters to get some of our long-standing UFOs completed.  It occurred to me that this approach could be applicable to any crafter with a backlog of projects, but this one is specifically organized for quilters.

To participate, you pick one UFO for the month, blog about your intention to finish that UFO *that month*, link the blog post to the Year of Lovely Finishes linky party.  Then ... FINISH THE UFO.  You gotta do that. :-)

When you've finished it, blog about it, link the finished UFO blog to the linky party .. voila, you're done for that month.  As an incentive to finish, each month has gifts that were donated by the sponsors; they will be awarded on a random number basis.

Sadly, I missed out on January; I hadn't read about the program.  But here I am for February!

Therefore, my UFO to finish is .... Grapes.   Grapes is a needleturn applique wall-hanging designed by one of my favorite designers, Nancy Lee Chong of Pacific Rim Quilting Company.   Over the years, I had tried many different techniques for applique but it wasn't until I learned Nancy's technique that it finally "clicked" with me.  Now, I'm not intimidated at all by needleturn applique projects.  They make excellent Forever Projects ™ !  :-)

I started this project in January 2012.  I actually finished the needleturn part so the top is technically done.  But, being the complete lamer that I am, I let the top languish in the UFO pile since then.

Since this is my LYOF February project, I am now deciding on the quilting design to do.  Nancy quilted her's in echo quilting, but that doesn't float my boat.  Once the quilting has been decided on, it'll get loaded onto Lizzie and quilted.

woo hoo!!!   I'm on my way!  :-)