 |
| The top vine has appliqued flowers; the side vine does not. |
There are all sorts of techniques for hand applique, most of which I thoroughly detest for various reasons. I don't say this to disparage any one technique but to be up front that I have *tried* many techniques and found that they just do NOT work for me.
UNTIL I was introduced to fusible, water-soluble stabilizers by a quilting buddy of mine, Suze Noonan of California. Suze uses stuff she bought from Floriani (the exact product name escapes me), which comes on a roll. I'm using C&T Publishing's "Wash-Away Applique Sheets" which come in 8.5"x11" sheets. (That size will come in VERY handy in just a minute). There are others that you can use. The key thing is that it needs to be FUSIBLE on one side and WATER-SOLUBLE. My stuff looks very much like non-woven interfacing.
 |
| After I had all the flower bud appliques made and I could see all the colors I had, I pinned them in place. |
The beauty of this technique is that you LEAVE the stabilizer IN when you are quintupling the shape to the foundation fabric. When you launder your project, the stabilizer will *wash away*, leaving just the applique fabric on the foundation fabric. How easy can that be? Gosh, I love it.
 |
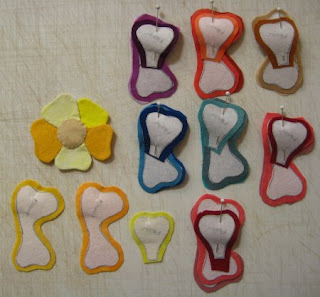
| Finished applique is at top left. Piece parts are directly below. The rest are units to be worked on. |
What I LOVE about C&T's product is that since it is 8.5"x11" sheets, you can run them THROUGH YOUR PRINTER. Why is that earth-shattering? Well ... in your graphics editor program (I use Paint Shop Pro), create a page and draw (or scan in) your applique piece templates. Copy each of your applique template onto the new page. Crowd them to maximize the use of the 8.5"x11" because you're going to be cutting them out afterwards. What you now have is a page-size "picture" of your applique pieces ... that you will now PRINT onto the C&T sheets. *No need to manually draw each applique template!!!* Let your printer "draw" them for you! All you need to do is to cut them out on the lines (which is the final size of your applique piece).
 |
| back of the 5-petal flower, showing wrapped and glued seam allowances. |
Fuse those templates onto the wrong side of your applique fabric, cut them out leaving a small seam allowance, wrap the seam allowance to the back and glue it down. You are DONE! So fast and easy!
So, that's what I'm doing on the Lone Star UFO project. Making millions of flower and leaf appliques. Some flowers are single templates, some are multiple pieces that I pre-assemble by appliqueing all the pieces together so that I have a single flower unit ready to be placed on the Lone Star top. It's slow going because each applique piece obviously needs to be done individually. But, it's a great way to pass the time while I'm watching a TV show. :-)
 |
| All the leaves I've made so far. |
 | ||
| front and back of a leaf |


Your appliqué project is beautiful Shelley! The fabric colors are gorgeous. I'm thinking there must be a way to do this with the Scan n Cut using the Floriani stabilizer. I'm not a hand appliquér, so I wouldn't know how.
ReplyDeleteHi Shelley,
ReplyDeleteIt is so beautiful. My favorite of yours (so far).
Can't wait to see it "live".
Ang
Angie, in fact, that is the exact reason I bought the SnC .. for the fabric applique. The scrapbooking aspect was icing on the cake.
ReplyDeleteI'm waiting to get a second blade holder so I can have a dedicated blade (and holder) for fabric and another set for scrapbooking .. much like we have fabric scissors and paper scissors. :-) Since I don't don't particularly care for fully fusible appliques (I realize they have their place in the sun), I'm thinking of using Terial Magic to stiffen the fabric and then cut it out. The Terial Magic could be rinsed out, leaving just the soft fabric so I can do my needleturn applique!
Think .... Hawaiian applique!! How fantastic would that be to just do the FUN part of the applique and not the tedious part of the cutting!
And then ... I had a Lightbulb Moment. Instead of using my printer to "draw" my applique templates onto the fusible, water-soluble stabilizer and then cut them out by hand ... OMG ... just scan my template master into my SnC and have *it* CUT THE DANG TEMPLATES OUT!!! I don't see why the SnC would have problems with the stabilizer stuff. Talk about having perfectly cut templates every doggone time! Wowsers!
I just ordered a second blade holder this a.m. from Amazon. Like minds! I haven't cut a thing with my new SCut2 yet. I did get it all set up wireless with Canvas though. My Ellisimo is in the shop as of yesterday for routine maintenance, but I was having a problem with the embroidery arm belt. Possible slipping. John, the tech is so busy I don't think I'll get the machine back for about a week or more. So, I thought I would just cut a bunch of random stuff with the SNCut. Some of the projects in Canvas maybe? Also I am going to start a hand embroidery project and get back to piecing the Minature Menagerie quilt top. I'm so busy with sewing and quilting stuff to do, I don't know which way to turn!
ReplyDelete