Wednesday, March 19, 2014

hexagons: the first column


Well, now, lookee here.    I've stitched together a column of hexagon flowers with a green garden path between them.  :-)

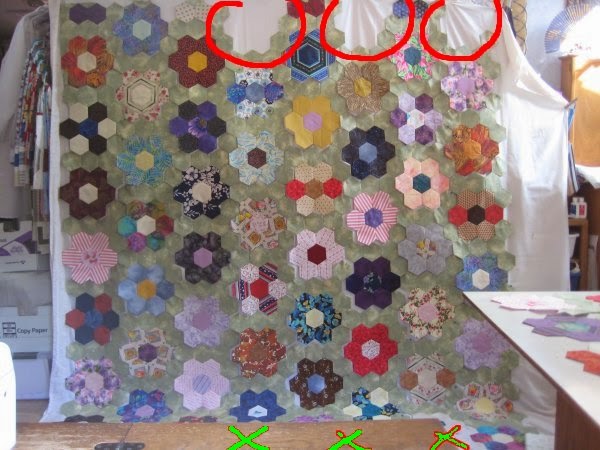
Please disregard the crookedness and the scrunched top & bottom of the picture - I couldn't back up enough to get a decently framed picture.

The black is just the king-sized sheet that I pinned the column to .. it's not the background of the hexagons.

The left side will get filled in with half-hexagons so I have a straight edge.  Ditto with the top & bottom edges; they get a different half-hexagon shape for the fill-in.

The ragged right side will hook into the left edge of the next column.  Kinda looks like castle crenelations,  don't they?  :-)

Seven more columns to go.


Monday, March 17, 2014

Houston: we have a problem


Last time, Dear Reader, you might remember that I had documented that I had finished *all* 60 flower units for my hexagon quilt.   My flower units consist of a single ring flower hexagon plus a 5-hexagon "path" stitched to the top of the flower.

I was so proud of myself.

I was ready to advance to the next step in the process, which is to layout all the flower units so that I can *try* to distribute the colors in a pleasing manner.  ::cough::  ::cough::   What I was trying to avoid was concentrations of any one color or dark colors or light spots.

To do this, I needed a BIG design wall, as this top mathematically measures to be somewhere in the vicinity of 90"x102".  I don't really have a design wall that big, but what I have used, as a stop-gap measure, is a king sized flat sheet secured with clothes pins to a very long curtain rod, which I have jury-rigged to the top of my bookcase, which contains my fabric cubbies.

It has enough length horizontally, but not quite enough height vertically.  The excess vertical amount of the sheet gets stretched out onto the floor.  Unfortunately, when I have a quilt top this big, I don't have quite enough space to back away from it to be able to take a picture without a whole lot of furniture being in the way .. which is why you see my brown sewing cabinet at the bottom of the picture and a corner of my sewing table on the right edge.

But ... it'll do, since I don't have anything else.  I began by just pinning the flower units up in staggered rows, not paying attention to what colors they were.  Once I had everything pinned up, I sat back and began to stare.  Where were the hot spots?  Where were the dark color concentrations?  Where were the areas that had too much of one color?  Flower units were unpinned, repositioned, and repinned.

However, there was a SLIGHT problem.  I had such a great time hand-stitching the green path units to the flower units that I wasn't paying attention to my layout (from EQ).  I actually didn't NEED to sew a path unit to every flower unit.  In fact, I really needed some flower units NOT to have a path.  And I also needed some path units without a flower.

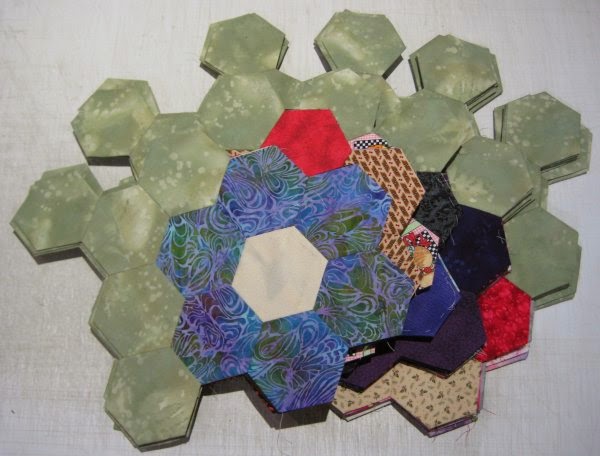
See the picture to the right?  These are the three "extra" flower units .... I don't need them to have a path attached.  In fact, I CAN'T have a path attached.   So, I spent some quality time with Jack the Ripper and removed all of my carefully hand-stitched whip stitches to separate the path from the flowers. 

See the flower units circled in red?  Well, once separated, they went at the top of the quilt, where the corresponding red circles are on the first picture.  See the path units circled in green?  Those pieces were needed at the bottom of the quilt (which you can't really see because my sewing cabinet is in the way) but I marked the spots with green X's.

Once I got that annoyance rectified, I once more sat back and enjoyed the view.  Except ... geez, Louise ... there are some gaps along the edge where I need some single green hexagons.   AAARRRGGHHH!  Fortunately, I have some extra.

And that is what happens when you don't really pay attention to the layout.

I have now, very carefully, made piles of all the flower units in a column.  I have 8 columns, so I now have 8 piles, each  numbered for future reference.  My hand-stitching is now devoted to sewing all the flower units of a column together, so eventually I will have eight column of flower units separated by their green paths.

After that? Why sew all the columns together in order to have (most of ) the top!   I'm probably going to put a border around it but exactly what kind of border or how wide, I haven't decided yet.


Friday, March 14, 2014

Progress on two projects: Hexagons & Eclipse


The Hexagon Forever Project ™.

According to my notes, I started this current Forever Project ™ in July 2013.  These are *large* hexagons (4" at widest point), specifically to cover a vast amount of real estate so that I really could be able to eventually finish it and move on to the next Forever Project ™.  :-)   They are hand-pieced.

At this point, 8 months later, I have absolutely, positively finished the last of the 60 flower units I need to make the top I want.  I think the top will be about 90" x 98" without borders; I'm not sure what sort of borders I will put on.

The picture above is a completed flower unit: a single ring of hexagons sewn to a path.  This completed unit is roughly 12" x 13".

Now comes the difficult part ... layout out all 60 flower units into a "pleasing" color arrangement.  From that point, I can start sewing the flower units together into columns (or rows .. whatever) to construct the top.  Once I start sewing the flower units together, it's going to start becoming more and more unwieldy.

The picture to the right shows all 60 completed flower units stacked up in groups of 10.  I thought I would NEVER finish them!

I'm not quite sure how long this phase it going to last .. hence the name ... Forever Project ™.  :-)

This is kinda/sorta/more-or-less what the completed top is going to look like, once all the completed flower units are sewn together.


Eclipse

Last month, I participated in About.com's annual Quilting Retreat in Phoenix, Arizona.  We've been having this retreat for about the past 13 years, although not always in Phoenix.  All of us are active on About.com's Quilting forum and we all look forward to seeing each other in real life every February.

This is the cover quilt from the Eclipse pattern
This year, a quilt-along was suggested.  One of our members had made Eclipse, a pattern designed by Sandy Brawner.  No project at the Retrreat is mandatory but because the sample quilt was so pretty, I got sucked into buying the pattern and ALL THE BATIKS necessary for a queen size quilt (oh, let it not be said that I stick to the easy quilts).

There is only one block, an easy Drunkard's Path that finishes at 8".  You just keep sewing all the fabrics together to make lots and lots and lots and lots ... and even more lots ... of the one block.  Once all the blocks are finished, then you simply "arrange" them and sew the blocks together.

Although I did try to keep to a kinda/sorta/not exactly organized color scheme, what I ended up with isn't anything that I'm absolutely IN LOVE with.  Which is a doggone shame, since batiks are expensive, even at the sale price I bought them at.


While at the Retreat, I made a certain number of blocks but by no means all of them.  After all, there are a LOT of activities going on!  Upon my return home, I did put my nose to the grindstone and finish sewing all the blocks and even trimming them to uniform size.  

I need 144 blocks to make my queen-sized quilt and the picture to the left shows the 144.  There better be 144!


And this is the pile of trimmings from those 144 blocks.  Somehow, piles of trimming strings like these amuses me.   (It takes so little to do so these days).

And that's where this project lies right now: all the trimmed blocks are stored away in a project bag with the border fabric and pattern.  Since I'm not IN LOVE with it, I'm going to let it marinate a while so I can proceed with quilting all the OTHER tops that have been patiently waiting their turn. :-)