Sunday, June 07, 2015

Space: Above and Beyond


I was rummaging through my sewing room, looking for ... well, whatever I was looking for.  What I came across instead (one more time) was a "kitted" project ... the pattern and fabric were neatly packaged, simply waiting for me to stitch it up.

Now, generally speaking, I don't usually make quilts exactly the same as the examples I see.  Typically, it's the pattern itself that draws itself to me.  But this sample .. I just loved it as it was.   The layout, the fabrics used .. it was perfect.  (In fact, this layout would also be perfect some some fantastic focus fabric .. not just this space-themed one.)

It was early 2014 when I first saw it.  The freebie pattern is "To Eternity and Beyond" and was designed by Wendy Sheppard for Benartex.  Amazingly, it is still available here, along with other, similarly themed patterns.   I don't know if the space fabric is still available, though.

Since I know that specific fabric tends to have a short shelf life, I immediately set to ordering all the fabrics specified on the pattern.  I needed to order from several different online stores.  But, get them I did!

And then, I packaged the fabrics and the pattern together and stored them on a shelf.  For a later time.

Well, that "later time" came today.   Although in over-all time, it took me about 12 hours to sew together, if you subtracted the meal times and other distractions, it really didn't take that long at all.  It's all straight seams and the most "difficult" part was the construction of the half-square triangles.  I had been able to devote the time strictly to sewing, I bet I could have finished the piecing in a single afternoon.

This photo isn't the greatest .... the top isn't really as wavy as it looks; there are bumps underneath the sheet that the top is pinned to.  I tend to finish a lot of my tops late at night and want to share my accomplishment RIGHT THEN!  I don't *want* to wait until the next morning when conditions would be better.  Which means horrible lighting and a less than optimum setting! 

The *only* drawback to completing this top is that it *wasn't even on my list of UFOs to work on!*  It just kinda slipped its way to the top of the list, cutting right in front of the other projects.    I really must be more disciplined.  :-)

However, it won't be quilted right away.  I not only have a client quilt waiting to be done, but I have stacks of other tops to be quilted.  *This* one can jolly well wait its turn. :-)

Oh ..and the name?  Well, it harkens back to a *fantastic* but short-lived scifi TV show called Space: Above and Beyond that I and my far-flung online friends were rabid fans of.


Thursday, May 28, 2015

I emptied my scrap bin today


OMG .. an empty scrap bin!
and it was a LONG time coming. 

Like most quilters, I create a sizable accumulation of scraps ... leftover bits and pieces from whatever project you are working on.  They are too small to use in your project but clearly too large to just literally throw away.  You know they are good for something else ... mini projects, mock-ups, experimentation ... that you will *certainly* do some day.  In the future. The far future.


color piles of scraps

My scrap bin was over-flowing.  I can tolerate a high degree of clutter but this was absolutely over the line.  So, while the TV was showing something that I wasn't terribly interested in, I started sorting the scrap bin.  I made piles of color-related scraps .. or mostly related.   Sometimes it's a judgement call whether a scrap should go in one color pile or another.

I do admit that it felt really good to finally have an empty bin and more-or-less organized scraps.


where do you stash multi-color scraps?
But wait!  There are some scraps that defy pigeon holing. 

What on earth do you do with multi-color fabrics that don't have any clear, defined dominant color? 

I am still puzzling over this.  If you have any suggestions, opinions or solutions, I'm all ears.


sewn units .. for something useful

Then there are what I call the "sewn units",  These could be mock-ups, experimentation or just plain fooling around. 

They are also leftovers and extras from projects.  I'm sure they could be incorporated into ... something. 

I have a couple of shoe boxes just for sewn units.  And I sure haven't done anything with any of them yet.


drawers for scraps divided by color
Back to the piles of scraps, now organized by color.   I do have a set of drawers that I have put my color scraps in.  At the time I acquired this set of drawers, I could put 2 colors in each drawer.  Sadly, with the scraps I organized today,  I am beyond this set.  I also have No More Space in my sewing room to put another set of drawers.  I'm going to need to think about this.

Actually, I know what I *really* need to do is a massive clean up and reorganization of not only the sewing room in general, but the shelving units and bookcases.   I need to purge myself of the items that I *know* I'm just never going to use so that I will have more space for the things that I do use.  ::sigh::  This is not going to be a single afternoon endeavor.

However, I'm going to do my very best Scarlett O'Hara impression and ignore what I should be doing today and will think about doing it tomorrow.


Monday, May 25, 2015

May 2015: my current Forever Project™


I always have a Forever Project going.  I coined the term "Forever Project" literally forever ago when it took me 10 years to finish an embroidered throw pillow.  :-) 

For me, a "Forever Project" is always a handwork project.  It is portable so that I can take it with me when I was at Little League games, doctor appointments but mostly when I was in the car on road trips or vacations.  I absolutely need something to keep my hands busy and I decided long ago that although I love to read books, I wanted something to show for all that time besides having finished Yet Another Book.

I've had many Forever Projects over the years.  Some take longer than others.  Some surprise me by being completed relatively quickly.  But they never have deadlines; they get done when they get done .. hence the name "Forever Project".  :-)

I recently finished my (former) latest Forever Project, which was a hand-stitched hexie 104"x116" quilt top (which you can read about here but you'll need to scroll to get to the February 2015 paragraph). 

leftover hexies
When I completed that project, I had a bunch of the small hexies leftover, such as these.  I had been using them to make flower units for my (former) Forever Project, so I just kept making flower units without thinking about what I was going to use them for.  It occurred to me that I *really* ought to have A Plan otherwise it was just pretty silly to be making all these cute little flower units that weren't going to be used in anything.

"Reaching Out" by Edyta Sitar
Right about then, I came across the pattern "Reaching Out", an applique quilt pattern design by Edyta Sitar (Laundry Basket Quilts).  As you can see, there are columns of on-point 9-patches, which separate gorgeous columns of appliqued flowers.  I thought that I would substitute my leftover hexie flower units for the on-point 9-patches and use the same fabric for the applique columns and the setting triangles in the hexie columns.

After doing some rough calculations, I determined that my hexie flowers were about twice as large as the 9-patches, so I'd need half as many units to make up the narrow columns. 

I do hope the change in scale works out well because that's the size the hexie flowers are going to be!  :-)


a flower unit


So, from about March 2015 onwards, I've been making lots of little hexies ....  putting the little hexies into flower units .... 


A flower unit with green "leaves" and black side diamonds
putting green hexie "leaves" on the flower units ... and finishing them off with black diamond side pieces.

That's what I'm working on right now:  sewing the 4 little black diamond pieces onto the sides of the hexie flower units. 


A column
All the these hexie flowers will stack on top of each other to form the narrow columns that will separate the wider applique columns.  Once all of flower units have their black diamonds, then I will work on constructing the columns of hexie flowers, trying to nicely distribute the colors.  That's going to be the hardest part (for me): randomizing the hexie flower colors so it looks nice.

Via the "magic" of some VERY basic photo editing, I've created a VERY rough idea of what the hexie flower column is going to look like.

I've already obtained the white-on-white fabric that will be the background fabric for the applique columns.  I can see that pretty soon, I'm going to be working those applique columns!  I'm looking forward to that part of the quilt process!  :-)


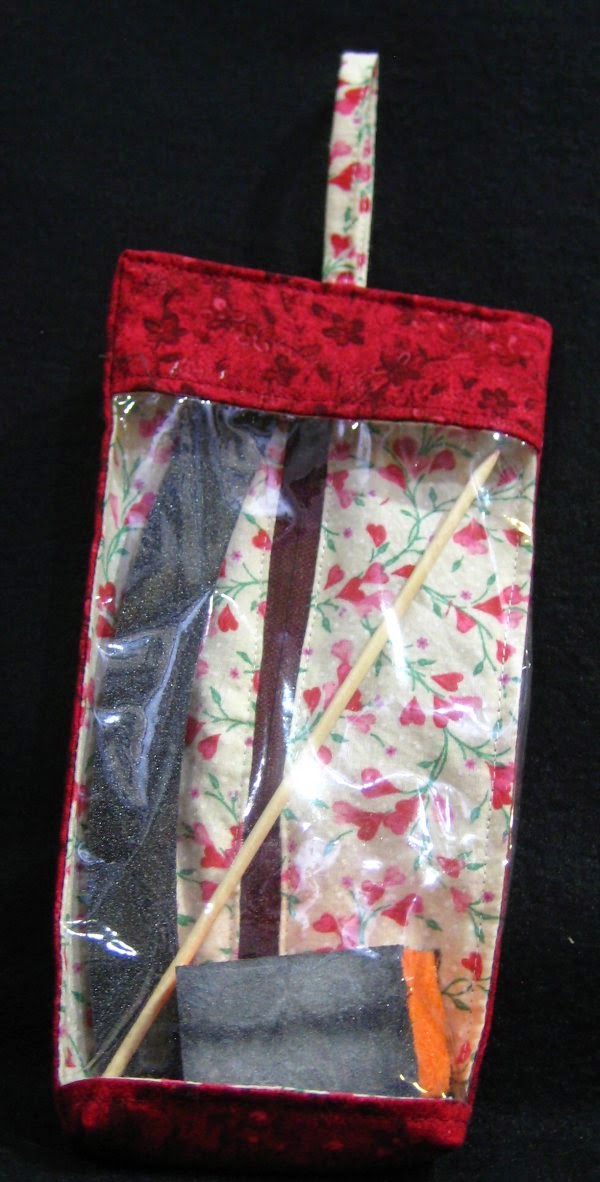
Manicure pouch


I have a confession to make: I have a twice-monthly indulgence .. a manicure.  I love how pretty my nails look after my manicurist performs her magic on them. 

At my latest visit, she said that she was offering to all of her regular clients, a "kit" of manicure supplies that would be used exclusively for them.  It consists of  items that she normally uses: a nail file, a nail file block/buffer and a cuticle stick/orange stick ... but we would need to bring them back every time.

I'm not entirely certain what prompted this but if it makes her job easier or satisfies some new regulation, I'm happy to oblige.

(Oh. Hmm.  The top of the pouch looks crooked in the picture, but I assure you it really is square.  The pouch must have been slouching over!  The lazy bum!)

BUT .. I know that I would be having a problem remembering to bring the items to every appointment without some sort of memory jogger.  It occurred to me that if I made a little pouch for them .. with a window on one side so I could see the contents .. a zipper for easy access ... and put this pouch with my supply of nail polishes ...it would not only remind me to bring them but would be a classy way to transport them back and forth.  PLUS, I could put my new nail color bottle in the pouch!

(I always bring my own nail polish because, even though my manicurist has a lovely supply of polishes, if I need to touch up my nails, I would need to have the exact color to match the other nails.  Bringing my own nail polish solves that problem.)

So, I made a windowed zipper pouch.  Very easy.   It's simply a flat tube that I boxed on one end to accommodate the nail file block/buffer and put a hanging loop on the other end.  All of the supplies fit nicely inside; I can see the contents and it's still big enough to hold a bottle of nail polish.

I'm really quite smugly pleased with myself. :-)


Monday, May 11, 2015

SF Giants zippered pouch bags

In addition to the SF Giants fabric to make a tote bag, I had enough leftover to make 3 zippered pouches.

I made a windowed pouch as a companion to the tote bag.  The tutorial for this bag is a PDF, available from Moda Fabrics and is called the "All You Need Bag".

It's a very clever technique that incorporates two interior dividers so that you have 3 sections inside.  The front features a clear vinyl window so that you an immediately see what you have inside that section.

The dimensions, per the PDF, will yield approximately a 3"x5" little pouch ... obstensively just big enough to fit your ID/license, keys and some money ... so that if you need to make a quick trip to the corner store, all you'd need to do is grab this little pouch instead of your big, ol' purse.

I chose to make my windowed zipper pouch bigger, to better accommodate the fabric pieces that I had.


The other two zippered pouches are the same ... so that my sister-in-law and her sister wouldn't be giving me any grief about how I made the OTHER sister the "better" zipper pouch!   You know how sisters are. :-)

The front of the pouch is the black logo fabric and the reverse is black and white striped "umpire" fabric.  Both pouches have a bright orange zipper pull.  They are a single compartment pouch.


You can find tutorials for standard zippered pouches all over the internet, so I'll let you use your favorite. 


from Michelle Designs
However, what REALLY bugs me about most zippered pouches are how the *ends* are so bunched up and UGLY.   The term I've seen for this is "dented" .. and that's exactly what it is.    The picture to the right is from the most excellent tutorial from Michelle Designs.

Because my zippers were slightly smaller than the length of the pouch, I added a small piece of fabric to the end of the zipper to lengthen it.


Here you can see both ends ... VERY neatly finished.  They look so pretty!  

In fact, the technique used in the Michelle Designs tutorial is similar to that demonstrated by another most excellent zipper pouch tutorial, the Open Wide Zippered Pouch by Anna of Noodlehead.

So, if you don't have a zippered pouch tutorial/pattern that you already like, go take a look at the Open Wide Zippered Pouch.  Anna will guide you through 3 different sizes, all beautifully made and finished.


SF Giants tote bag


Among some of the fabric that I acquired when my sister-in-law's mother died, was some SF Giants woven fabric.  For whatever reason, I can find SF Giants and SF 49er fleece out here, but woven cotton is practically non-existent.  So I was delighted to find these pieces in her stash.

Now, I am not, by any stretch of the imagination, a baseball fan.  The sport is just waaay to slow for me.  But, my niece and sister-in-law and my sister-in-law's sister are HUGE Giant's fans.  I mean dyed in the wool fans.  So, when I spied the SF Giants fabric, I asked my niece if she would like a tote bag ... or something ... made from it.  She agreed that a tote bag would be dandy.  (I also made my sister-in-law and her sister some zip pouches from the fabric, so they wouldn't feel left out.)

I searched through my collection of tote bag tutorials and chose my version of the Jordy Bag.  This is a great tote bag, but over the years, I've added some extras that have proven to be very useful.   This specific bag is larger than the original Jordy Bag, as I wanted to maximize the use of the fabric that I had.  The dimensions of this bag are a very generous 15"l x 17"h x 4"d.

I like to have an interior, hidden zippered pocket as well as a divided patch pocket.  The lining is a bright SF Giants orange solid and the zipper is a contrast black.  When the zippered security closure is flipped down, you can't even see that the hidden zipper pocket is there.  What I like about this pocket is that the pocket itself hangs freely between the lining and the tote bag.  It's securely made from interfaced fabric so there is no chance of it falling apart inside.  It's a very ingenious design.


On the other side of the tote, I put a divided patch pocket.

It's nice to have an easily accessible pocket for small things. 


The inherent downside of patch pockets is that all the stress is at the top, where the pocket is stitched to the base fabric.  Whenever you delve into the pocket, those stitches take the brunt of the pull.  I put a patch of interfacing on the back of the lining so help support that stress, as well as stitching a triangle at the top of the patch pocket instead of a single line of stitching.   But ... in the grand scheme of things, I expect this patch pocket to tear away at some future time.

 
My favorite middle daughter likes to have a loop to hang her key carabiner on, so she can immediately latch onto her keys instead of fumbling around at the bottom of the bag.  Sadly, I forgot all about this step when I made this tote bag ... oops.  :-)

I like to have a zippered security top for tote bags ... although I have never been pick-pocketed, I am leery of having an open-topped tote bag in public.  You just never know when a light-fingered individual is around.

I chose a bright orange sport zipper to coordinate with the black background logo fabric.


I also like to have the handles/straps fully surround the tote bag ... so that they start/end at the center bottom seam.  Having fully supported handles like this enables you to carry heavier loads in the tote without being concerned that the stitches only at the top seam will pull out.  Additionally, when the handles are sewn like this, you have a ready-made framework for an exterior patch pocket.

I made a patchwork pocket from the VERY SMALL pieces that were leftover.  (What now remains are even smaller pieces, which could be good for crumbs, but that's about all!)

Finally, I like to put a separate, removable firm false bottom in the tote.  I'm still trying out various substances for the false bottom; this one is foam board.  I cover the false bottom with the lining fabric and I put a piece of Velcro on the back side of the false bottom to match a piece on the bottom of the tote.  That ensures that the false bottom sticks in place but can be removed when the tote is washed.

The Jordy Bag is fully lined, which presents a beautifully finished interior, which is a lovely touch.  But as with many lined tote bags, the lining is a separate piece.  This means when you fumble around the bottom of the bag, many times the lining will detach itself from the bag.   This is annoying.  I figured out an easy way to permanently and invisibly attach the lining to the bottom of the tote bag but still have a fully finished interior.

When I made the Jordy Bag, I would make notes on the instructions, so I wouldn't need to think of how to do that feature again.  I have incorporated those features into the instructions so that my version is sort of a mish-mash of different tutorials from various people.  I figure, why reinvent the wheel when another sewer has already done the work?

The tutorial for the original Jordy Bag can be found at Jordynn Mackenzie.    The tutorial for the interior, hidden zippered pocket can be found at Jerisew(s).   The tutorial for the zippered security closure at the top can be found at the forum at Craftster.  The other variations are self-explanatory to any experienced sewer.


Saturday, May 09, 2015

Audrey's Brights: 2 donation quilts


Well, they WILL be donation quilts once they are quilted. :-)

I tend to want to wait until a quilt is finished in order to show off display what it is that I'm working on.  But because I don't always quilt a top immediately upon completion of the piecing, it could be a LONG time until I blog about them.  Then I remembered that showing a WIP is always appreciated, too. :-) So, with that in mind, here's what I've been working on lately.

Earlier this year, my sister-in-law's mother, Audrey, died.  Audrey & her family have been social friends with my family from when I was a little girl .... long before her daughter married my brother.  So, there's a long time connection between our families.

Audrey was a sewer.  She and my Mom often made matching square dance dresses to wear to conventions and hoe downs. She collected fabric and "inventory" long before the concept of building a stash was made popular.  She obviously had a great fondness for Christmas, both religious and secular.  When she died, my sister-in-law and her sister asked me to help them clear out their Mom's sewing room.  Neither of them sew or do crafts, so they have absolutely NO idea what would be worthwhile to save and what could safely be donated.  They said that I could have whatever I liked, as whatever I didn't take would either go to the dumps or to donations.

Let it not be said that I denied someone a helping hand.  Especially when the payoff is fabric. :-)    Nah, I would have done it even without the fabric.

Originally, Audrey had organized her sewing room well.   She had shelving around the walls with totes and cubbies on the shelves.  But much later in life, she either gave up or became confused or didn't remember or didn't much care .. whatever .. because her purchases soon were simply tossed into the room.

It took me over 6 hours just to clear out the center of the room, behind the door and the top of the sewing machine cabinet.  I never even reached the shelving.  Thankfully, it was all "stuff".  No garbage.  No little beasties.  No bugs.  

I separated the fabric & notions & supplies that I could use, craft supplies that I would donate to our local elementary school, counted cross-stitch supplies to a kindergartener teacher who stitched.  I boxed everything for ease of transport and filled up the back of our Jeep with all those boxes.  And when I got home, I started putting all the fabric in the laundry.  (I don't use anything that hasn't been washed .. personal preference).

Remember me saying that Audrey liked Christmas?  Well, her inventory of red & green Christmas fabrics totaled over 45 yards.  Oy vey.   I never did get around to figuring out how many yards of everything else, but it was at least that much.

the leftover BRIGHT scraps
In going through Audrey's fabrics, I came across some BRIGHT, imaginative and fanciful scraps of mushrooms and flowers.  Think 1960's.  No yardage but just remnants leftover from some project.  I was able to cut a 4" square from the smallest of the scraps and then proceeded to cut as many 4" squares from the rest of them.  By the time I was done, I'll be lucky to be able to cut a 2" square out of what is left.  :-)

I also found 6 BRIGHT coordinating solids.  I had some fleece of my own that I had earmarked for quilt backings and was determined to use Audrey's bright scraps for the tops.

For the first top, I simply put the bright print squares and the 6 solids into rows, one following another.  It was very repetitive but easy to sew together.  Not terribly exciting but, boy, is it BRIGHT.  I figure some little kid will be delighted with it.

When the first top was done, I found I had quite a few bright print squares left over.  This time, I looked through my collection of inspiration pictures and found something that caught my eye.  Using the 4" squares, this new layout would yield a 14" block with the BRIGHT print as a machine appliqued heart in the center.  Eventually I made (20) 14" blocks for the second quilt.  I found 3 other small pieces of fleece, that when sewn together, would produce a suitably sized backing. 

this is the 14" block for the second quilt top
What is interesting is that when all those blocks were put together, the resultant top was such that you would never think that there was a basic block that started the whole thing.

The fleece backings and the pieced tops have now been paired together and await their turn to be quilted.  I had intended on loading the first quilt onto my longarm machine this past week, but before I could do so, a client called up to see if I could quilt something for him.  Yep .. I sure could .. and Audrey's Brights will need to wait until the client quilt is done.

Luckily, there is no deadline for my donation quilts .. when I finish a "goodly amount", I bring them over, rather than transporting them onesie/twosies.


Monday, April 27, 2015

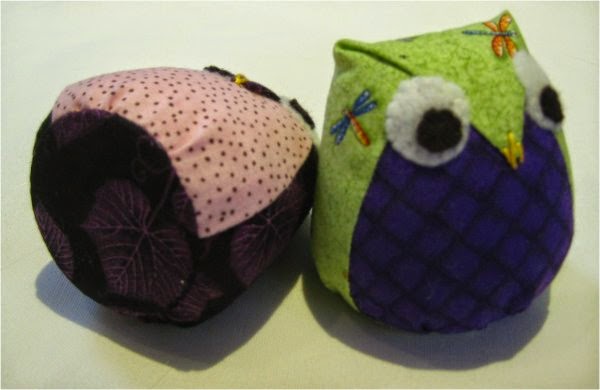
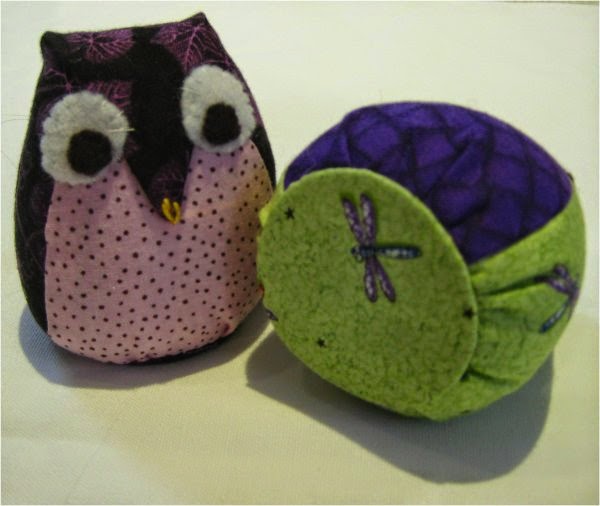
the Zakka owl: an adorable, small stuffed owl


You may start squealing with ooh's and aaaah's at any time. :-)

There is a very easy tutorial for these stuffed owls at Moon Stitches ... the tutorial is presented in picture format, spread out over the subsequent pages.  Also, do a Google/Images search for "tutowlrial" and you'll see all SORTS of simply adorable samples!


Although the tutorial shows the owl being sewn by machine, this little project is one that you could easily
stitch by hand, if you wanted a portable project when you are on the go.  They are great little projects to do whilst you are watching a TV show.


Allow yourself the freedom to choose WILD fabric for your owls; they won't mind. :-)   If you think far enough ahead, you could fussy cut the circles that are used as the owl's base.  I didn't consider that when I was cutting my fabric.  And speaking of the base, I used cardboard for mine.  Be aware that whatever you do use as the "stiffener", stays inside the circle of fabric.  Because I used cardboard, these little owls aren't washable ... you might think of using something that won't be affected by water if you think your owls are going to be in an environment that would warrant them being cleaned.

I used felt circles for the eyes, since these owls are going to be sent to two young girls (ages 2 and 4). 
Buttons would also be a great item to use for eyes .. but not if young children are the recipients.  When you use buttons, be aware of the direction the final stitches through the buttonholes are placed ... you can really alter the look of your owl, depending on whether the thread is horizontal, vertical, diagonal or even crossed!   If you were so inclined, you could fully embroider the eyes, use smaller circles of appliqued fabric or even paint them on the fabric.   If you position the eyes UNDER the "nose" flap, then the owls will have a stern look to them.

Again, do take the time to do a Google/Image search with the keyword "tutowlrial" ... you'll see lots and lots of very clever ideas to spark your imagination!

If you use the pattern "as-is", the owls will be about 3" high.  They fit comfortably in the palm of my hand.  Once you see how the pattern pieces fit together, you can scale the pieces up or down to create a larger or smaller owl.  With different sizes, you could have an entire family of owls!

These little guys are just sooooooooooooooooooooooooooo adorable.   I'm putting one into the Bendy Bags that I blogged about earlier.


Sewing Projects


I've had my quilting projects on hiatus while I worked on some sewing projects.

First up, is the Bendy Bag by Lazy Girl Designs.  I saw this pattern, kitted up with fabric and zipper, at a recent local quilt show.  I'm a real sucker for zipper bags.  I LOVE them.  I have quite a collection patterns for variations on a theme of zipper bags.  Lazy Girl Designs have come up with a unique look/design and I didn't even bother to resist the temptation. :-)

With most zipper bags, the zipper goes straight across the top of the bag.  Not this one.  The name "Bendy Bag" comes from the way the zipper bends at the corner to continue part way down the side. 


It's a different construction technique also.  I like the interior of my projects to look as neat and tidy as the
exterior, so I don't care for exposed seams inside.   Because I was thinking that the fabric that came with the pattern as the "good" fabric, I wanted to practice with some other fabric first ... as I wanted to see if I could manipulate the directions so I didn't have the exposed seams.

My first attempt was using leftover Texas longhorn fabric as the exterior and bugs as the interior.  It came out cute ... but my attempts to completely contain the seam allowances didn't work out.   I concluded that with their design, you just can't put all the seam allowances so they are hidden.

You use an overly-long zipper so that you can use the "excess" as a loop/handle on the side of the bag.

I ended up mailing this bag to a Texas quilting friend of mine ... but ... and this is why I absolutely HATE mailing valuable stuff ... the post office managed to mislay the package.  It never arrived.   The post office at my end hasn't a clue where the package went or where it is.  Doggone shame.


I made two other Bendy Bags, this time following the directions!  The interior exposed seams are neatly trimmed and overcast (with a zig-zag stitch).
For one of the bags, I used matching bias binding to cover up the seam, but that really did add just a whole bunch of time to the construction process.

The butterfly fabric was what came with the pattern, along with the hot pink lining and zipper.

The cupcake fabric was specifically chosen because my youngest daughter is One Terrific Cook.  She can bake and cook *anything*.  Nothing phases her (unlike me, who needs a precise recipe).  I thought she'd get a kick out of the cupcake motif.  Ah, but my mother's intuition was 5 degrees off-center this time.  She didn't care for it.  While I will admit to being disappointed, I *am* very glad that we are able to be honest with each other so that she didn't feel obligated to accept it when she truly didn't care for it.

 She did mention that one of her friends has two young daughters (ages 2 and 4) and perhaps they might be recipients?  Bingo!  Done!  There's nothing I like more than making stuff for little girls. 

Which got me thinking ... even though I don't *know* these little girls nor their Mom, I couldn't "just" give them a Bendy Bag.  Oh no ... my mind was all awhirl with a set of goodies .... a small stuffed owl to go in the bags, a crayon/coloring book caddy and a ruffled tote bag to put everything into. 

So, off I went ... deferring my quilting projects for this newest sewing project!  More pictures and descriptions of the other items in another blog entry!