Like many other longarm quilters, I use doodle cloths to practice new-to-me quilting designs. I load muslin as a the top, whatever batting I have on hand (frequently splicing small pieces together) and using something sturdy as the backing. Sheets and home dec fabric are my favorites.
I've taken some hands-on longarm quilting classes that have resulted in we students taking home the sample doodle cloths we stitching in class.
I've even cheated with doodle cloths! When I've filled up the muslin top fabric, still want to practice some more but don't want to go through the nosebleed of loading up another sandwich .... I've actually just thrown another piece of muslin right ON TOP of the already stitched doodle cloth! Sure, I'm stitching through 4 layers .. but who cares? I'm just practicing the stitches and all I really need to see is what's on top!
Sometimes, I keep the doodle cloth samples. They show examples of designs that I know I would like to use "sometime" and need to keep the stitched sample around to remind me. But, I must say, MOST of the time, once I've done the doodle cloth .... and then probably used the design in a quilt ... I don't NEED the doodle cloth any more.
What do you DO with them? They certainly can't be used for quilts! For one thing, since I'm using a regular width of muslin, it's just not wide enough.
BUT .. it occurred to me that they would be great for pets to lay on. Specifically, the cats at our vet. When cats are kept for observation or overnight or boarded, they are kept in pet cages. The vet & staff do put towels down so soften (somewhat) the floor of the cages, but it can't be terribly comfortable.
I asked our vet the dimensions of the cages ... 27"x36". Using that as a basis, I use 60" wide muslin as the top, and draw (with a Sharpie) two 27"x12" rectangles (landscape mode) on the muslin. My longarm is a Tin Lizzie 18". The useable workspace is about 16", so a 12" deep rectangle fits quite nicely on the workspace. A 27"x12" rectangle is a nice size to doodle in. If I need more space to doodle, I just wander on over to the adjacent 27"x12" rectangle. 54"x12" is MORE than enough to doodle in!
I make sure that the 60" wide muslin is at least 1-1/4 long ... that let's me draw (3) sets of the 12" deep rectangles. When I'm done doodling the rectangles, I have (2) sets of 27"x 36" rectangles! I cut those sets out, bind them with leftover bias binding ... just like I do for my quilts. These are *sturdy* pads for the pets to lay on ...and for the vet to launder! I'm very pleased that my vet appreciates them!
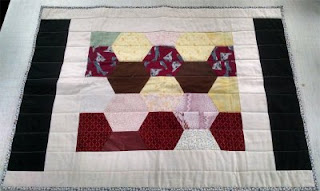
So, this last batch yielded 7 sets of cage liners ... and one oddball one! I had some leftover half-hexies from a project. I sewed them together, added on some plain border to size the top properly, sewed some home dec samples together for the backing and ... voila .. one more cage liner!

I've taken some hands-on longarm quilting classes that have resulted in we students taking home the sample doodle cloths we stitching in class.
I've even cheated with doodle cloths! When I've filled up the muslin top fabric, still want to practice some more but don't want to go through the nosebleed of loading up another sandwich .... I've actually just thrown another piece of muslin right ON TOP of the already stitched doodle cloth! Sure, I'm stitching through 4 layers .. but who cares? I'm just practicing the stitches and all I really need to see is what's on top!
What do you DO with them? They certainly can't be used for quilts! For one thing, since I'm using a regular width of muslin, it's just not wide enough.
BUT .. it occurred to me that they would be great for pets to lay on. Specifically, the cats at our vet. When cats are kept for observation or overnight or boarded, they are kept in pet cages. The vet & staff do put towels down so soften (somewhat) the floor of the cages, but it can't be terribly comfortable.
I asked our vet the dimensions of the cages ... 27"x36". Using that as a basis, I use 60" wide muslin as the top, and draw (with a Sharpie) two 27"x12" rectangles (landscape mode) on the muslin. My longarm is a Tin Lizzie 18". The useable workspace is about 16", so a 12" deep rectangle fits quite nicely on the workspace. A 27"x12" rectangle is a nice size to doodle in. If I need more space to doodle, I just wander on over to the adjacent 27"x12" rectangle. 54"x12" is MORE than enough to doodle in!
I make sure that the 60" wide muslin is at least 1-1/4 long ... that let's me draw (3) sets of the 12" deep rectangles. When I'm done doodling the rectangles, I have (2) sets of 27"x 36" rectangles! I cut those sets out, bind them with leftover bias binding ... just like I do for my quilts. These are *sturdy* pads for the pets to lay on ...and for the vet to launder! I'm very pleased that my vet appreciates them!
 |
| back of half-hexie cage liner ... home dec samples sewn together |
 |
| front of half-hexie cage liner |
So, this last batch yielded 7 sets of cage liners ... and one oddball one! I had some leftover half-hexies from a project. I sewed them together, added on some plain border to size the top properly, sewed some home dec samples together for the backing and ... voila .. one more cage liner!


