Monday, December 16, 2013

American Girl clothing: it all started with a big girl's quilt


Back in July 2013, I made a personal sized quilt for a 9 year old daughter of one of Mr. Pirate's cousins.  Technically, the daughter is a first cousin/twice removed, but that gets very cumbersome.  She just calls us Uncle & Aunt.

I found out from the Mom that the daughter had an American Girl doll, McKenna, who the daughter still loved.  I offered to make a matching quilt for McKenna.   The suggestion was enthusiastically agreed to.

So, I made an almost-matching quilt, using the same fabrics as in the daughter's quilt.


Then, what if McKenna didn't have a bed to sleep on?  I had no idea, but poor McKenna, if she didn't.  So I made her a mattress and pillow.

Oh dear!  What if McKenna didn't have any jammies????  Can't have our dear doll being cold in bed, can we?  So a set of jammies was made with Winnie-the-Pooh light weight flannel.


I attended a doll show, in the hopes that I would be able to pick up some American Girl "stuff".  Just what sort of "stuff" I had no idea because I didn't have a clue what might be available.  So, I went with an open mind, alert to possibilities.  I was able to pick up some shoes (black Mary Jane types, a pair of sandals, a pair of blue "suede" boots and a pair of red rain boots), some socks, hair curlers (!), clothes hangers, a beautiful hand-knit sweater and some other items that I can't quite remember.

Once back home, I began to plan outfits that would use the items I had just purchased. 

It was summer time and warm weather was still here.  McKenna surely needed a sundress!  I had some gold-veined cotton that I made a drawstring dress out of, which coordinated with the gold sandals. 


And for the parties that McKenna would be going to, I also had some yellow/gold Sari cloth that was used for a party dress ... it also went nicely with the gold sandals.


An ordinary sundress was made from turquoise cotton that had a white border print, using the same pattern as for the Sari party dress.


In anticipation of the coming Fall and cooler weather, I made a pair of trousers to coordinate with the sweater.

The sweater had off-white/cream sleeves and back with a mottled off-white/turquoise front.  Gosh, it was so pretty!  


Turquoise was a deliberate choice, as that is the daughter's favorite color.  (Or at least it was at the time!) 


A blue/black/white plaid flannel was used to make a cape to coordinate with the blue suede boots.   That would certainly keep McKenna warm!  

You know what REALLY annoyed me about this cape???  I was SO careful about matching the plaid at the side seams that I apparently completely IGNORED the most obvious place: the center front!  Oh. My. Gosh.  I literally stamped my feet on the floor when I realized that.  Normally, I would have redone it but I didn't have any more of that plaid and neither did I have any other color fabric that would be suitable for a cape.  Additionally, Mr. Pirate was harassing me to "get those doll clothes DONE before the girl graduates from college!".  So, to my own everlasting disappointment, I let it go.  I don't think the Mom or the daughter will ever notice it (neither is a sewer), but every time I see that photograph??   aarrrgghhh!


I still need to make a raincoat to go with the red galoshes.  And maybe a Christmas dress ... although time is getting kinda short for me to get that sewn up.  I'll try.  :-)

What I just adored about this project was simply that I *could* make them.  I was thwarted when my own 3 girls were young; none of them liked to play with dolls ... My Little Ponies, yes.  Dolls, no.   So, at last, here was my chance to make doll clothing!  I tell ya, I was enjoying myself waaaay too much and Mr. Pirate's admonition was well said.  :-)


Monday, December 09, 2013

All That Glitters


It was late October when we last saw this project.   The piecing was done and had just been loaded onto my longarm frame.

Then, the horrible happened ... my Dad passed away and everything came to a screeching halt.  I seriously, *seriously* underestimated how long it would take to handle everything associated with his funeral and ... omg .. the paperwork.  Right after that, Thanksgiving occurred and we were away from the house for about a week and half.

But, events concerning my Dad's estate are kinda/sorta under control.  Thanksgiving is over and done with.  I really needed to get All That Glitters quilted and off the frame, since I had previously volunteered to quilt some charity quilts and 2 had been delivered to me.

FINALLY .. last night, December 8th ... I finished the quilting for All That Glitters!

I had previously finished the quilting in the border blocks.  I needed to remember what I had planned for the red sashings (anything?), how to treat the center tree and what I was going to do about the background (anything?)

The border blocks: the stars were SITD with holly leaves quilted in the green squares & the red center square and nested loops in the green  triangles.  I used Glide thread in "Khaki", which is totally a bogus name.  It really looks like a low-sheen, burnished Old Gold.  Awesome thread, incredible color.

The blocks between the stars were quilted with a circular feather design.  Because the printed design on the fabric is in gold, I decided to quilt the feathers in a matching green thread.  I realized the quilting would be inconspicuous but, dang, it really did just about disappear!  I wouldn't advise feathers in a printed fabric for a customer quilt for exactly this reason but for my own quilts, I can do what I want. :-)

Sashings are always a dilemma.  Quilt or not?  The photo shows the quilt hanging sideways on the frame.  What looks like the top/bottom horizontal red strips are really vertical when the quilt is hung properly.  They are 2" wide.  The other red strips are 1-1/2" wide.  I quilted nested circles in an alternating, wave orientation.  I used red Glide thread.  Awesome stuff.

That left the tree in the center.  With Glide "Khaki", I outlined every doggone snowflake.  What a major pain to need to tie and bury all those tails, but I did.  The background of the center medallion was densely quilted with nested clamshells in green, so the background would be flattened and the actual quilting wouldn't show ... all you'd "see" is the texture.  This enabled the non-quilted parts of the tree to puff out in a 3D effect.

I've read several accounts of the mini-LED lights not having the final effect that was expected and that the wires & battery box on the back prevented the quilt from laying flat.  A suggested alternative was to use Swarovski crystals.  So, I'm going to go that route, once the quilt is squared up.

I'm on the 5 yard line, folks!   Detailed, close-up pictures will be taken when the quilt is finished.


Thursday, December 05, 2013

It's COLD.


The Pirate family lives in sunny California.  You know .. the land of beaches and fields of golden poppies and fun in the sun.    We don't live near any beach, so you can just forget that part. :-)

Along with almost everyone else in the country, we've been experiencing some cold weather.  Of course, the 55° F in North Dakota that seems balmy would definitely be chilly-willy here!

So ... just how cold did it get here last night?  At least 32° F.  How do I know?

Well ... on our deck, we have a water dish for the critters.  When our chickens get loose from their chicken yard and free-range, they enjoy a drink of water from it.  The raccoons certainly make use of it at night.


This morning, this is what the water dish looked like.  Pretty normal, huh? 


But wait ... something doesn't look *quite* right about that water.   Oh look!  It's hard water!  Or at least firm enough to hold up a full bottle of beer.    Now *that's* cold.


Wednesday, November 13, 2013

updating status


* California Poppy needleturn applique
Well, I finally got this one finished on October 7th.  I must admit that I wasn't truly enthused about completing it, as I thought the kitted fabric for the flowers wasn't showing off the petals nicely enough.  I seem to remember the shop sample as being much more distinctive ... but then they probably used different fabrics.

I feel very pleased with the needleturn applique.

In any case, it's done and is probably going to stay in this form for foreseeable future, as I don't really have any inclination to do anything more with it.


* Continuing with the hexie quilt
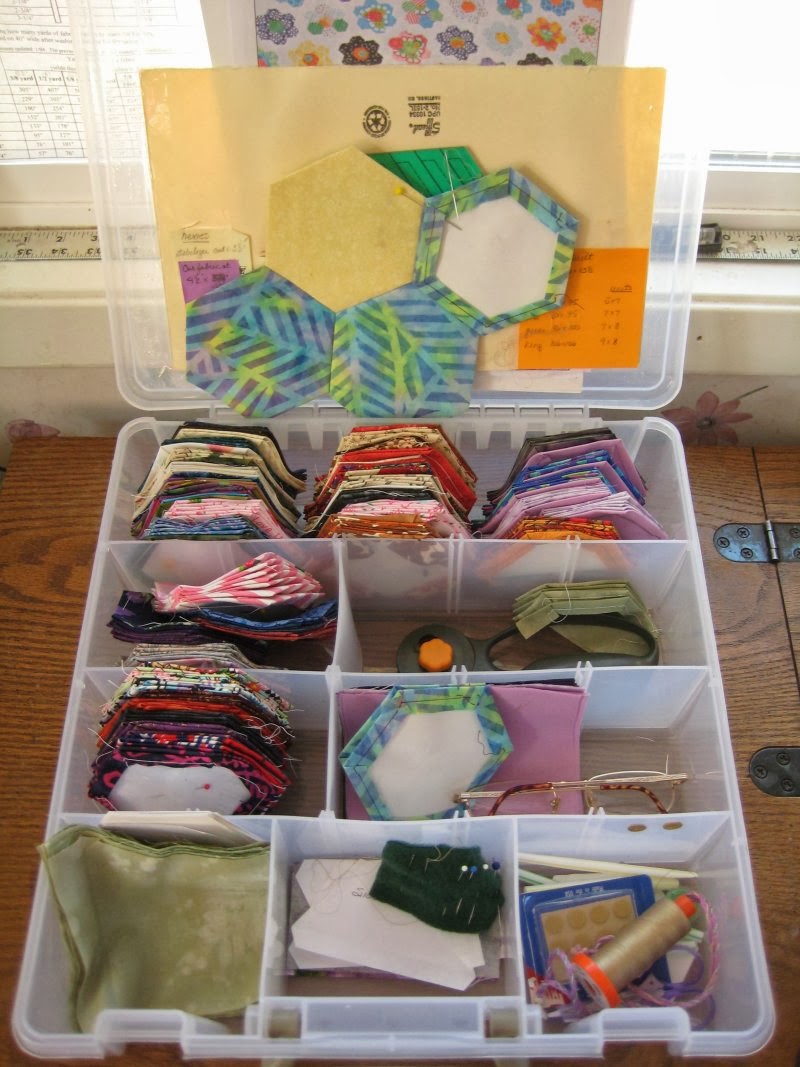
Progress continues on this project.  I have a whole project case full of prepped hexies that now need to be stitched together.  If I tire of the flowers, there are interminable green background hexies to make.  And if I need anything else different to make, there are the partial green hexies to make for the edges.

So, this project is going to be around for a while.  I find this hexie project surprisingly satisfying, mainly, I believe because I'm using HUGE hexies ... they are 3-1/2" from top to bottom, so they fill up a lot of real estate fairly quickly.  I might not be so enthused about this project if the hexies were small.


* All That Glitters
I had been making great strides in this project: the top was finished on October 19th.  I thought about how to quilt it for a couple more days.  The quilting wasn't entirely intuitively obvious .. or at least, I didn't want to fall back on something tried-and-true, since I kinda wanted to do a motif that was new and different to me.


I finalized the quilting designs in all the different areas of the quilt, got the batting and the backing, then loaded the whole shebang onto the frame.  I even started the quilting (the circular feather shown in the photo on the left in green) and was feeling pretty doggone good about it.

Then .... it was put on hiatus.


I got the phone call that I have been expecting for the past 5 or 6 years: my Dad finally died.  It was October 24 at 7:22am.  He was 90 years old and died peacefully in his sleep in his home.

He had his 3rd stroke in 2005 and it was really bad.  He never really recovered from it.  When he realized that he was never going to regain his mobility nor his independence, he just gave up.   There was absolutely nothing I could do to cajole, encourage, bribe, nag, or convince him otherwise.

His end had been a long time coming and, ultimately was a relief.  He had no quality of life and was really just waiting to die to join my Mom.   Other than the standard plethora of pills that he was taking for this, that and the other, he had not been hooked up to any machines nor medications.  But his body finally gave up and I'm very, very sure he is now exceedingly happy.

Once a week since 2005, I had driven to his house to visit and then later on, to also pay his bills.  It will feel very strange not to make that weekly trip.  We had his memorial service and Celebration of Life yesterday.   Those events are supposed to provide closure and finality; I'm not entirely certain that it has.  I feel I should have done "more" for him but in what way, I have no clue.  Rest in peace, Dad.  I love both you and Mom.


Monday, October 21, 2013

hexie update: hexagon unit construction


Recently, I attended Pacific International Quilt Festival (PIQF).  One of the vendor booths was hawking a tool to help with construction of hand-pieced hexagons.  I stopped to watch.  The tool was a glue pen.  To use it, you draw a line of glue on the template and press the fabric seam allowance down so the glue holds it whilst you baste through the template and fabric.   I used to use the method (only I was using washable glue stick, instead of a pen), which I have blogged about here.   (You'll need to scroll down to the bottom of that blog entry, as I also talked about other proejcts first.)   I no longer use this technique because (for me) it creates unnecessary extra steps.

BUT ... there was one other pearl of wisdom that the vendor imparted .... she cuts her fabric as a SQUARE.

Say what?!??!   She's not cutting her fabric hexagon-shaped?!??!  What outlandish shortcut is this?!??!

Indeed, her fabric was NOT cut as a hexagon to match the template.  Yes, there was excess fabric on the back of the hexagon once the fabric was folded over.  The more I thought about it, the more I realized .... so what?  That small amount of excess "seam allowance" fabric wasn't going to amount to a hill of beans in the scheme of things when it comes to quilting.   AND it has the extra added attraction of reducing the amount of preparation steps I would need to do.  I'm all for streamlining and ease of construction!

So ... what am I talking about?   Let's see ....  (aside: I had already cut my hexie fabric into 4-1/2" strips to accommodate the acrylic template I use to cut the hexagon shapes.  This means that could not cut the fabric into *squares* because a 4-1/2" *square* wasn't big enough for a proper amount of seam allowance to fold over.  Instead, I have to cut the fabric for my templates into 4-1/2" x 5-1/2" rectangles.  The fact that I am using rectangles instead of squares makes no difference whatsoever in the construction process.)

First, look at the front of the hexies, side by side.  I realize that pictures won't let you feel the thickness of each one, but I assure you that *to me* there is negligible difference between the two.

 Once they are whip-stitched together, you can't tell there is any difference between the shape of the fabric that was originally used.


Looking at the BACK of the same units ....  oh, now THERE'S a difference you can obviously see. 

The hexie flower unit on the left was made with fabric rectangles.  The back of these hexies has more fabric covering the template than the hexie flower unit on the right, which was constructed with hexagon-shaped fabric.

Yes, the flower unit on the right looks a whole lot more tidy but once the quilt is quilted, not even the Quilt Police would be able to tell which flower unit had hexagon-shaped fabric and which ones had the rectangle-shaped fabric.

I use an acrylic template (by Darlene Zimmerman, available through EZ Quilting) to cut my paper templates and my fabric.  This is a nifty template for cutting because it allows me to choose between 5 different sizes.  To efficiently use it, you first cut your fabric (or paper, for templates) into strips, the size of which is printed on the acrylic template.

My paper templates are 3-1/2", so I cut paper strips at 3-1/2", then subcut all my paper templates.  The fabric to wrap around the paper templates uses the 4-1/2" size hexagon.  I cut fabric strips at 4-1/2" x WOF, then subcut the actual hexagon shapes using the 4-1/2" markings.

This requires me to make 4 cuts per hexagon, once the strip (of paper or fabric) is ready.  This really isn't annoying; you just  zip-zip-zip-zip around the acrylic template and you have lovely hexagons.

BUT ... that *is* 4 cuts of fabric.  After the first 2 cuts, you need to flip the template around so you can cut the other two sides.  That breaks your rhythm and takes time.  And aren't we all about saving time?  :-)

If I use a square/rectangle piece of fabric, I'm saving myself 3 cuts of fabric!  How?  Well, I still need to cut my fabric into 4-1/2" x WOF strips.  No getting around that.  But the subcuts???  Just ONE slice at 5-1/2" gives me a rectangle that is suitable for wrapping the paper hexagon template.  That's a reduction of 3 fabric slices AND I don't need to turn the template (which I'm not using) over.   This allows me to cut my fabric more quickly so I can get to the hexagon construction phase.

Here's a comparison of the hexagon construction with both shapes of fabric:

First, the "traditional" method, using hexagon-shaped fabric.  Place the paper template on top of the fabric.  I put a pin in the center to hold the two pieces together.  The seam allowances are folded over the paper edge, one by one, and I simply *hold* the fabric down whilst I take a back-stitch in each corner.  This holds the two layers of folded seam allowances down.  I do *not* go through the paper template.  I drag the thread over to the next corner and repeat the back-stitch until I am finished.  These basting stitches *stay* in the hexie.  (i.e. I do not have the extra, added step of needing to remove the basting stitches when the hexie unit is done.)

The back looks very neat and tidy, doesn't it?  :-)

When I'm using the rectangle-shaped fabric, it looks like this.  I follow the *exact* procedure as with the hexagon-shaped fabric but there is obviously excess fabric in the corners, which makes the back of the hexie unit look messy.

But, goodness gracious ... WHO is going to look at the BACK of your hexie units once the quilt is done?  Heck, no one is even going to be *able* to look at the back unless they take your quilt apart! 

For both methods, once the fabric has been basted around the paper template, I do give each hexi a pressing to flatten the fabric down and create a very crisp edge for me to whip-stitch.  Once each hexi has been pressed, each one is VERY flat.  Honestly, it's exceedingly difficult to tell the difference between the two just by feeling them.

Now, I will say that if you are going to hand quilt these hexies, you might be able to tell when you've hit the areas with the extra corner fabric.  But, I don't hand quilt.  My longarm machine will go through anything, so the extra corner fabric doesn't even figure into the quilting process.   I've done a number of hexies withe the rectangular fabric and I'm pleased enough to continue using the rectangular-shaped fabric vs the extra time & effort it takes to cut the hexagon-shaped fabric.  

The only drawback?  You need to get OVER the fact that the BACK of the hexies don't look tidy.  :-)

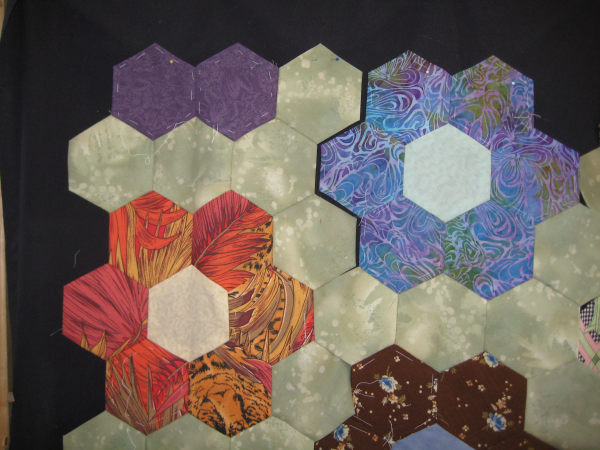
Here's my progress so far .... this is my "design wall"  (i.e. a king-sized black flat sheet) that I've pinned the completed hexi units onto. 

The hexie units on the left side have been sewn together into columns.  Then I realized that was a tactical mistake ... I really do need to have ALL of my hexie units available to be able to place them in a pleasing manner and also to avoid having too many of the same color scheme next to each other.  (Oh, the horror of it all, should that ever happen!) 

So, if you look to the right, you'll see the individual hexie units pinned but not sewn together  AND you'll see flower units without their background hexies stitched on .... I haven't gotten around to that right now, as I've been concentrating on stitching the flower units together.

What do I call a "hexie unit"?  .... well that is a flower unit sewn together with its background hexies.  At that point, I can place that entire unit wherever I want it to be. 

All of the hexie units interlock with each other.  This makes it very, very easy to move the units around and see what the overall color scheme looks like.

Onwards!  :-)


Sunday, October 20, 2013

"All That Glitters" wall-hanging


I recently attended Pacific International Quilt Festival (PIQF) in Santa Clara, CA with a very good quilting buddy.  It's always nice to go to shows with a kindred spirit because you can talk shop without needing to do the background info.

One booth we stopped at had a Christmas tree wall-hanging, "All That Glitters"  designed by  Christine Baker & Nellie Holmes, featuring a gorgeous panel print and companion fabrics.  The thing that caught my eye ... along with everyone else's! .. was the twinkling lights that had been inserted in the wall-hanging!  It was just so doggone cute!

As it happens, my youngest daughter loves Christmas.  She has an apartment but I bet that she's not going to spring the money for a Christmas tree.  I thought that she might like this wall-hanging in lieu of a real tree and it might suffice until she gets a home of her own to settle in, where she *can* invest some emotional energy and funds to decorate for Christmas "properly".

The booth had the wall-hanging available as a kit ... panel print, companion prints and the lights!  Even though it was early in the day, I sprung for the kit.  You just never know how fast something will sell out at a show.

Yesterday (Saturday, 10/19), I spent time to piece the top together.  It's rated at a beginner's level and I must agree.  It is very, very simple to construct.

I have a couple of nitpicks to discuss.  The star blocks are Sawtooth Star blocks.  Sometimes the points are made with Flying Geese; sometimes they are made with triangle-in-a-square blocks.  This pattern chose the triangle-in-a-square block. 

One nitpick was how they pieced the triangle-in-a-square unit.  They have you make a half-rectangle to VERY specific measurements then join the two half-rectangles to make the triangle-in-a-square.  This results in a seam down the center of the block.  This seam creates unnecessary bulk at the center top of the block.   If you are slightly off in the seam allowance or in the pressing of the seam allowances, your final half-rectangle unit won't be quite the right measurement, which means your triangle-in-a-block unit won't be quite right either.

Having said that, *most* of my triangle-in-a-square units were within a reasonable margin of error.  Beginning sewers might not have as much good luck.  When constructing units such as these, I like to make them slightly over-large and trim them to size.  In this manner, I can be absolutely assured that the final block will be precisely the correct measurements.

 Furthermore, I wouldn't have used the half-rectangle approach.  I have Eleanor Burn's "triangle in a square" ruler, which makes constructing this block a cinch.  Personally, I *adore* this ruler set for making this block.  It is absolutely, positively fool-proof.  However, even if you *didn't* have Eleanor's ruler, you could still make this block by cutting two side triangles and a center triangle (one such tutorial is here, but there are many others out there).  But, you'd need to be aware that this construction technique is an alternative.

The other nitpick I had was that the panel print was skewed.  The panel print consists of the Christmas tree bordered top & bottom by snowflakes.  You need to cut the snowflake borders off (and reattach later after the sashing is inserted).  The resultant piece is just the Christmas tree.  Well, when I aligned the top & bottom raw edges so that the fabric was hanging flat, there was about 1" overhang on each side.   If  I had just straightened out the whole panel print, I would have seriously cut through the end snowflakes.  As it was, I was required to cut quite a bit from the Christmas tree to create a true rectangular panel.  This made the final Christmas tree panel narrower than the instructions called for .... which meant that the end snowflakes of the top & bottom borders were going to be sliced off.  :-(

But other than that, the construction was absolutely straightforward and very easy.  I started slightly before our dinner was ready and even though I was interrupted several times during the course of the evening, I was able to finish the piecing of the top that night.  Here's the timeline:

6:00pm.   Cut the top & bottom snowflake borders from the Christmas tree panel print.  True-up the Christmas tree panel rectangle.


6:15pm Make the half-rectangles.


Make a whole bunch of them.  Put them aside for the moment.


6:21pm  Cut and sew on the red fabric sashing and inner border.


6:30pm  Chain stitch the two halves of half-rectangles together to create the triangle-in-a-square unit.  Make a whole bunch of them.  Make more.

[break of 2 hours ... helping Mr. Pirate can some tomato sauce and eat dinner]


8:55pm Construct star block component 1, consisting of one triangle-in-a-square and two plain fabric squares.   Make a whole bunch of them.


9:34pm Construct star block component 2, consisting of two triangle-in-a-squares and one plain fabric square.  Make a whole bunch of them.


10:05pm  Combine star block component 1 and 2.  This resulted in 10 star blocks.

Construct the borders (top, bottom, sides), consisting of alternating the Sawtooth Star blocks and plain fabric squares (from the companion prints).


11:39pm  Final, finished version of the top is completed, ready to be quilted.

Note that the duration was 6 hours BUT at least 2 hours of that was interrupted by non-sewing stuff.  This is a top that can EASILY be made in one day.

At this point, the top can be quilted.  Once quilted, you square it up and bind it.

Then, you decide where you want the little LED lights are to be placed.  Make a buttonhole (machine or by hand) at those spots so that the LED light can be inserted from the back.    Yes, you could just poke a hole through the quilt with an awl, treat the raw edges with Fray Check or Fray Block and then put the LED lights through the hole .. but really.  REALLY ... don't do that shortcut at this point!  Take the extra time to make the buttonholes!

The LED lights have a small battery pack that powers them.  You'll need to make a pocket on the back of the quilt to hold this battery pack so it is out of sight.

But sure to put a hanging sleeve on the quilt!   I like to sew the top of the hanging sleeve onto the quilt when I sew on the binding.  That way, I know that the hanging sleeve is going to be securely attached to the quilt.

Don't forget the LABEL!!


Sunday, September 29, 2013

hexie project: edge update


True to form, I couldn't stand not knowing how slicing off the excess of the hexies would work for creating a straight edge.  :-)

Here's the upper left corner. 

The blue arrow shows the one hexagon that has been stitched in place to become the side edge hexie. 

It fills in the "castle crenelation" space.


This picture shows a blue line on the ruler measuring a 3/8" seam allowance beyond the finished edge of the full hexies. 


I'll cut along the ruler edge, leaving the 3/8" extra to fold under.


And this picture shows the sliced off "excess". 

I had a thought .... what if this sliced off "excess" could be used to fill in the zig-zag space at the top/bottom ? 

*That* would be awesome!

But alas ... it's the wrong shape and doesn't fill the space. 

So, the excess piece from the side hexies is just waste.  It really is too small for me to do anything else with.


Here's the finished edge of the sides of the top ... the half hexie fills in the "castle crenelation" space beautifully and creates a perfectly straight, finished edge.  You can see in this picture both the front and back of this area. 

The basting thread you see on the back of the top *stays* on the hexie, holding the seam allowances in place. 
Because I don't stitch THROUGH the paper template, the basting thread doesn't show on the front and hence, doesn't *need* to be removed. 

I really dislike having more steps than is necessary when working on a project.  If you need to do a step, that's fine ... but in this case, I read a blog (uncredited, I'm afraid) that showed the quilter taking a back-stitch at each folded corner *BUT* not going through the template, then dragging the thread to the next corner, etc until all the corners had been tacked together.  In this manner, all the corners are held down and the basting thread does NOT need to be removed when the hexies are stitched together!  


Although removing the basting thread is very easy ... it just pulls out ... it's one step that I don't have to do with all the many, many hexies that will be in this top.  If I was using smaller hexies, there would be many more of them and removing the basting thread would that much more obnoxious.

And finally ... here's a picture of the finished corner!  I forgot to take progress pictures when I was doing the smaller partial hexies for the top, which fill in the zig-zag space, but it follows  the same procedure as for the side hexies. 

I was pleased to discover that my full-size hexie yields (2) of these smaller hexies, so there is much less waste.

I'm also pleased that, eventually, I will have a nice finished, straight edge on the hexies so that I will be able to easily (and I'm all about being easy!!  :-)   ) sew on border strips.


hexie progress


So, as I've been working on my hexi Forever Project ™, I've not only been pondering how in the heck I'm going to quilt this thing but thinking about the more immediate problem of how the edges are going to look like.

Here's the upper left corner of my work-in-progress.  There are two vertical columns here that haven't been sewn together.  The top edge looks like a zig-zag.  The side edges look like castle crenelations.  Neither of which I'm thrilled about.  Now, I realize these are these edges are the natural result of the hexagon shape, but those edges just don't do anything for me.

One other piece of information: I'm a complete neophyte when it comes to hexies.  I've been reading around the internet and taking in everyone's ideas and suggestions but eventually coming up with my own combination of techniques .... which admittedly probably isn't a new combination at all!   That's one of the neat things about quilting: you can use whatever technique and method that suits you as long as it results in what pleases you.

Now about those edges .... am I supposed to LEAVE them as-is?  As in, that's the final edge of the quilt?  Kinda like an angular scallop?

Or, do I applique my finished hexie top to a border background so the final outer edge is nicely straight?  If I do applique the hexie edge to a border strip, will my applique stitches be STRONG enough to withstand the stress of use?

So many things to worry about!

And then .... ta da!   I read Texas Freckles' 2010 blog entry on how SHE was thinking of finishing the edges of her hexie project.  She proposes to simply *cut off* the extensions of the hexagons that are on the edge!  What?!?!??!  How radical!

Since I am hand-piecing my hexagons, my first thought was 'oh no ... no way am I going to cut my hand-pieced seams in half!  They'll come undone!'  To avoid that, I made some paper templates that would effectively fill in those edge spaces and give me a folded edge to work with .... just like the full hexagons along the edges.  I experimented with some scrap fabric just to see what it would be like and I must admit, I love the look and the idea!   The drawback is that these are irregular shapes and folding the seam allowances to the back at the corners is tricky.

But, it sure gives me the straight line with a folded edge that I wanted!  This will allow me to whip-stitch a border strip onto the edge of the hexies just like I've been whip-stitching the hexies together.  I feel much better and more confident about the strength of a whip-stitched seam than an appliqued "seam".

However, even working with the sample template and fabric was annoying ... just because the shape is irregular.  It *would* be so much easier to make a full hexagon and chop it off 1/4" beyond the finished edge.  And in thinking furthermore, if I do that, I'm not actually cutting through any seams at all.  The seam that attaches the two hexies stops AT the edge; cutting the part that extends beyond that point would simply be a seam allowance.  At least, I think so, since I haven't actually tried it yet.   The only drawback to this method is that it does "waste" a full hexagon and there's not too much you'd be able to do with the cut-off portion.    But since cutting and sewing a full hexagon at the edge and cutting off the excess would really be so much easier than my irregular templates, I think I'll go with that.  :-)

Therefore, that is my working goal at this point .... all the spaces in the edges will be filled in with partial hexies, probably full hexies that will get chopped off and the excess (seam allowance) fabric folded over.  This will result in a lovely STRAIGHT edge for me to work with.  Oh hooray.  :-)

The quilting design?  I'm kicking the can on that decision down the line a bit; I don't need to finalize it.  But I'm still thinking about it. :-)


Monday, September 23, 2013

The Barter Quilt


In October of 2012, I started another hand-pieced top using  ... oh my gosh ... MORE of the fabrics that had been used to make the Diggin's Quilt and 4-patch and Straight Furrows and Underground Railroad and a small Ohio Star quilt that went to the tornado victims of Moore, OK.   I swear this fabric was multiplying on its own.  I can't conceive that I ever bought that much.

I like having hand work to do when I'm away from home. I call these projects my "Forever Projects" because I really don't have a deadline for them to be finished and I really don't care when then get done.  I've had a number of Forever Projects since the first one in the 1990's.

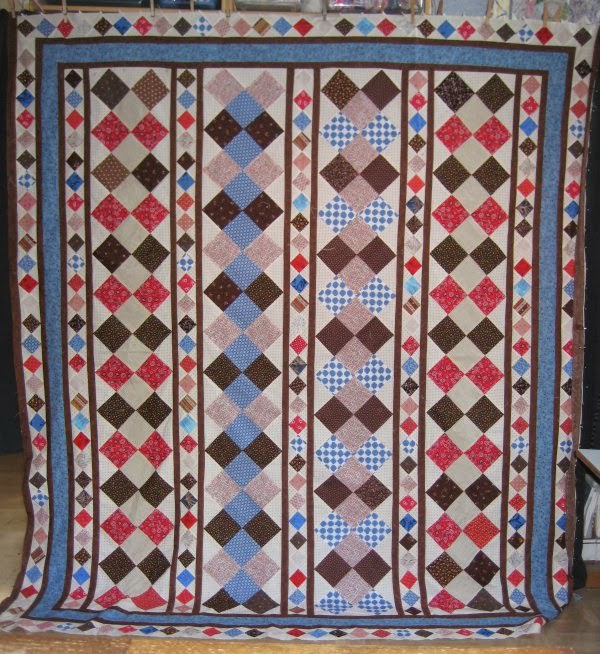
I called this particular Forever Project "Vertical Diamonds".   Clever and original, huh?  :-) 

Well, I worked steadily on this project.  Every Wednesday, I visit with my Dad and always take along a Forever Project.  A lot of this project was sewn during those Wednesday visits.  By Spring of 2013, it was done.  My notes don't say how big it turned out to be but judging from the picture, I'd guess, off-hand, that maybe it was double?  *maybe* a queen.  I'm not really sure.

In fact, the picture to the left isn't even of the *finished* top!  I know there is another blue border around that outer border of diamonds.

In any case, I eventually got the top finished.  Now I was in a quandry.  For whatever reason, I wanted this top to be hand-quilted.  I had put a lot of time and effort into all the hand-piecing, although it obviously can't be seen.  It seemed to me that hand-quilting would be the "proper" way to finish this quilt.

But not by me.  I don't do hand-quilting.  The limited number of SMALL projects I've done have been more than enough for me.  I appreciate hand-quilting.  I recognize the skill it takes.  But, for me?   it's simply terminally boring.   So, this top was going to remain just that ... a top ... because *I* was not going to hand-quilt it and I'm just waaaaaay too cheap frugal to pay for someone to do it for me.  (Not that they wouldn't be worth it!! Heavens no!  *I* just don't want to pay for it!  Just as other quilters don't want to pay for longarmers to quilt their quilts.)

Enter my quilting buddy, Donna.  Donna hand-quilts.  She pieces tops only under duress and then, only so she has something to hand-quilt.  She'll even buy cheater panel prints, just to hand-quilt them.

In the Spring of 2013, I asked Donna if she would be agreeable to a barter ... would she hand-quilt my top?  In return I would longarm quilt any quilt she has.  She *was* agreeable except that she wanted me to finish piecing a Forever Project of her own ... something that had been languishing in her To Do pile since 2002 or 2003.

I jumped on the opportunity!  Without wanting to sound like a braggadocios, I feel confident in my own sewing ability to be able to sew almost any doggone quilt top you can throw at me.

In March 2013, we exchanged projects.  I handed over my Vertical Diamonds.   We talked about what sort of hand-quilting would be done.  I was of the opinion that ANYTHING she did would be a vast improvement of it laying about in my house.  I was completely comfortable with whatever she felt comfortable doing.  She stressed that she was not an expert hand-quilter; that her stitches weren't the same size top and bottom.  I reminded her that the top wouldn't get quilted *at all* if I held on to it.  She took notes on what we discussed and I gave her permission to change the quilting designs if she felt the urge to do so.

Donna's project came from the book, "Trip to Ireland" by Elizabeth Hamby Carlson which combines Irish Chain blocks with Trip Around the World blocks in various fashions.  Donna's choice was "Irish Trip".

She gave me a GINORMOUS storage bag of yardage, strips, the book and a color key to relate her fabrics to the fabrics used in the pattern.  Because there was no time deadline for her to hand-quilt my Vertical Diamonds, she asked that I not start on Trip to Ireland "too soon" because she didn't want to be under  "pressure" to finish the hand-quilting.  So, I sat on it for a couple of months.  

Donna would sporadically send me photos of her progress-to-date.  After the second one, I realized that even if she took YEARS to do the hand-quilting, if *I* waited until she was almost done, I might very well forget not only where I put her project but that I was supposed to do anything at all!  So, in August 2013, without telling her that I was starting, I did.

I cut hundreds of strips.  I made tens of hundreds of strip sets.  I sub-cut thousands of strips from the strip sets.  I made tens of thousands of Irish Chain blocks (well, 13, if you want to be specific).  I made tens of thousands of Trip Around the World blocks (well, 12, if you want to be specific).

Each block is made up of 10 strips. Each strip has 10 squares, so that each block has 100 squares.  The entire Irish Chain and Trip around the World block portion of the quilt is made up of 25 blocks (5 rows of 5 blocks each) for a grand total of 2500 squares.  Not every intersection meets *exactly* but, by golly, most of them do!  Two borders, one narrow, one wider, surround the pieced center.


By September 2013, the top was completely finished.  The measurements are approximately 88" x 88"; it's a good sized quilt top!

  So, now ... all of Donna's materials, supplies and the completed top is packed away in a ginormous storage bag.  I *HOPE* I remember where the darned thing is when Donna eventually finishes the hand-quilting on my quilt. :-)

At that point, I will have a fantastic, incredible hand-quilted sandwich.  She will receive a pieced top, made as carefully as I could do.  I think we will both be very happy.  :-)