Monday, April 27, 2015

the Zakka owl: an adorable, small stuffed owl


You may start squealing with ooh's and aaaah's at any time. :-)

There is a very easy tutorial for these stuffed owls at Moon Stitches ... the tutorial is presented in picture format, spread out over the subsequent pages.  Also, do a Google/Images search for "tutowlrial" and you'll see all SORTS of simply adorable samples!


Although the tutorial shows the owl being sewn by machine, this little project is one that you could easily
stitch by hand, if you wanted a portable project when you are on the go.  They are great little projects to do whilst you are watching a TV show.


Allow yourself the freedom to choose WILD fabric for your owls; they won't mind. :-)   If you think far enough ahead, you could fussy cut the circles that are used as the owl's base.  I didn't consider that when I was cutting my fabric.  And speaking of the base, I used cardboard for mine.  Be aware that whatever you do use as the "stiffener", stays inside the circle of fabric.  Because I used cardboard, these little owls aren't washable ... you might think of using something that won't be affected by water if you think your owls are going to be in an environment that would warrant them being cleaned.

I used felt circles for the eyes, since these owls are going to be sent to two young girls (ages 2 and 4). 
Buttons would also be a great item to use for eyes .. but not if young children are the recipients.  When you use buttons, be aware of the direction the final stitches through the buttonholes are placed ... you can really alter the look of your owl, depending on whether the thread is horizontal, vertical, diagonal or even crossed!   If you were so inclined, you could fully embroider the eyes, use smaller circles of appliqued fabric or even paint them on the fabric.   If you position the eyes UNDER the "nose" flap, then the owls will have a stern look to them.

Again, do take the time to do a Google/Image search with the keyword "tutowlrial" ... you'll see lots and lots of very clever ideas to spark your imagination!

If you use the pattern "as-is", the owls will be about 3" high.  They fit comfortably in the palm of my hand.  Once you see how the pattern pieces fit together, you can scale the pieces up or down to create a larger or smaller owl.  With different sizes, you could have an entire family of owls!

These little guys are just sooooooooooooooooooooooooooo adorable.   I'm putting one into the Bendy Bags that I blogged about earlier.


Sewing Projects


I've had my quilting projects on hiatus while I worked on some sewing projects.

First up, is the Bendy Bag by Lazy Girl Designs.  I saw this pattern, kitted up with fabric and zipper, at a recent local quilt show.  I'm a real sucker for zipper bags.  I LOVE them.  I have quite a collection patterns for variations on a theme of zipper bags.  Lazy Girl Designs have come up with a unique look/design and I didn't even bother to resist the temptation. :-)

With most zipper bags, the zipper goes straight across the top of the bag.  Not this one.  The name "Bendy Bag" comes from the way the zipper bends at the corner to continue part way down the side. 


It's a different construction technique also.  I like the interior of my projects to look as neat and tidy as the
exterior, so I don't care for exposed seams inside.   Because I was thinking that the fabric that came with the pattern as the "good" fabric, I wanted to practice with some other fabric first ... as I wanted to see if I could manipulate the directions so I didn't have the exposed seams.

My first attempt was using leftover Texas longhorn fabric as the exterior and bugs as the interior.  It came out cute ... but my attempts to completely contain the seam allowances didn't work out.   I concluded that with their design, you just can't put all the seam allowances so they are hidden.

You use an overly-long zipper so that you can use the "excess" as a loop/handle on the side of the bag.

I ended up mailing this bag to a Texas quilting friend of mine ... but ... and this is why I absolutely HATE mailing valuable stuff ... the post office managed to mislay the package.  It never arrived.   The post office at my end hasn't a clue where the package went or where it is.  Doggone shame.


I made two other Bendy Bags, this time following the directions!  The interior exposed seams are neatly trimmed and overcast (with a zig-zag stitch).
For one of the bags, I used matching bias binding to cover up the seam, but that really did add just a whole bunch of time to the construction process.

The butterfly fabric was what came with the pattern, along with the hot pink lining and zipper.

The cupcake fabric was specifically chosen because my youngest daughter is One Terrific Cook.  She can bake and cook *anything*.  Nothing phases her (unlike me, who needs a precise recipe).  I thought she'd get a kick out of the cupcake motif.  Ah, but my mother's intuition was 5 degrees off-center this time.  She didn't care for it.  While I will admit to being disappointed, I *am* very glad that we are able to be honest with each other so that she didn't feel obligated to accept it when she truly didn't care for it.

 She did mention that one of her friends has two young daughters (ages 2 and 4) and perhaps they might be recipients?  Bingo!  Done!  There's nothing I like more than making stuff for little girls. 

Which got me thinking ... even though I don't *know* these little girls nor their Mom, I couldn't "just" give them a Bendy Bag.  Oh no ... my mind was all awhirl with a set of goodies .... a small stuffed owl to go in the bags, a crayon/coloring book caddy and a ruffled tote bag to put everything into. 

So, off I went ... deferring my quilting projects for this newest sewing project!  More pictures and descriptions of the other items in another blog entry!


Friday, March 20, 2015

Getting caught up


When I work on my projects, whether they be quilting, sewing, needlework or whatever, I always make a folder on my computer to put all the pictures and documentation for that project.  I add to the folder whenever I take status pictures.  Eventually, all the pictures and documentation for a project will help me create a website gallery page for it.

And I even might make a blog entry.  :-)

But, over the past *several* months, I have discovered that when I got to the point of the project where I would normally publish what was going on, I felt incredibly lethargic.  Those of you who *do* blog, know that there is a tremendous amount of behind the scenes work that needs to be done to get pictures ready for publishing and then, of course, you need to think of what words to say.  And I was feeling ever-so-lazy. 

Even though I "blog without obligation" (which basically means I'll blog whenever I doggone well feel like it), I have been feeling a twinge of guilt about not blathering about what I've been doing.  Therefore, *this* blog entry is going to be a synopsis of projects that I've worked on ... some have even been completed! ... but never quite got around to blogging.  It's going to be a bare-bones description and only one or two pictures per project because .... I still intend on making the full-blown webpage full of pictures and gory details of text and links!  At some point. :-)

Quilting.
February 2014.  Over on About.com's Quilting Forum, a bunch of the participants raved about the Eclipse quilt, designed by

Sandy Brawner of Quilt Country   From March through September 2014, I worked on and FINISHED this top!   In order to bring it to the next Retreat (February 2015), I left it as a top, since bringing a fully quilted quilt on a plane is very cumbersome.

It still needs to be quilted.


June 2014.  One of our niece's partners had twin boys.  I made baby quilts and a pieced throw pillow for the babies.  The quilt patterns are "Covent Garden" by Emma of Sampaguita Quilts.


and "Flying Geese" by Jackie Kunkel of Canton Village Quilt 
Works. 


The throw pillow used two blocks from "Jungle Friends" by Willow Bay Designs.


September 2014.  I got a wild bee in my bonnet and felt like using some scraps. 

This top is "Garden View" by Wendy
Sheppard, as featured in the June/July 2014 issue of The Quilter and in the May 30th entry of her blog, Ivory Spring.

It still needs to be quilted.


September 2014.  I also started a hand applique, needle-turn project that I would bring with me to work on when I was away from home. 

This is "Plumeria" by Aloha Quilt Shop.    It's about 18" x 18".  I'll probably make it into a throw pillow after I quilt it.

I put the last needle-turn stitch in this project in March 2015.


September 2014.  A friend of mine was going through some rough times .. personal health issues, her Mom's health issues and her cat's health issues.  Good lord .. could it get any worse?

 "Stairway to Heaven" is a pattern that I've had for a LONG time and  I made it for her.


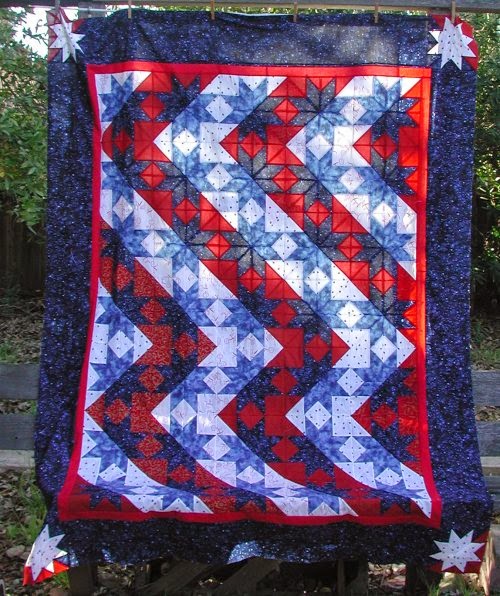
September 2014.  "Ten Minute Tile" is an incredibly EASY quilt to make but you gotta beware ... it is THIS graduated colorway that makes the quilt! 

I'd seen it previously in other, non-graduated fabric choices and just walked away ... boring. 

But with the color gradients?  Whoa!  Super!  

This quilt was given to my favorite middle daughter who loves purple.

This pattern is designed by Mary Lou Hallenbeack for H.D. Designs.


November 2014.  Taking a break from large quilts, I made this small (12"x22"), table-top decoration for my youngest daughter,
who loves all things Christmas. 

"Simply Evergreen" by Marcia Layton of Marcia Layton Designs.


January 2015.  Whilst going through piles and stacks of fabric and leftover units from other projects, I rediscovered a strip section not used in the original project. 

It was too big to throw away but too small to use on its own, if left it the width-of-fabric size. So, I cut the WOF in half crosswise, stacked the two halves on top of each other and put a border around it. 

I figured it was a good size for a drag-around quilt for the baby of one of our nieces.


 January 2015.  Our youngest daughter was relocating to a distant city and to help with making her new apartment feel like 'home' while not using things that had memories of the current apartment, I made a set of place mats and coordinating napkins (with napkin rings!!)  for her and the new apartment.  

The fabric is "From Paris With Love"


 February 2015.  One of my cousins is finalizing the adoption of two young brothers,  I made these two I-Spy quilts for the boys.

One is the Illusion quilt from Missouri Star Quilt Company
and the other is food jars on a bookshelf.


 February 2015.  Yet ANOTHER niece had a baby boy, so another baby quilt was made.  This one is from a free pattern from www.all-about-quilts.com and is called "Around and Around". 

It's an incredibly fantastic optical illusion but the best part is that is made ENTIRELY OF HALF SQUARE TRIANGLES.  It can't get too much easier than this.


February 2015.  I have FINALLY finished the hand-sewn hexie Forever Project top. 

The top is approximately 104"x116" and is *all hand sewn*.  All the hexies, the border and the appliqued vines. 

It took me about 18 months start to finish.  And it will join all the OTHER completed tops in the stack of Tops to be Quilted.


 March 2015.  I rediscovered some fleece yardage that I can only believe was given to me because it simply is not the color or pattern that I would ever buy on my own. 

I took the cupcake images from the fleece and made some fusible, machine appliqued cupcake blocks for the front. 

I alternated the cupcake blocks with 4-patch blocks, did an all-over pantograph and .. voila .. a donation quilt is finished!


Hand Needlework

On the hand needlework front, in August 2014, I participated in a Basic Crazy Quilting online class given by Kathy L Shaw.


Machine Embroidery

On the machine embroidery front, I made a fully-embroidered mug rug for a swap.  The design came from the San Francisco Stitch Company. 


One of my crafty friends liked it so much, she commissioned me to make another one for a mutual friend's birthday.


Sewing

December 2014: a tote bag and two pouches for my favorite middle daughter. 

I've collected a LOT of patterns for different zippered, organizational pouches over time and just LOVE making them .. but *I* don't really need them. 

I have no idea if my favorite middle daughter needed them either but she got them.  She *did* ask for the tote bag. :-)


December 2014.  One of Mr. Pirate's cousins is just a dear, sweet lady and I was in an absolute FRENZY of making all these cute
little pouches and bags and stuff.  I was on a roll, so I just kept making oodles of them and gave her a whole bunch.


January 2015.  I snailmailed a box to my favorite middle daughter.  Since her apartment mailbox is really small and she doesn't have anyone to accept packages, I usually mail stuff to her at her work. 

But she takes the subway home and that box was an awkward size to manhandle on the subway. 

So, I made a custom sized tote to hold the box in transit.


And that gets everyone up to date on what I've worked on.  Whew. 

(and if blogger doesn't upload all this correctly, I will just cry).


Thursday, January 22, 2015

Documenting who has what quilt


Dear Daughter #3 has accepted an accounting position at Amazon and will be relocating from California to Seattle, WA.  It will be a fantastic career opportunity for her.  One of her older sisters already lives in Seattle and she has various friends who also live there, so while it will be strange with her not being nearby, I'm glad that she already has a support group waiting to take her in so *she* won't feel so lonely.

As she packs what she wants to bring up to Seattle, she has asked me if she can have some more quilts.   Really?!?!?  She, along with her sisters, does already have several quilts that I made specifically for her ... but she says that she loves my quilts and wants to have more to surround her.

Honestly, what mother could say 'no' to that?  :-)

So, I went through my pile of quilts and pulled out the bed-sized ones for her to look through.  She picked three.  I told her to take Very Good Care of these quilts because I have sentimental emotions about them.   Quilts that I give as gifts, I give freely and without attachments.  The recipient can do what they wish with the quilts.   These quilts, aren't *quite* a gift ... hear that Dear Daughter #3??? ... I do expect them to be returned at some point!

Quilt #1 is Royal Mendhi Crystals and was made in 2010.  You can read about it on this webpage.

Not only do I just love, love, LOVE this color combination, but this was the first time that I had used a new template on my longarm that allows me to stitch a 5-rope cable as a continuous line.  I LOVE this quilting design!


Quilt #2 is Stars and Stripes ZigZag.  I made this one in 2001.  You can read about it on this webpage.

I was a pattern tester for this quilt and I just LOVE the way the half-square triangles are used to create the background zig-zags.


Quilt #3 is Halloween.  This quilt was (as I remember) the first quilt I made when my sewing room back to being operational after being torn apart for about two years.  I was *sooooo* happy to be sewing again!

I made this one in 2000 and you can read about it on this webpage.


The *main* reason I'm documenting these quilts is so that I will REMEMBER to add this information to those webpages and not panic when I can't find the quilts at home.   It will also serve to document the fact that Dear Daughter #3 has taken possession of these quilts and that her two sisters require Equal Time in the Quilt Possession Acquisition Process.  :-)


Monday, December 08, 2014

ISO: pantograph "Flowers for Linda"


This is a picture of a quilting pantograph, "Flowers for Linda".  I've drawn a red line between the two design rows.

I've found quilting websites that use this pantograph in their longarm quilting services but they do not sell the pantograph itself.

I would very much like to buy this pantograph .. on paper, not a digital version.

Would anyone Out There know where a paper copy of this pantograph can be bought?  I sure would appreciate any help.

You can reply in the comments or email me at pirate AT value DOT net.

Thanks much for any help y'all might be able to offer!


Thursday, September 11, 2014


Never Forget.    NEVER forget.

The radical, extremists who caused this .. not for the good of *anyone* .. but simply to subject the world to their twisted point of view ... have GOT to be stopped, removed and eradicated.

Otherwise, this will happen again.  Somewhere.  

Unless good people stand up, evil will continue.  Make no mistake, these people *are* evil.


Sunday, August 03, 2014

A hexie bag with zippered top


I have recently fallen under the spell of English Paper Piecing.  Not only do I love the absolute uniformity of the pieces but it's a fantastic take-along project.

While on our recent family vacation, I had prepped a bunch of small sized hexies.  No, not the inconceivable 1/4" hexies; I'm not THAT insane. :-)   My "small" hexies are 2" point to point / 1.5" top to bottom.  You may say that those are HUGE hexies but, again, I say 'no' because they ARE small when compared to the 4" point to point / 3.5" top to bottom hexies I'm using in my current Forever Project. :-)  (still a WIP)

My goal for vacation was to "make" the fabric for the front and back of a small zippered bag.  I'm proud and happy to say that I achieved my goal!  I sewed all the hexies together.  I sewed the hexies to the contrast top band.  I sandwiched the layers and even ... hold on to your hats ... *hand-quilted* the front and back "fabrics"!

The hand-quilting bit may not seem like a big deal but *I do not hand-quilt*, so yeah ... it IS a big deal.   There was also an Adventure involved with obtaining the hand-quilting thread, which you will need to read on the web page to find out what happened.  :-)

I eventually got the little bag sewn up, lined with red taffeta.  It has a "wide open" access, which I've linked to on the webpage.


That picture is just a teaser! For all the gory details, links and more pictures, please visit my web page for the Hexie zipper bag quilt.