Friday, May 25, 2012

Shot cotton ... or what?

I'm working on a wall-hanging.  The central part of the wall-hanging is a pre-printed panel that has an entire palette of beige/gold/brown tones.

One part of the wall-hanging is a small border I'm putting around the panel.  The fabric I'm using for the border was gifted to me by a fellow quilter who was de-stashing. 

The stuff is *gorgeous*.  I think it's a shot cotton.  It's made of an incredibly VIBRANT yellow in one direction (think neon) and a clear red in the other.  I know that Kaffe Fassett has a line of shot cottons, but I have no idea if this is one of his. 

From the Quilting Board forum, I found that "Shot cotton is special because the warp and weft yarns are 2 different colors woven together to create a special depth, a "shot" of color. When the edge of this fabric ravels, you can see a bright contrast to the body of the fabric."

This particular fabric is very lightweight and drapeable.  The yellow fiber feels as though it might be silk.  It snags on EVERYTHING .... rough spots on my fingers, other fabric and even itself!  It doesn't look like a woven thread; it's more like it's been drawn out than spun. 

I did a burn test on it.  It left soft ash.  It's certainly not polyester.  It caught on fire immediately although it didn't continue to burn.

The red fiber is definitely a spun fiber.  Very tight and straight.  It had the same burn test results as the yellow stuff.

The fabric might be a silk-cotton combination or not.  Whatever it is, it sure is pretty! :-)

Tuesday, May 22, 2012

That Purple Tote Bag

Once upon a time, I commissioned a machine embroiderer to stitch Dear Daughter #2's initials on a piece of Ultrasuede.  That was many moons ago.

Once upon a time, I acquired a purple tote bag from the Handi Quilter people.  Timeframe: unknown.

Current day, I have rediscovered both of them and the tote bag has been repurposed for my purple-loving daughter. :-)


That picture is just a teaser! For all the gory details, extensive verbage and more pictures, please visit my web page for That Purple Tote

Sunday, May 20, 2012

Solar Eclipse! Wowsers!

A rare solar eclipse is occurring today .. the moon is passing in front of the sun and if you are in the right physical location, you'll see a firey ring around a dark circle.

Here in the San Francisco Bay Area, we don't get to see the ring .. BUT ... with a *very primitive* pinhole camera, Mr. Pirate & I were able to see a partial eclipse.   (If anyone was stupid enough to look directly at the sun without the proper precautions, they have now burned their retinas out.)

I had gone outside on our deck and was immediately struck by how ODD the sunlight seemed.  It wasn't nearly time for twilight .. and even if it was, the light just was NOT twilight.  It was just "darker".  Then I remembered the eclipse.

I got a manila folder; Mr. Pirate tore it in half and poked a (literally) 3 pinholes in the middle of one. 

(One pinhole would have been sufficient, but you know boys .. more is better! :-)  ).  

He then held the non-holey page underneath and at a distance from the page with the pinholes. 


The sunlight shines through the holes (as light is wont to do) and what was projected onto the page below was .... THE ECLIPSE!   woo hoo!

Granted, it was only a partial one here .. it looked like a bite had been taken out of the sun.  But, what a nifty sight!


Then, as the moon moved along, the sunlight got stronger .. and now (let's say 15 minutes later), we have our normal late afternoon sunlight back again.

But .. DANG!  That was neat!  :-)


Monday, May 14, 2012

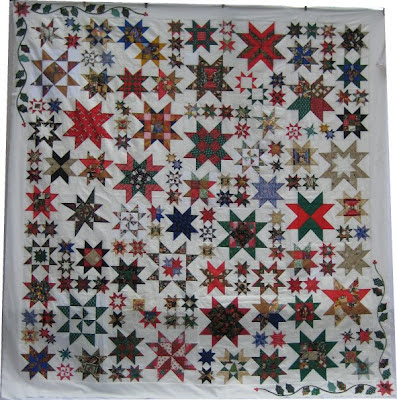
Oh My Stars! ... top completed! woo hoo!

oh yes, indeedy!  A big woo hoo for me!  :-)

Although, it wasn't without its attendant drama.  Isn't that usually the way?  There's *always* a back-story.  :-)

In this case, I was being So. Very. Careful. to make sure that all the sub-units were sewn in the correct orientation (you might remember the blog entry where I discovered, after the fact, that one sub-unit was upside down.  It annoyed me so much that I ripped the seam and re-sewed it right side up).   When all the sub-units are sewn together, you have three panels of stars: two narrow side sections and a wider middle section.

Anticipation was high as I eagerly sewed the three panels together.  And then the slab-o-borders.  Oh my!  Didn't that look wonderful?  Didn't that look tremendous??  I was feeling very pleased with myself.   I started to pin the assembled stars on my design wall to admire them.  But wait .. how come my sections can't be oriented in the same direction as the layout?  It's impossible that they can't!  I was Very Careful.

Hmmm.  OK .. I can see where *those* stars are the same as *those* stars in the layout but why are the stars at the END of the section different?  And then I saw it.  Oh. My. Gosh.  ::thunk  head on wall::  I sewed the third panel UPSIDE DOWN.   [see me stamp about the room, Very Very Annoyed, muttering Very Colorful Words.]

As I looked at it, more than a bit peeved, it occurred to me ... WHO, on this earth, will EVER notice that a section of stars .. stars which are SYMMETRICAL ... is upside down?  No one. I'd be willing to bet that in a year's time even *I* won't be able to remember or figure out which section is "wrong".

So, I left it.  :-)

I was about to take self-congratulatory pictures of the top, when I happened to come across a quilting blog entry that showed a Block-of-the-Month quilt with a very attractive border treatment.  In fact, I realized that I could use this border treatment as inspiration for the borders of my own Oh My Stars!

 And I did.  Instead of the country flowers on a straight stem, I put holly leaves on a wavy vine with 3 berries on the very end of the vine.  The quilt store that offers the Block of the Month ("Amish with a Twist") is A Scarlet Thread of McDonough, GA.

I was taught (way back, when I came over on the Arc with Noah) that "proper" applique is ALWAYS hand-done.  And I've usually done my appliques that way.  I know there are other techniques, but they have just seemed "wrong" to me.  Kinda like cheating, if you know what I mean.  But for this quilt, since it was a spur of the moment project, done with fabric I just had hanging about, I didn't feel like putting MORE time into hand applique.  (I have a queen sized quilt on my longarm machine that I MUST get back to and finish that quilting!) 

So, I cheated.  I used fusible holly leaf appliques attached with a zig-zag stitch with clear mono-poly thread.  Wowsers ... those holly leaves sure went fast!  :-)  As for the holly berries, I used the yo-yo technique and DID hand-stitch them in place. :-)   What I'm rather pleased about is that the berries are only 1/2" in diameter.  :-)

And now ... the top is completed!  I feel very very happy about that.  I have backing fabric pulled and I have some red striped fabric that will be used for the binding.  Since I use bias binding, the stripes will come out on the diagonal, which looks so attractive to me.

This top is on the pile of Tops to Be Quilted and will patiently wait its turn at the longarm.  :-)

And now?  I *really* need to get back to the longarm!

Wednesday, May 09, 2012

Oh My Stars! quilt along ... last of the sectionals

In a late night brilliant burst of speed and perseverance, I have FINISHED construction of all 8 sections for the Oh My Stars! quilt along.    Wowsers .. I thought it would never end!  :-)

I present to you, section 6 (green)   

[The colors that I am referencing are the colors of the sections on the Layout Diagram (shown to y'all in a previous post).]


and section 7 (turquoise)   It turned out that I was one small 4" block short, so I made a basic Sawtooth star to fill the gap. 

When I finished sewing all the sub-sections together and compared what I had just completed with the layout diagram, I realized something was amiss.  Inspecting and comparing the actual with the drawn layouts, I discovered that ... ::sigh::  I had sewn one entire section upside down! 

Now, in reality, with all the different size stars and all the different fabrics that I have used, NO ONE is going to realize that one sub-section is upside down.  And it probably wouldn't even matter in the Grand Scheme of Things.  But .. dang!  .. it bothered me! 

So, I ripped out the loooong offensive seam, turned the section right side up and re-sewed the sections together.  Whew!  I can't tell you how much better that made me feel!   (I'm sure the sub-section feels better also.)


and section 8 (blue).

And with that, I'm off to bed.  I'm reading a murder mystery book and if I'm able to keep my eyeballs open, I can read a chapter in order to advance the story!  I really dislike leaving the characters in limbo.

Tomorrow: sew the sections together to create The Top.  :-)

Tuesday, May 08, 2012

This Place is a Zoo.

Between the cats and the chickens, our homestead has never been lacking for bad craziness.

Now, we have a NEW resident.  A bird.  A very SMALL bird.  And she's a momma bird.  I have no idea what kind of bird.  It has feathers and a very small brain .. that's what kind of bird it is.

Here's our front door.  I really like our front door.  I picked it specifically for the stained glass circular insert.  It's pretty. 

See that yellow arrow on the right hand side?  That points to a ceramic sign that I bought, not too long ago. 

Above the sign, near the roofline, is our porch light.  It looks like an old-fashioned lantern.  I like it too.


Here's the sign.  Truer words were never spoken.  It was as though they KNEW our place.


Back to the small bird.  About a week ago, I noticed that every time we opened the front door and walked out onto the porch, a small bird flew AWAY from the door, out towards the trees on the fence line.  Then I noticed that .. oh my gosh .. there was a NEST built on top of our porch light!   Yes, the nest is fully constructed; it's obviously been there for *a while*. 

Just call me Capt. Obvious.  Or not.

Anyway, the bird was deliberately trying to deflect our attention from the nest to her ... and she was flying away.   "Come this way!  Chase me!"  or   "Move along.   This is not the nest you have been looking for."  :-)


Being the nosey kind of person that I am, I had Mr. Pirate get a ladder and he looked into the nest.  Oh my.  There were 4 little blue eggs.  This picture doesn't show the pretty blue color; the flash washed it out.  But without the flash, the picture was way too dark to be able to see anything.


So now, we can't use our front door; it disturbs momma bird.  Geez, Louise!  Exactly who is paying the property taxes here???? 

We have a *perfectly* wonderful, honest-to-goodness bird house on the chimney.  It has a vacancy; it's waiting for a resident. 

Does momma bird use the bird house? 

Noooooooooooooooo.  *She's* gotta use an impractical spot above our front porch light!


Anyone know how long it'll take for the eggs to hatch and babies to be independent?  Cuz until then, we're forced into using the back door!

(Sorry for the dark picture of Momma bird.  Evening was fast approaching and we were losing the light.)

Oh My Stars! quilt along - more sectionals

A late night sewing binge resulted in two more Oh My Stars! sections being sewn together.  I present to you: sections 4 & 5!  :-)

And now, it's late for me .. time for bed.  :-)

Will continue to work on the remaining 3 sections tomorrow.

Monday, May 07, 2012

Oh My Stars! quilt along ... assembling the blocks.

Oh hallelujah! Now I can FINALLY, FINALLY, FINALLY start combining all the different star blocks into sections!

Sheila (she who created the Oh My Stars! quilt along) has provided 2 layouts for this project: the original twin size and now, an optional queen-sized quilt.  I opted to go for the queen-sized quilt, as I just don't need any more twin-sized.  (and, I'm a glutton for punishment!)

Mr. Pirate may opine that we really don't need any more QUILTS ... but what does he really know on this subject?  :-)

Here's the queen-sized layout.  It all looks very jumbled together, doesn't it?  How on earth do you know what star block to put where???  Well, in fact, you don't need to know.  All the blocks of a size are interchangeable.  There is only 1 each of the 12" blocks, so all you need to do is stick one where a 12" block is indicated.

The 8" and 4" blocks are sometimes butted up against each other.  There are multiple 8" and 4" blocks of each star.  How do do you know which ones to use??   In the end, it's your choice.  You can put all of the same blocks together or scatter them around.


I chose to scatter them (as best as I was able ... I don't do random well).  I realized that since I used different fabrics for each and every star, as long as a I used a different star in each spot, it didn't matter which *specific* blocks I used. 

I do better if I have a plan.  A plan that tells me ahead of time, which block goes where.  That way, I don't have to dither about decisions or find out, to my dismay, that I'm *short* a block or two!  To make my plan, I knew I had 19 different stars.  I made a pile of each star (i.e., 19 different piles) and labeled each pile so I knew which number it was.  On a piece of paper, I listed how many sizes I had of each star type (in some cases, I was over-exuberant and made more than was called for).   Then, using the layout, as provided by Sheila, I simply put the number of the star in the layout.  It didn't matter if #1 was always next to #2 star ... the fabrics really made them look different.

To make things REALLY easy, Sheila provided us with a broken up layout ... she has VERY thoughtfully worked out a plan that is in sections.  Each section has sub-sections ... all very, very clear as to which size block goes where.  Exactly which star you want where is your choice.  And this is where I numbered the layout.  I started at the upper left corner and continued numerically down the list,  numbered all the stars of that size.  When all the stars of that size were numbered, I did the same thing with the other 2 size stars.  As I used each star, I made a tick mark on my list, so I would know how many stars of that type I had left. 

Once the layout was all filled in, I can't tell you how SIMPLE it was to assemble the sections!  You can see my numbering in the purple section above.  For the first sub-section, I know that I will need an 8" #1 star, a 4" #18 star, a 4" #17 star and an 8" #2 star.
 
Section 1 (purple)
I did take care, when constructing the blocks, to make SURE that each block was more-or-less the right size.  If the block varied slightly from 12", 8" 4" .. I wasn't terribly concerned.  Paying attention to where the seamline was would take care of those variations.  BUT, if the block was badly cut/constructed .. say 1/4" or more out of whack, I would re-do that piece of the star.  I was pretty annoyed when I had to do *that*.  ::grumble::

Even at that, there are a few stars whose points got clipped.  Well, that's too doggone bad because I just don't have any more of that fabric to remake the block.  Furthermore, I don't FEEL like remaking it.

I don't want to.
I don't have to.
I'm not gonna.    So there.  pphhhttt.  :-)

Having the blocks the correct size made the assembly a breeze.  It is so *wonderful* not to have to fight to get the blocks to play nicely with each other!  :-)

Section 2 (red)


Section 3 (orange)


I've now completed 3 sections and am working on the next one.  Pretty doggone soon, I'll be able to assemble the sections into a complete top!  :-)

Oh My Stars! quilt along. Extra blocks 16, 17, 18.

When last I posted about the Oh My Stars! quilt along, I thought I had finished making all the blocks required.   Then I read the section about assembling the blocks into a top and I discovered that another quilter had requested a layout that would allow for a queen-sized quilt.

I really don't need more twin-sized quilts (which the original layout was for), so I decided to continue making stars to accommodate the queen-sized layout.  I searched the internet for more/different Sawtooth star variations ... there are a million of them! .. and chose 4 that I liked.

First up is called "Make Mine a Double Please".  This lovely star was created by Jovita Goldschmidt of Jovita's Patchwork Atelier in celebration and anticipation of the impending birth of twins.  (In a tragic occurrence, she and her husband lost the twins shortly after birth.) 

I was drawn to this block, not only because it's just pretty, but I also have twin girls (now 23 years old).


Then came "Shimmering Star".  Although Oh My Stars! already had a block by this name, this is a different layout. 

This Shimmering Star layout was designed by Carole Hennell of Ewes Quilting and is part of her Jewel quilt along.


Last came the "Martha Washington Star" block, also created by Carole Hennell as part of her Jewel quilt along.

The 4" size blocks for both the Shimmering Star and Martha Washington Star were real buggers!  Some of the pieces were very small.


For this entire project, 12", 8" and 4" blocks were used.  The original 15 blocks had cutting measurements for those sizes included in the directions.   But for the blocks that *I* added, I needed to figure out the measurements myself.  Thank goodness for Electric Quilt!  I simply drafted each block and then printed it out in the correct size.  Sometimes the measurements were a tad awkward ... like 1-1/4" minus a 1/16th!  but instead of figuring out what THAT measurement was, I just cut the 1-1/4", then sliced off a sliver.  Even if that procedure wasn't accurate, it worked well for me (and saved a few brain cells in the process!).

I had originally used a small stash of Christmas-themed fabric, along with coordinating solids.  The fabrics weren't always red & green ... some were predominately other colors, but they all were Christmasy in look and feel.   Well, when I started to make these last blocks, I realized that I was seriously OUT of this stash; I couldn't make the 12" blocks at all (since they required the most fabric) and only a few of the smaller blocks.

BUT, the attraction of making a scrappy project is that it really DOES NOT MATTER if you start mixing in other fabrics late in the game.  It was all going to be scrappy anyway!  Additionally, I knew that the layout for this quilt mixed all the different sizes so that not only were you varying the sizes but the fabrics used.  Eventually, I found some more compatible, but not necessarily Christmas-themed, fabric to use.

Ya know?  I'm really glad all the blocks are finally made!  Next up: assembling all the blocks into sections.